Get to know Painless Desktop!
Need further assistance? Call Our Tech Support at
1.800.GO.BENCO x4357.
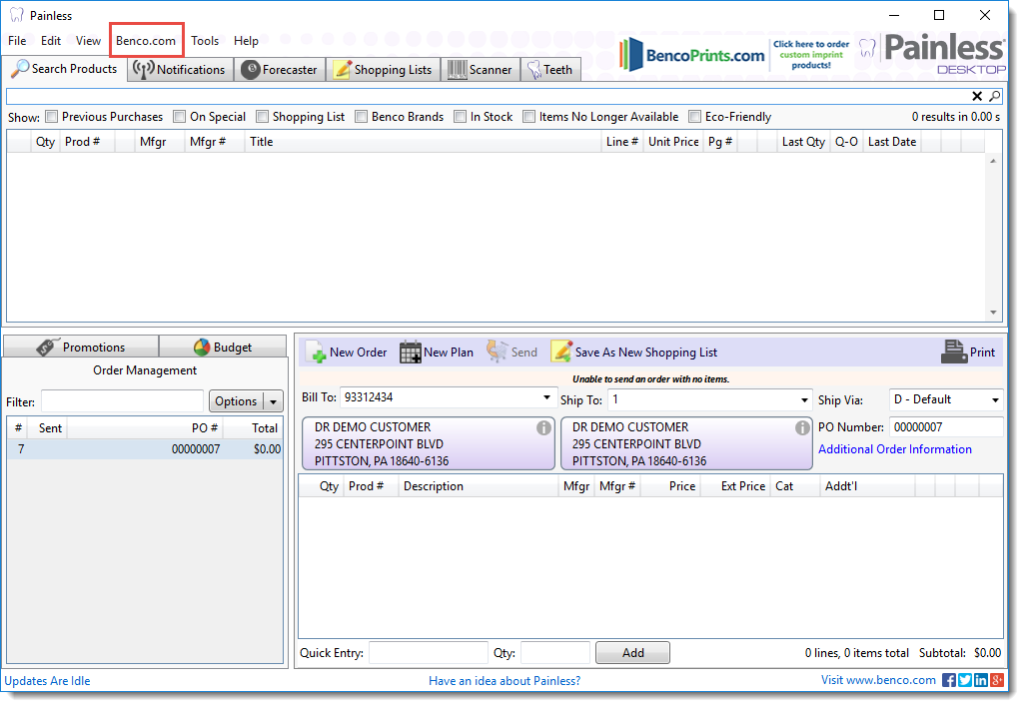
To check your account balance, log into Painless Desktop and click on Benco.com.
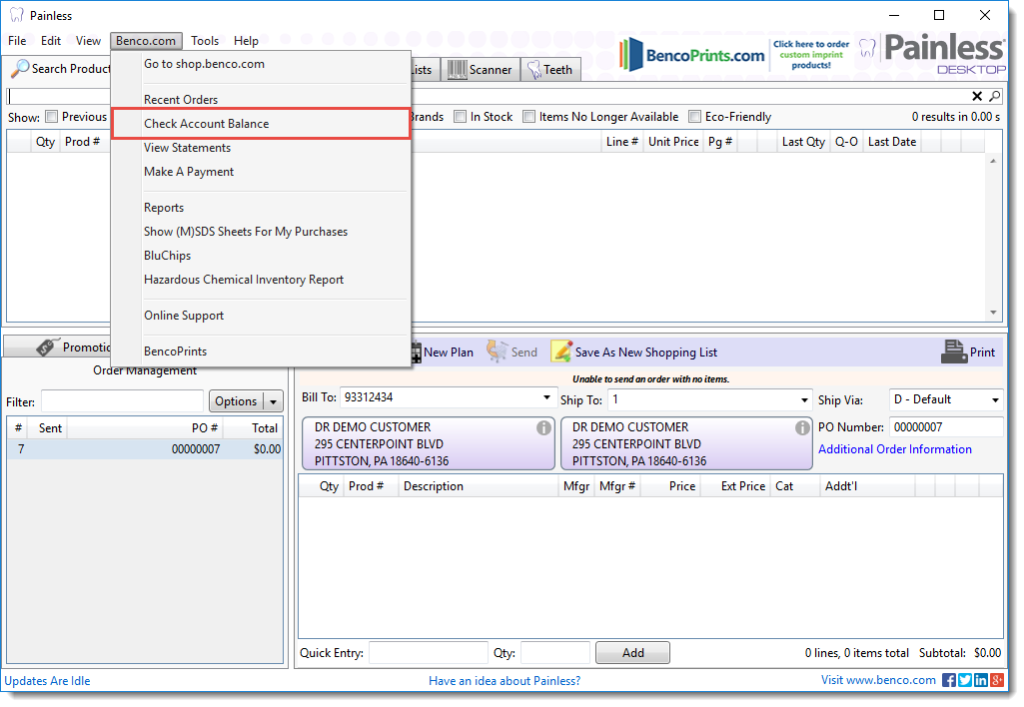
Next, click on Check Account Balance. You will be redirected to benco.com.
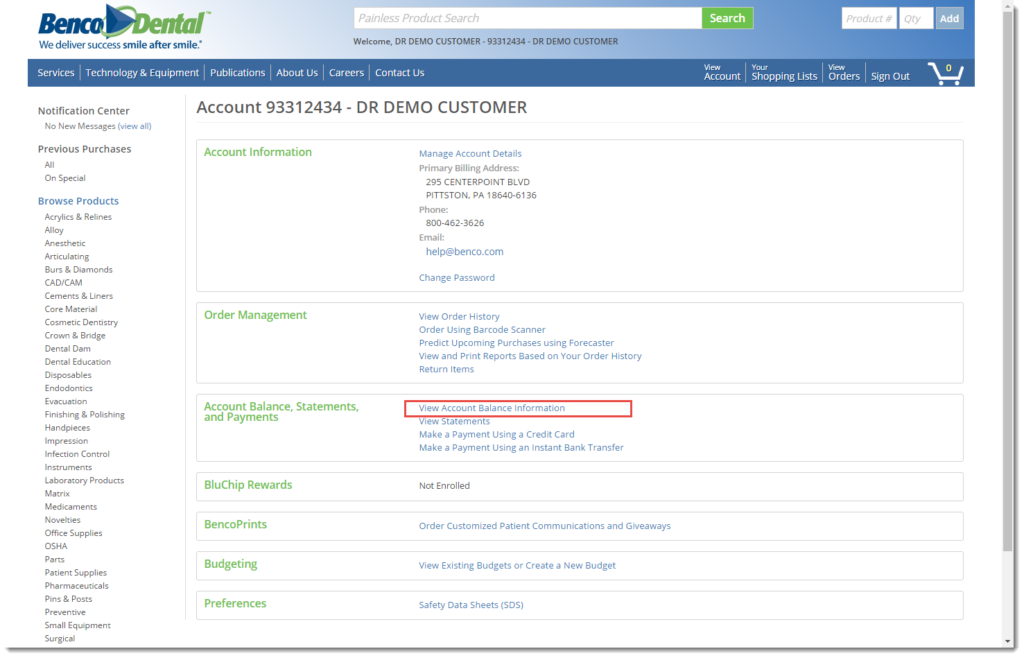
Next, click on View Account Balance Information.
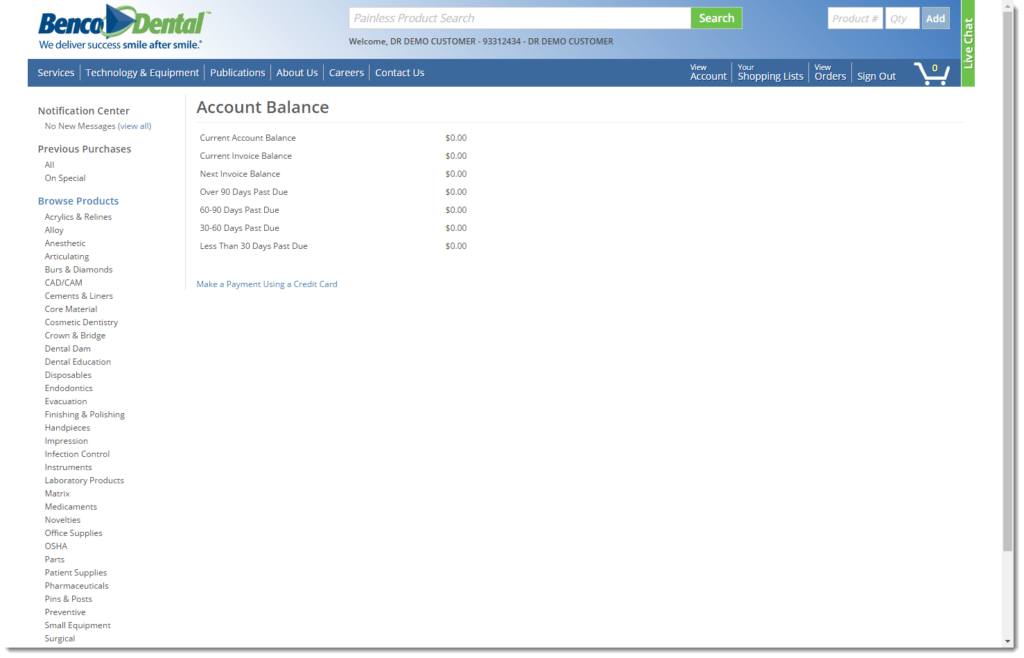
The Account Balance page will display and include your current account balance, invoice balance and next invoice balance.
How do I make a payment using an Instant Bank Transfer?
How do I make a payment using a credit card?
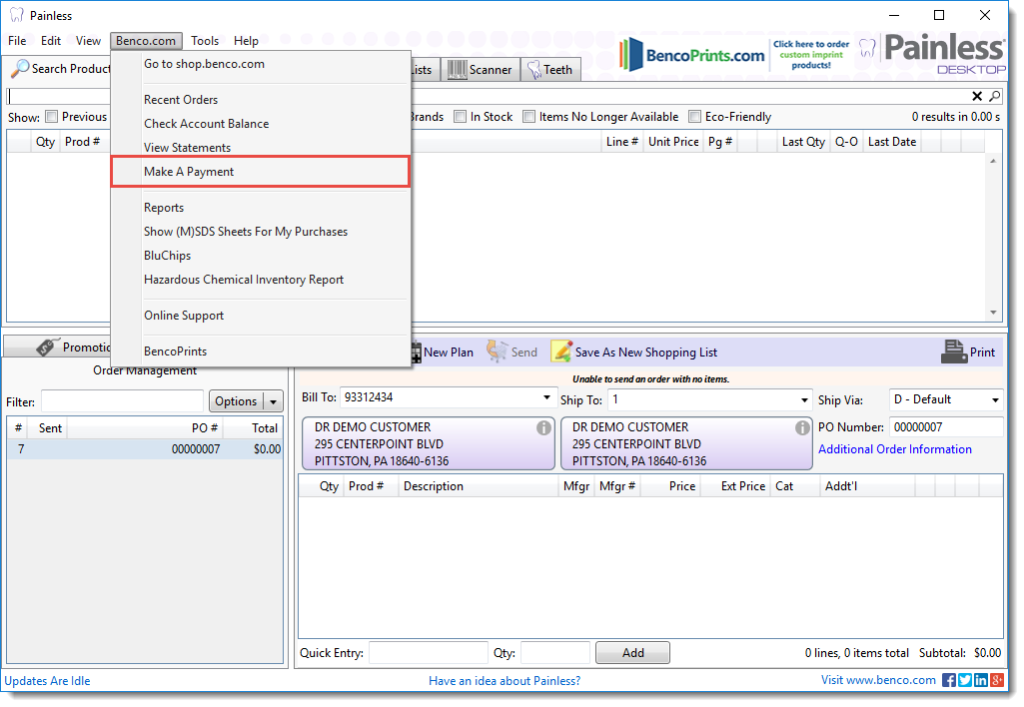
To make an account payment, log into Painless Desktop and click on Benco.com in the main navigation.

Next, click Make A Payment. You will be redirected to benco.com.
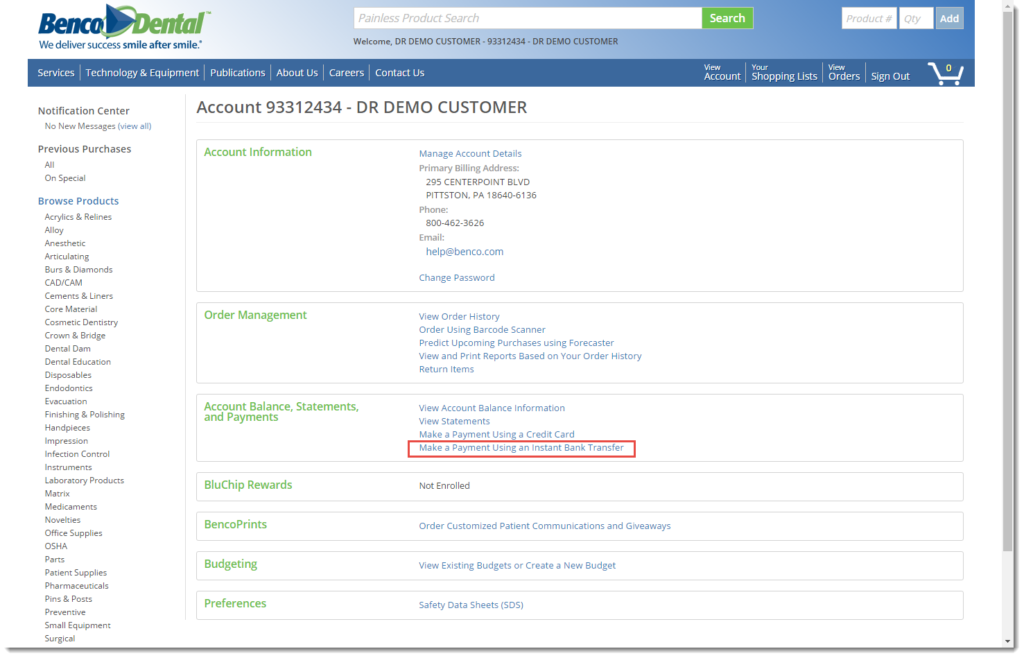
Next, click Make a Payment Using an Instant Bank Transfer.
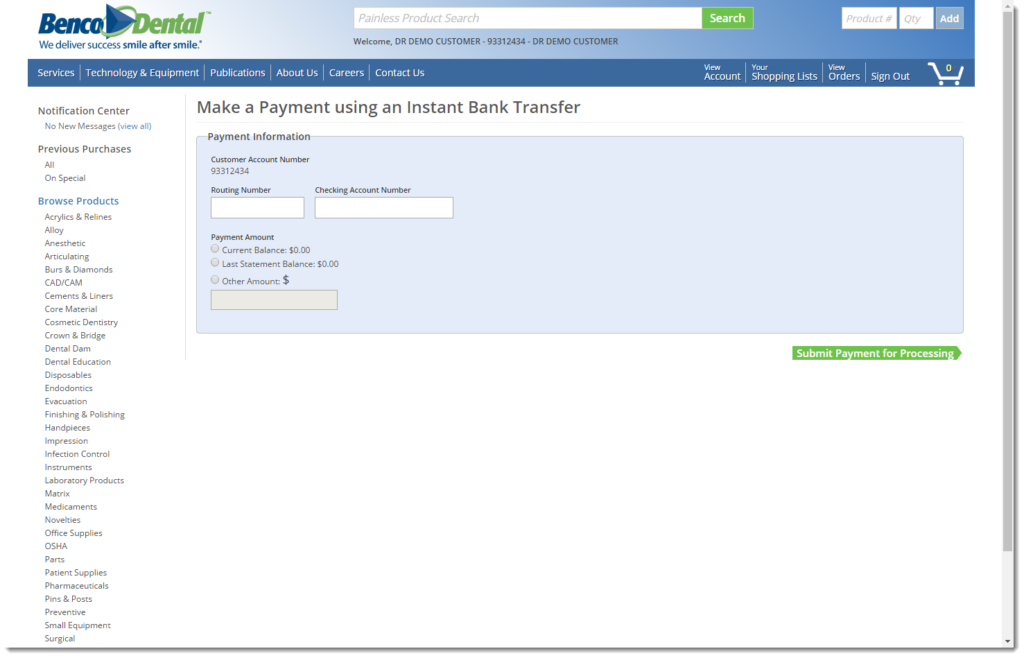
Enter your bank account information and select the radio button next to Current Balance, Last Statement Balance or Other Amount. Finally click Submit Payment for Processing.
How do I make a payment using a credit card?
How do I check my account balance?
To make an account payment, log into Painless Desktop and click on Benco.com in the main navigation.

Next, click Make A Payment. You will be redirected to benco.com.

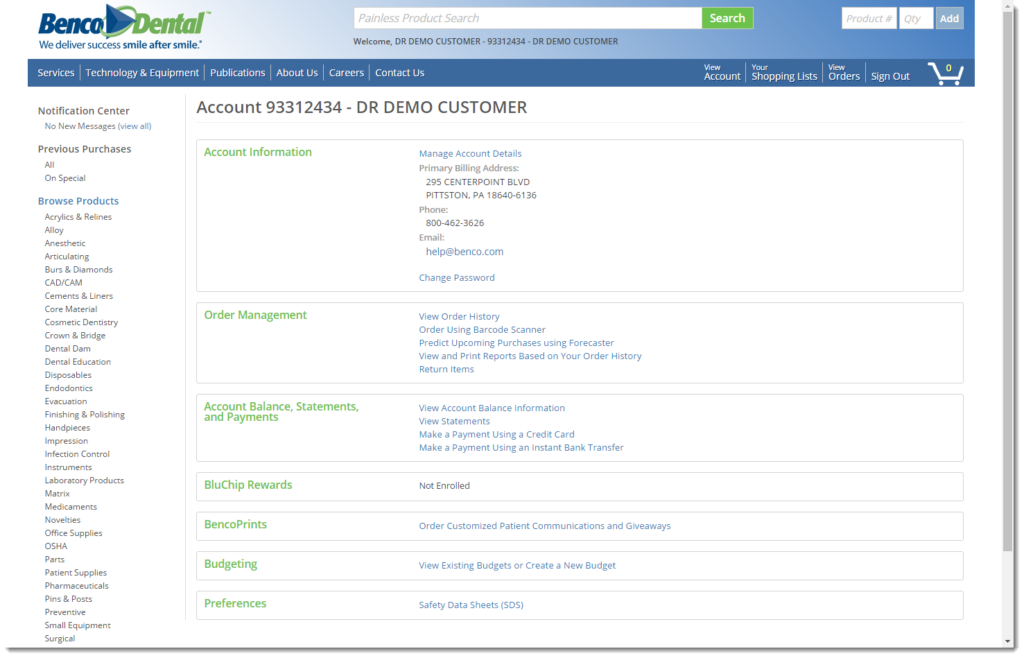
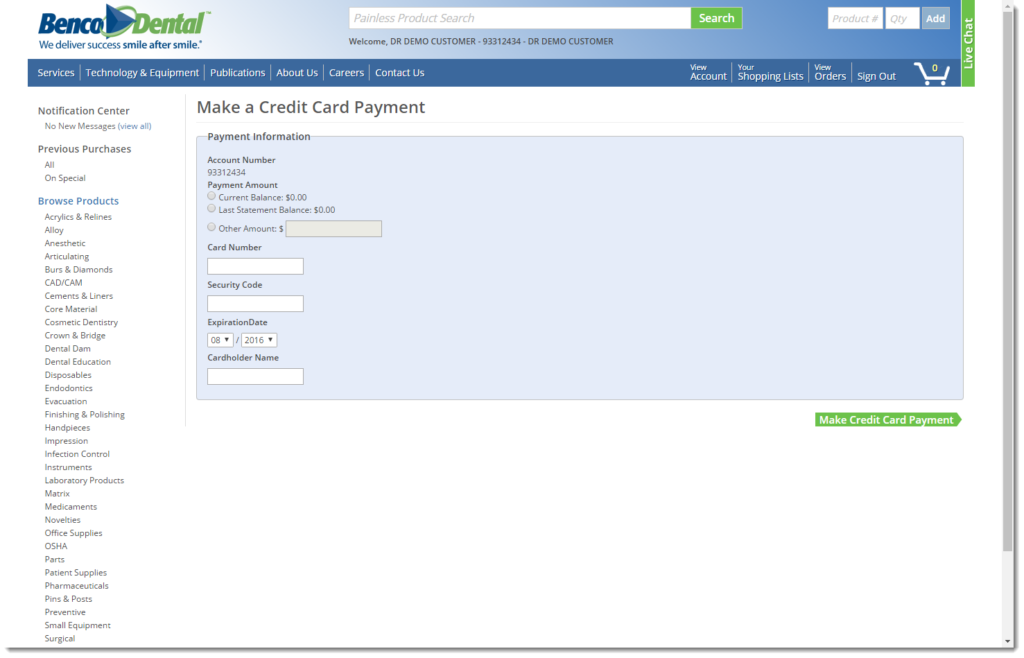
Next, click Make a Payment Using a Credit Card.
Select the radio button next to Current Balance, Last Statement Balance or Other Amount. Enter your credit card information and click Make Credit Card Payment.
How do I check my account balance?
How do I make a payment using an Instant Bank Transfer?
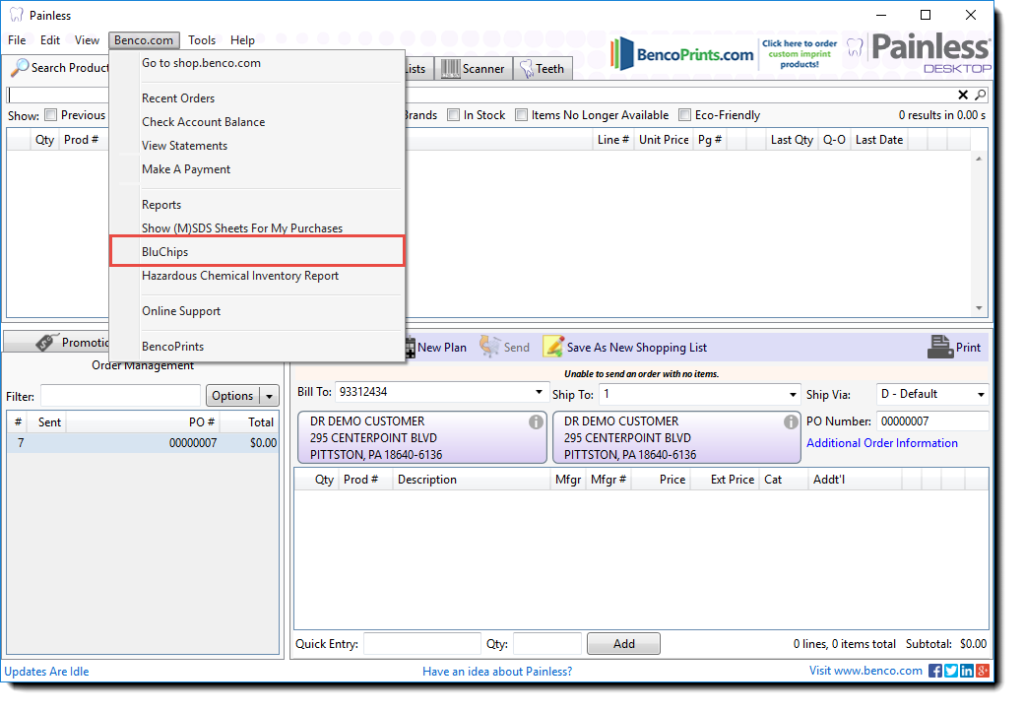
To access your BluChip Ledger, log into Painless Desktop and click on benco.com

Next, click on BluChips.
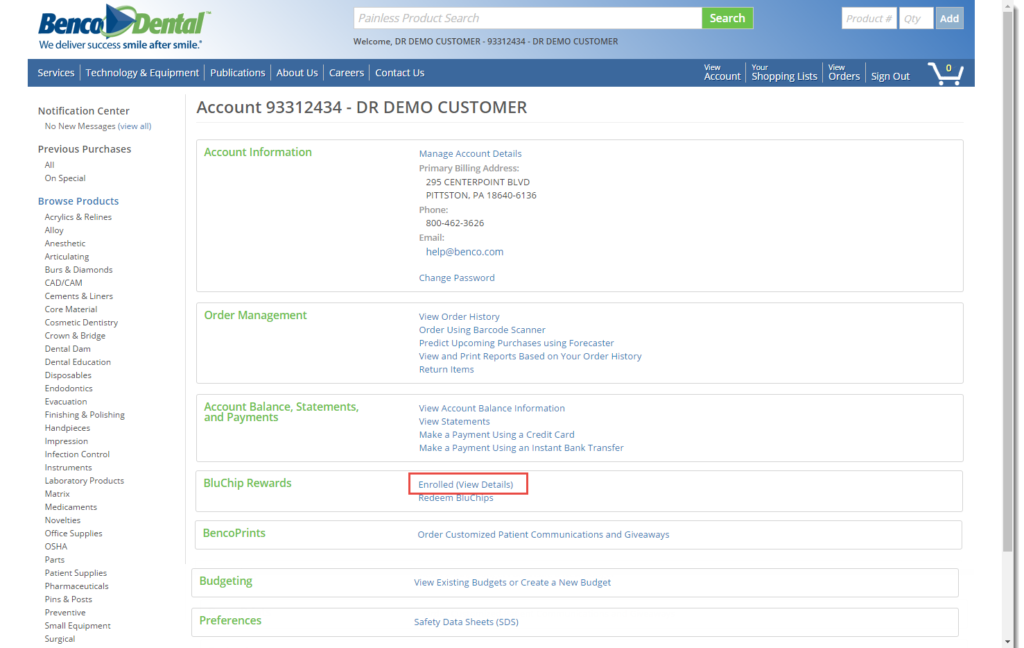
Next, click on Enrolled (View Details).
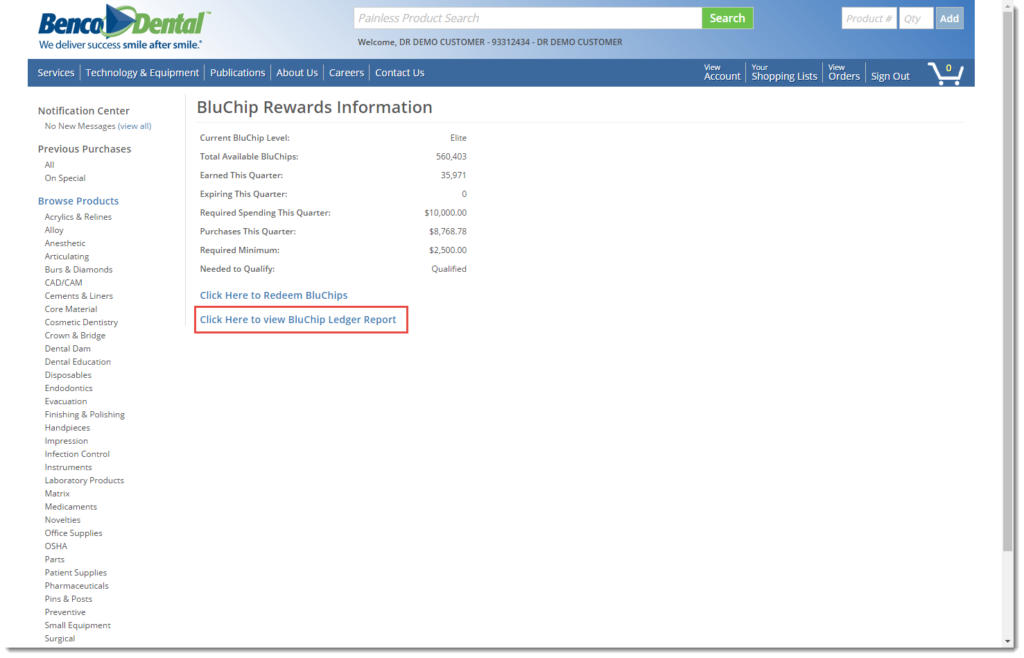
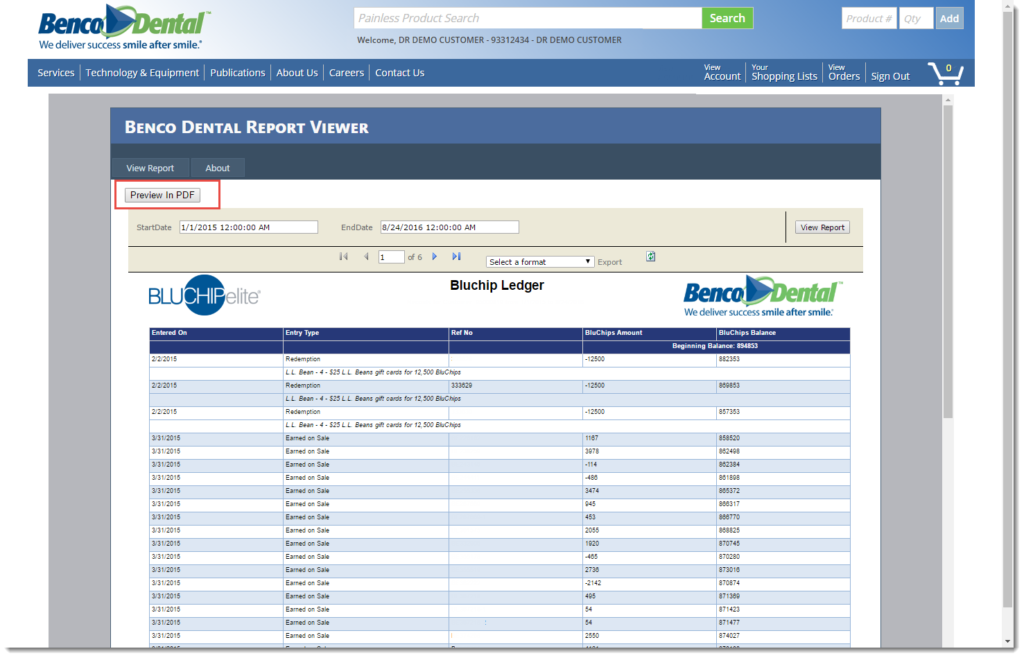
The BluChips Rewards Information page will display, click on Click Here to view BluChips Ledger Report.
The report will display, if you would like to view as a PDF, click Preview in PDF.
You can redeem your BluChips by going to https://www.mybencorewards.com.
To view your BluChip balance, log into Painless Desktop and click on benco.com.

Next, click on BluChips. You will then be directed to benco.com.

Next, click on Enrolled (View Details).

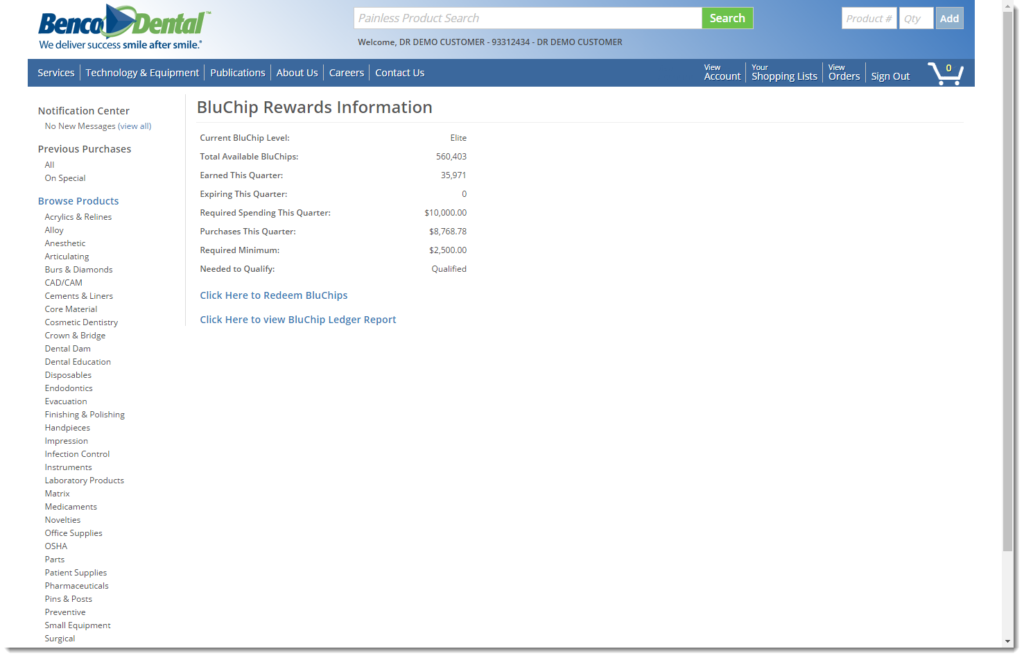
The BluChip Rewards Information will display for you to view your BluChip balance.
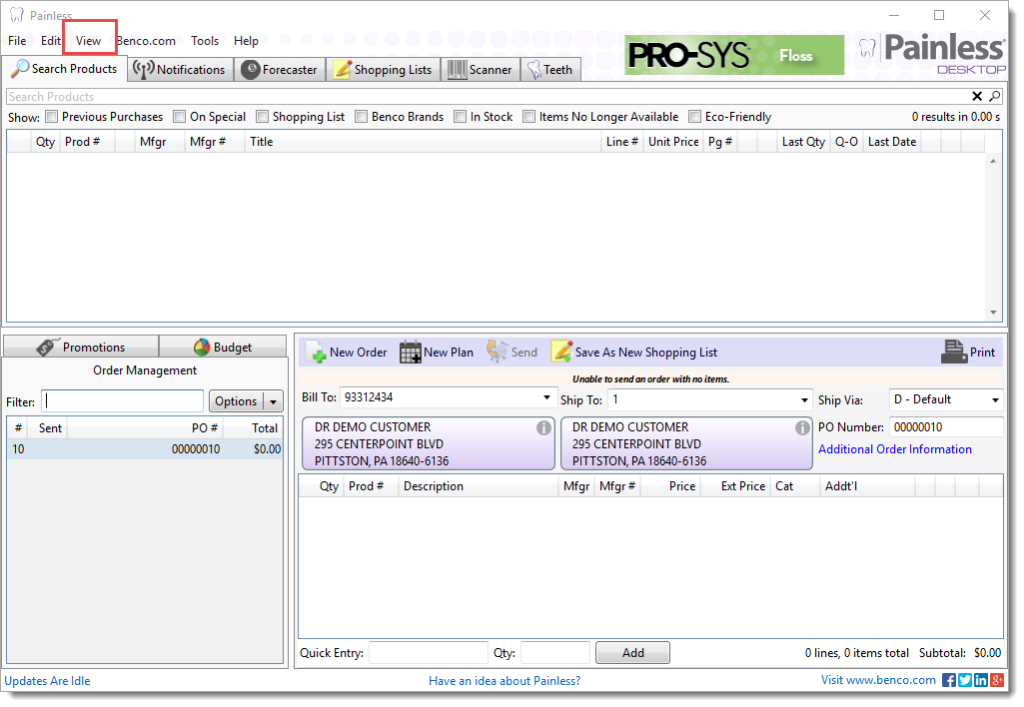
If you need to return an item, log into Painless Desktop and click on View.
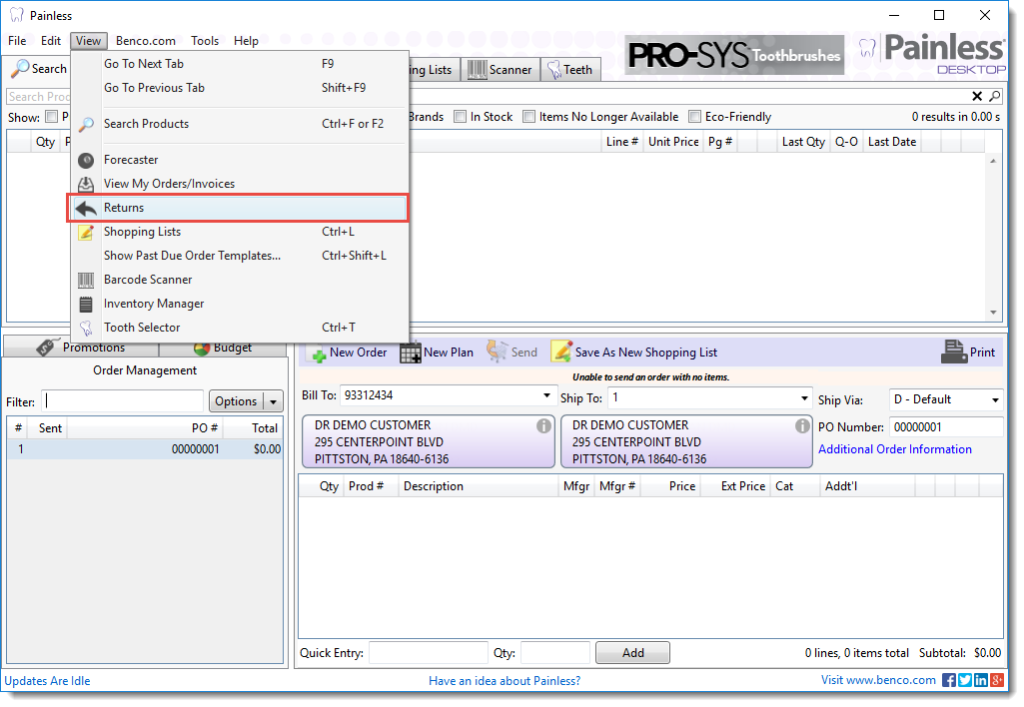
Next, click on Returns.
Next, select the item you would like to return and click Add. (repeat this step if you have multiple items to return)
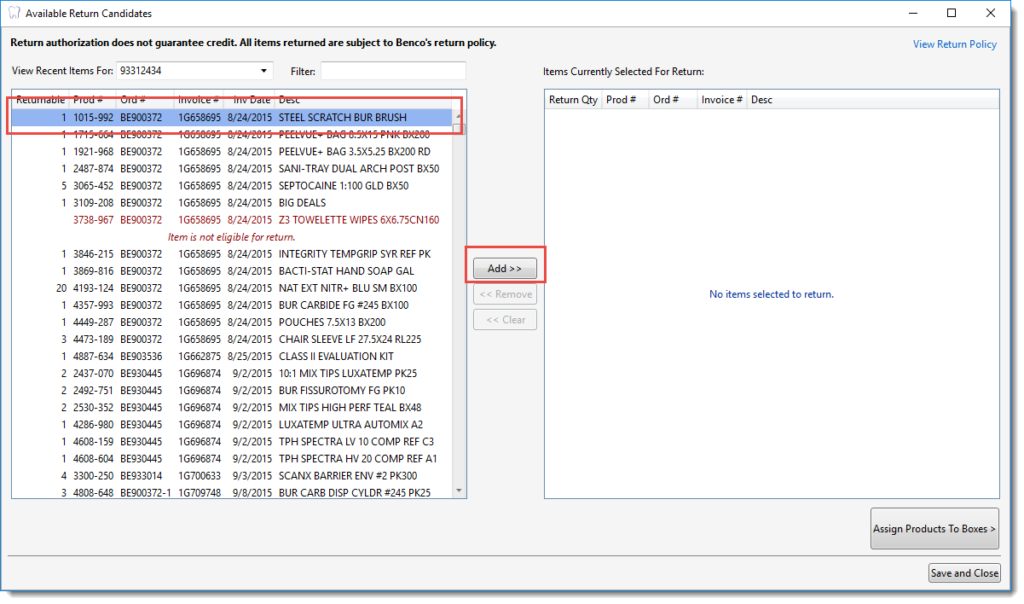
Next, adjust the quantity for the return and select the return reason.
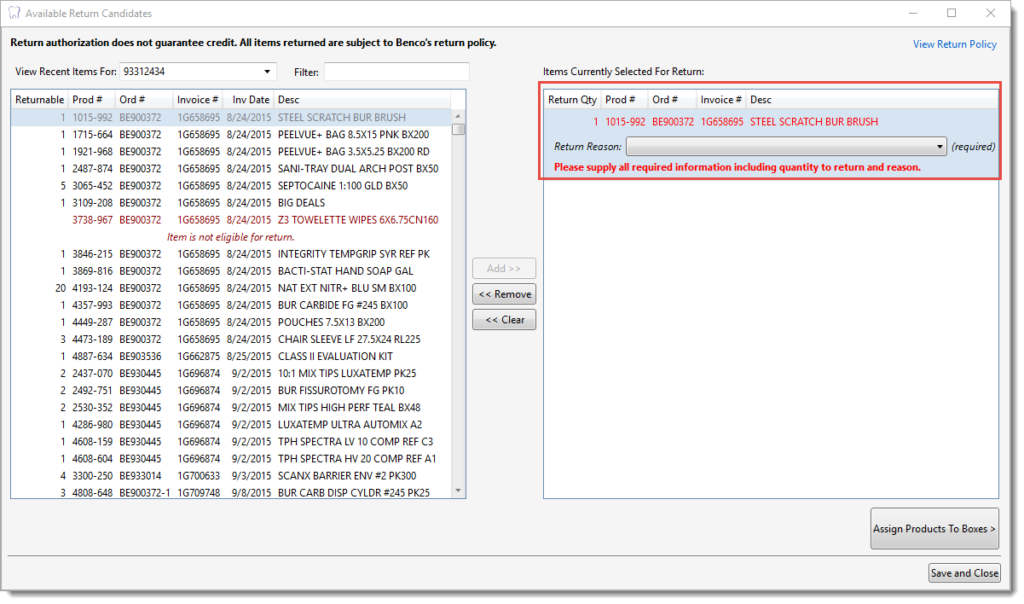
Next, click Assign Products to Boxes.
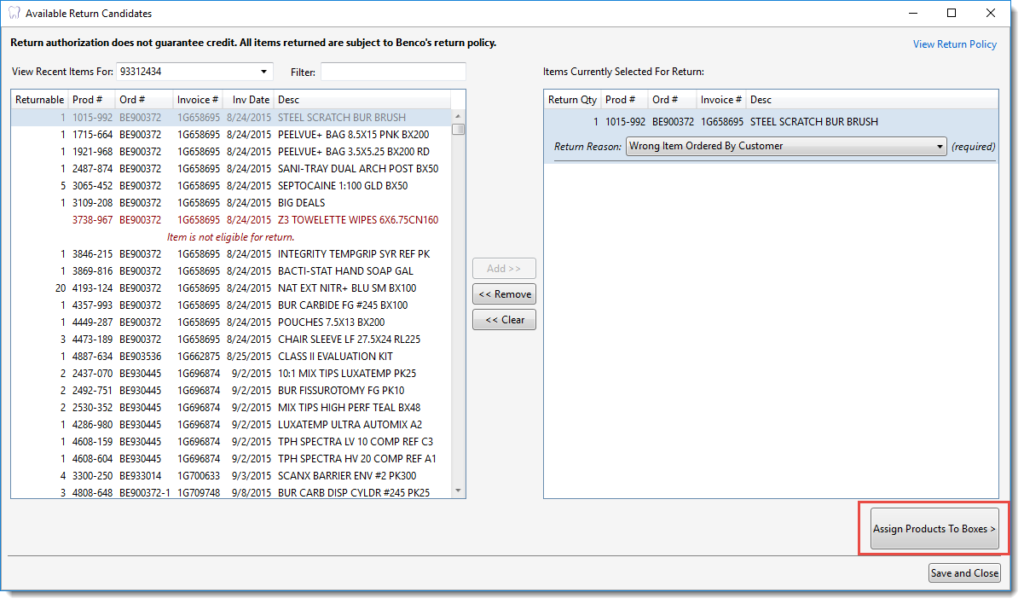
Next, click Add.
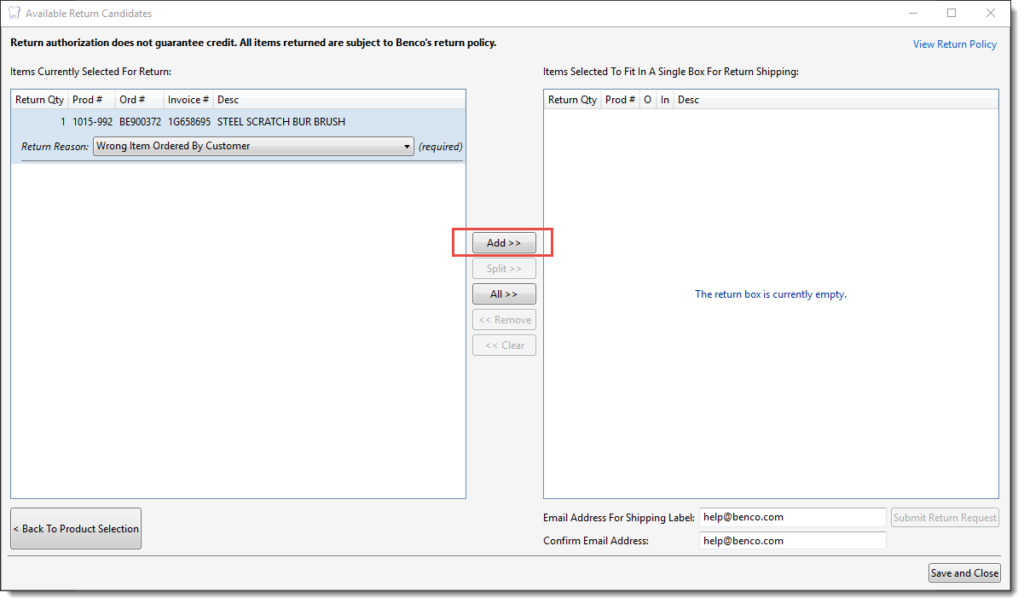
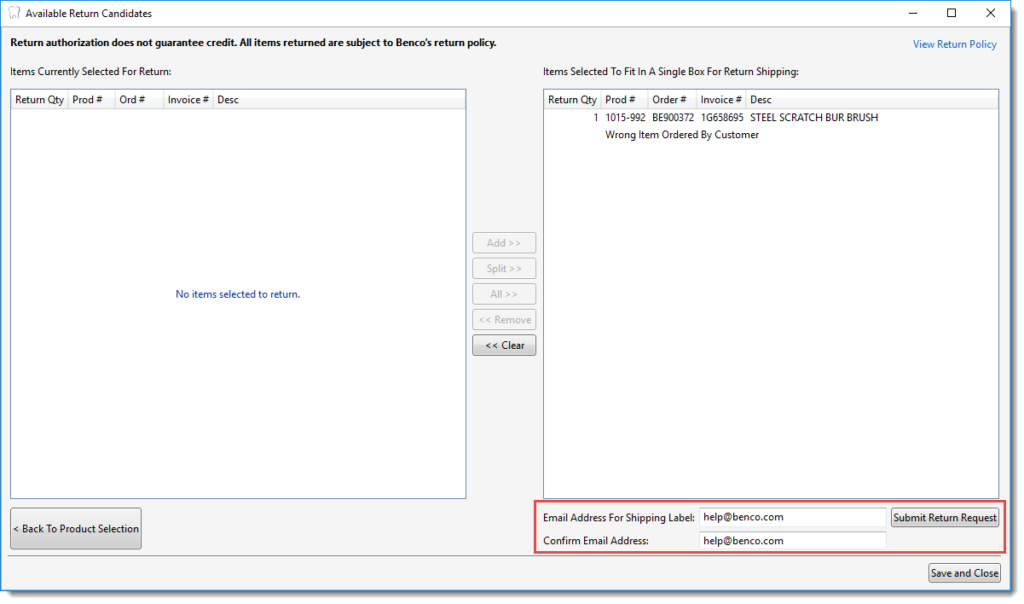
Finally, enter your email address and click Submit Return Request. You will receive the Return Authorization and the Shipping Label in your email.
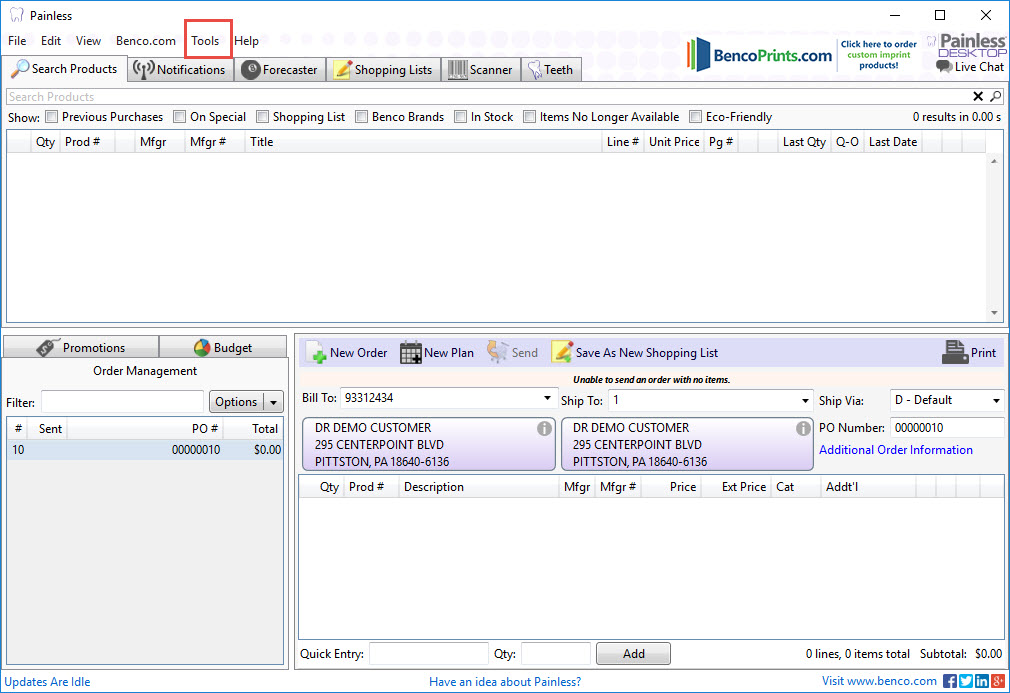
Tags and Labels can be printed from items in your Forecaster, Shopping Lists, Inventory Items and Saved Merchandise Orders. To begin, click on Tools.
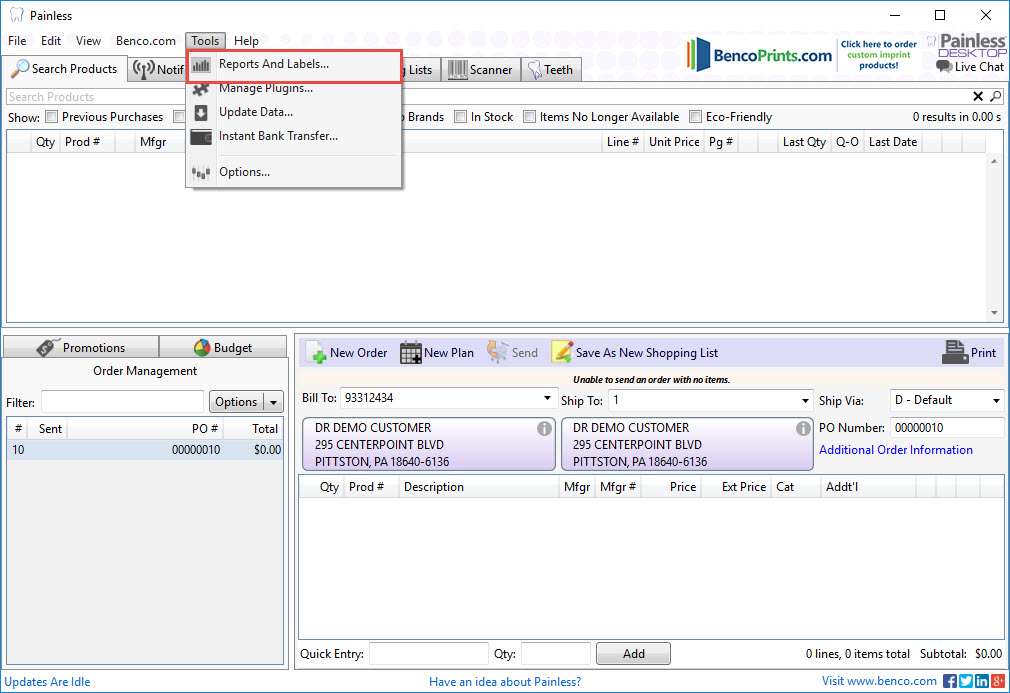
Next, click on Reports and Labels.
A list of available reports and labels will display, click on Painless Inventory Management (PIM) Tags and click Next.
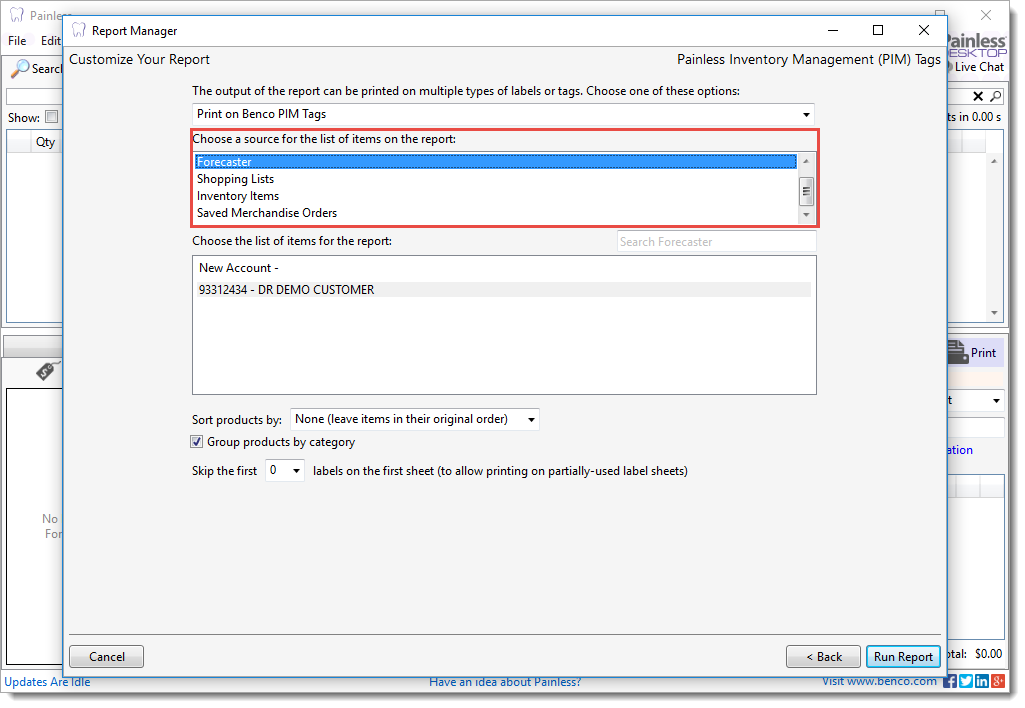
Next, select the output of the tags. Your options include: Print on Benco PIM Tags, Print on Avery 5163 or 8163 labels or Avery 5162 or 8162 labels.
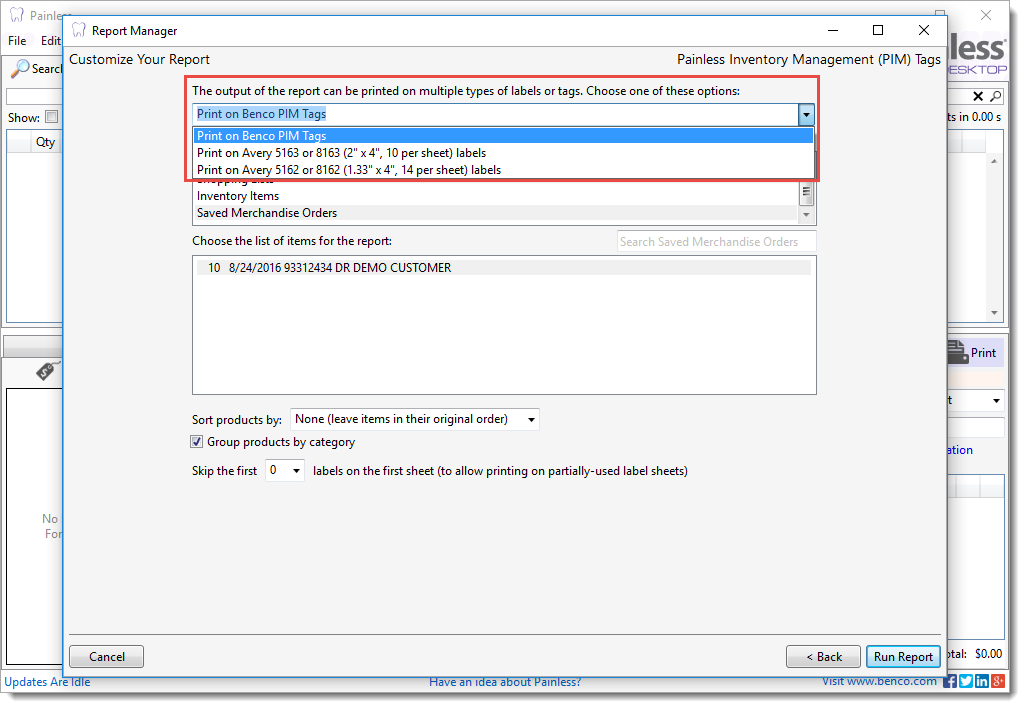
Next, select the source. Your options include: Forecaster, Shopping Lists, Inventory Items and Saved Merchandise Orders.

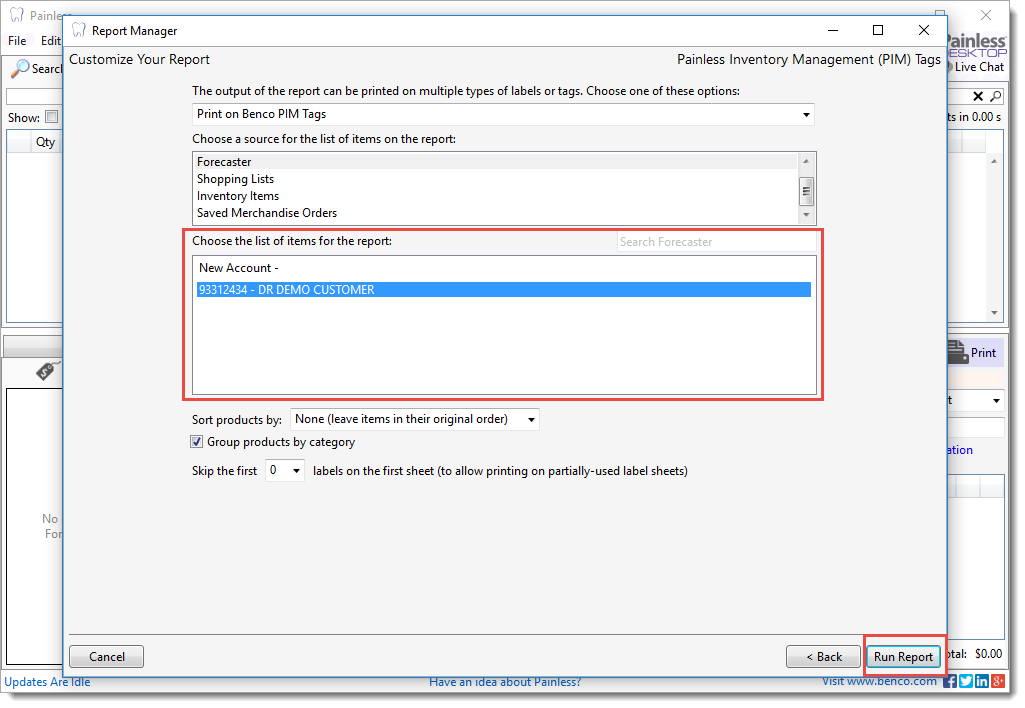
Next, select the list of items for the report and click Run Report.
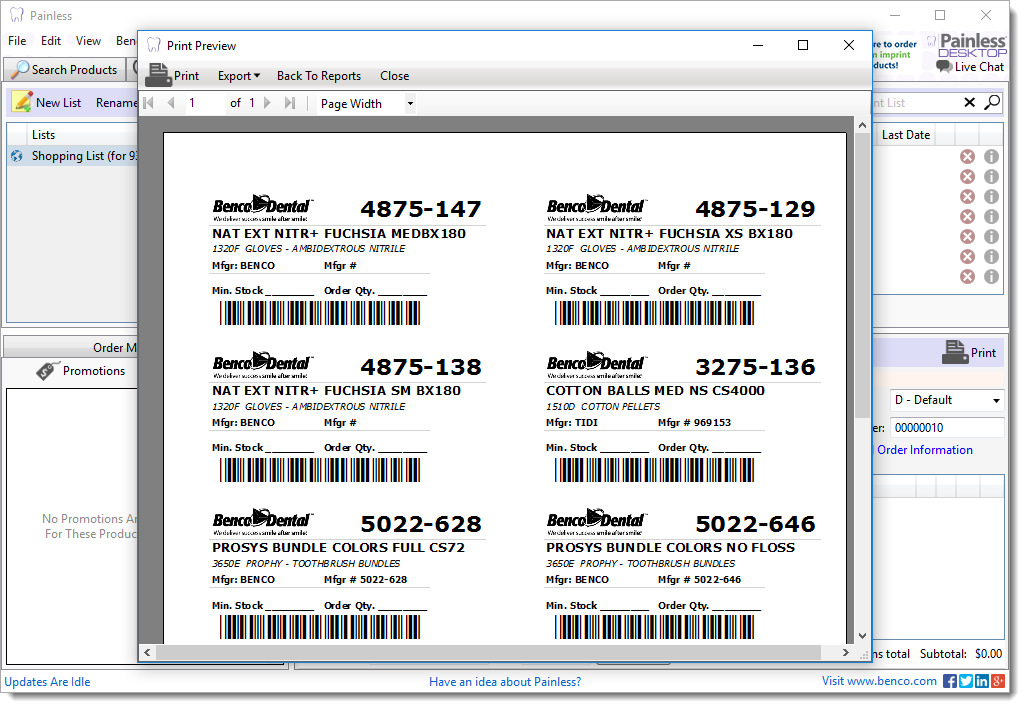
Finally, the PDF will display for you to print.
The forecaster offers you a quick look into items that you may need to purchase. The Forecaster identifies the items that you have purchased in the past and recommends the quantity and the date that items should be ordered.
To access the Forecaster, click on the Forecaster tab.
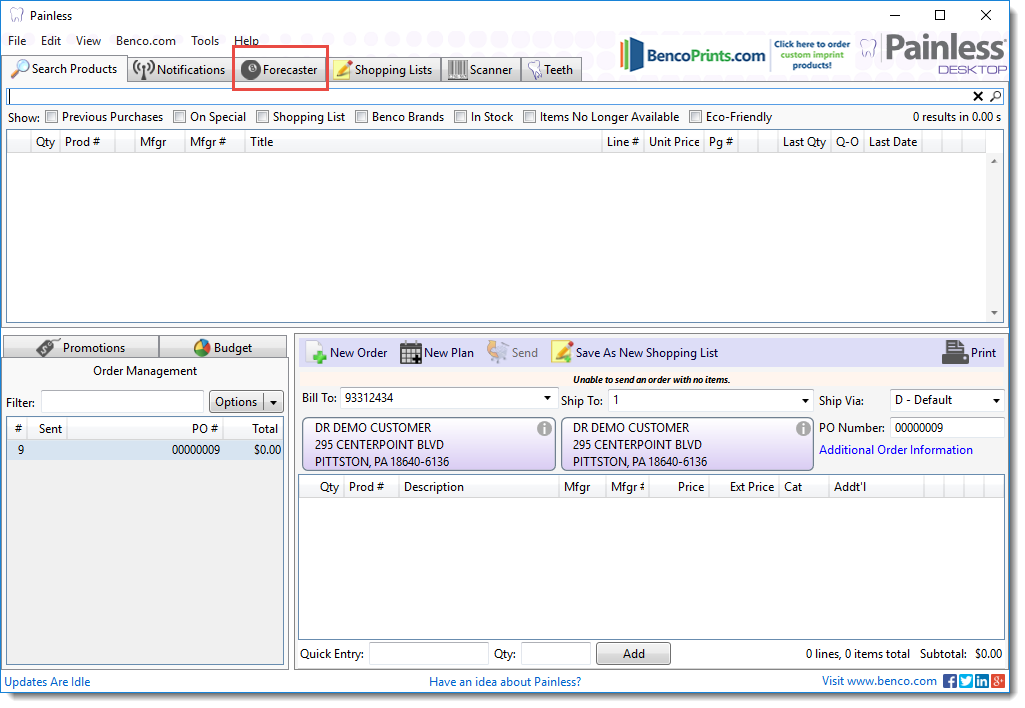
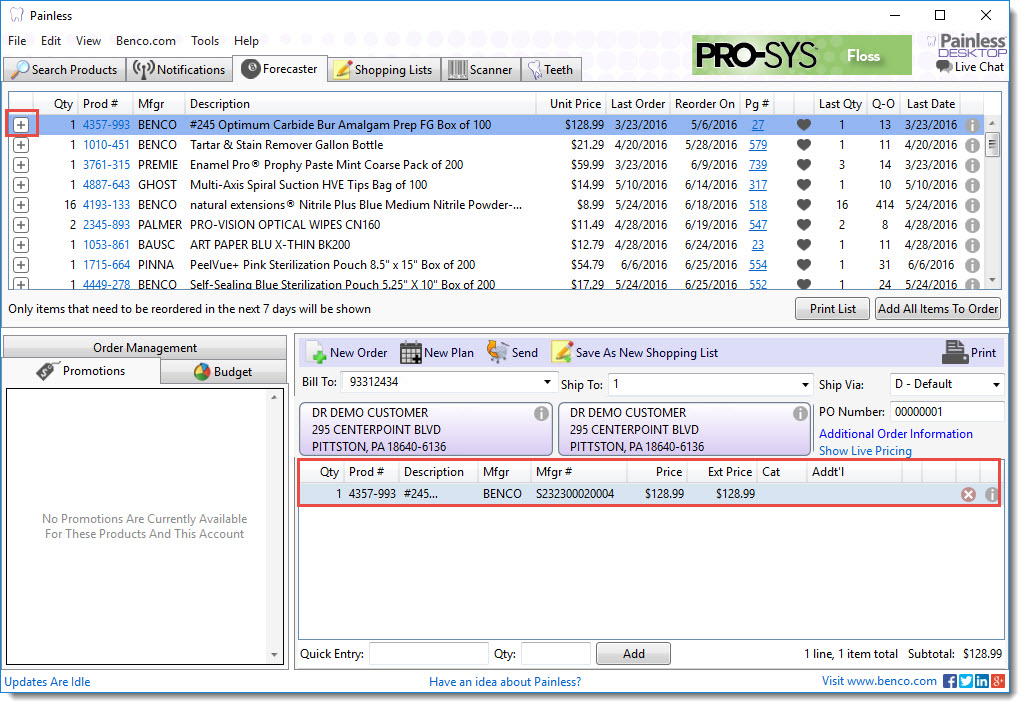
The Forecaster information will display on the screen.
If you would like to order an item, click on the plus sign or the line item to add it to your order.
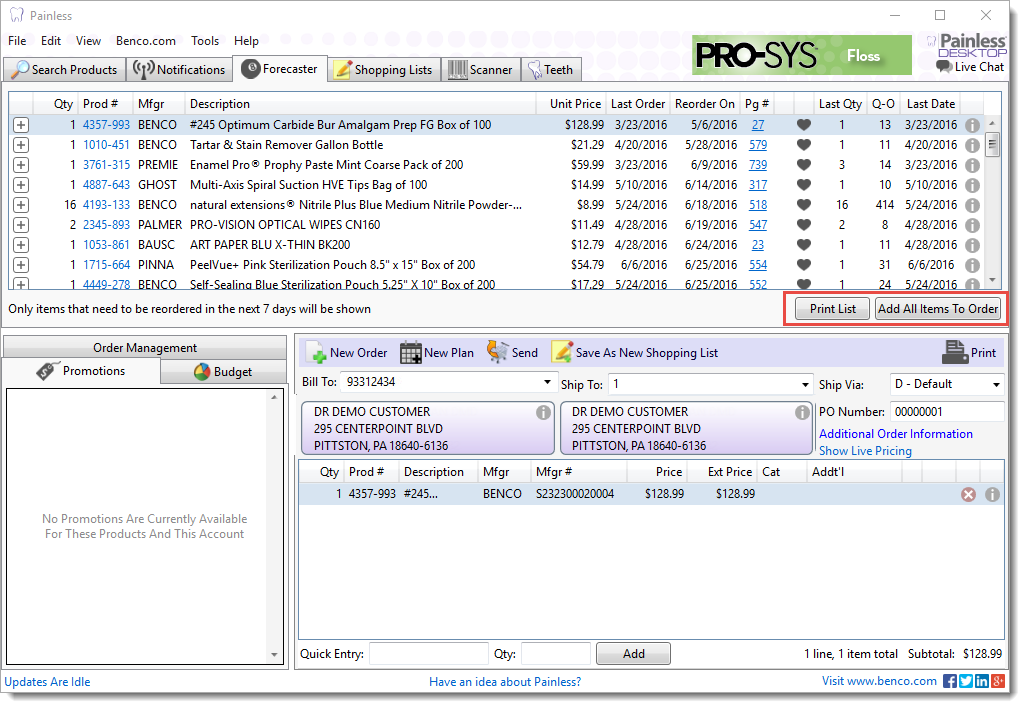
You can also Print a List of the items in the Forecaster or you can Add All Items to the Order.
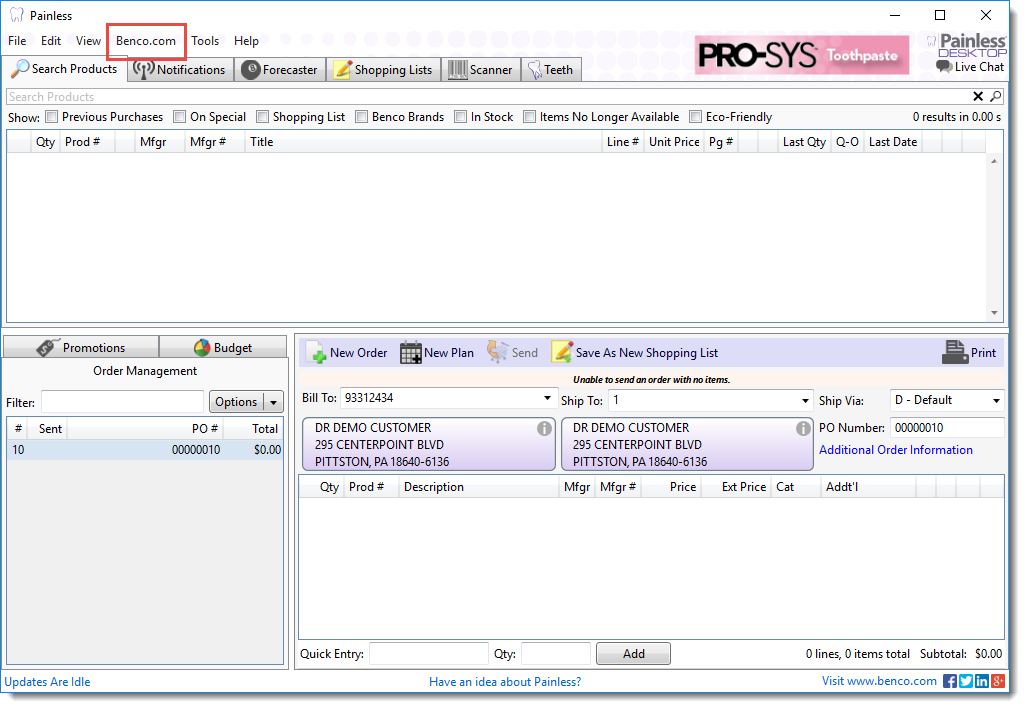
To access the SDS sheets for items you have purchased, begin by logging in Painless Desktop and click on benco.com.
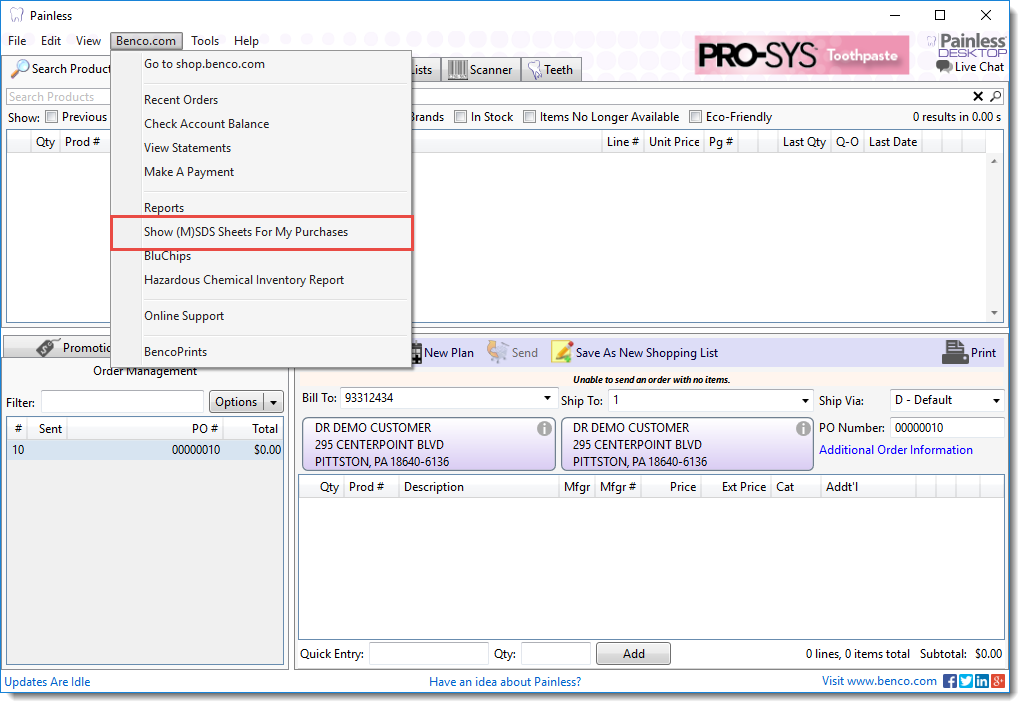
Next, click on Show (M)SDS Sheets For My Purchases.
You will be redirected to benco.com. Click on the button that says Download (M)SDS Sheets for All Displayed Orders.
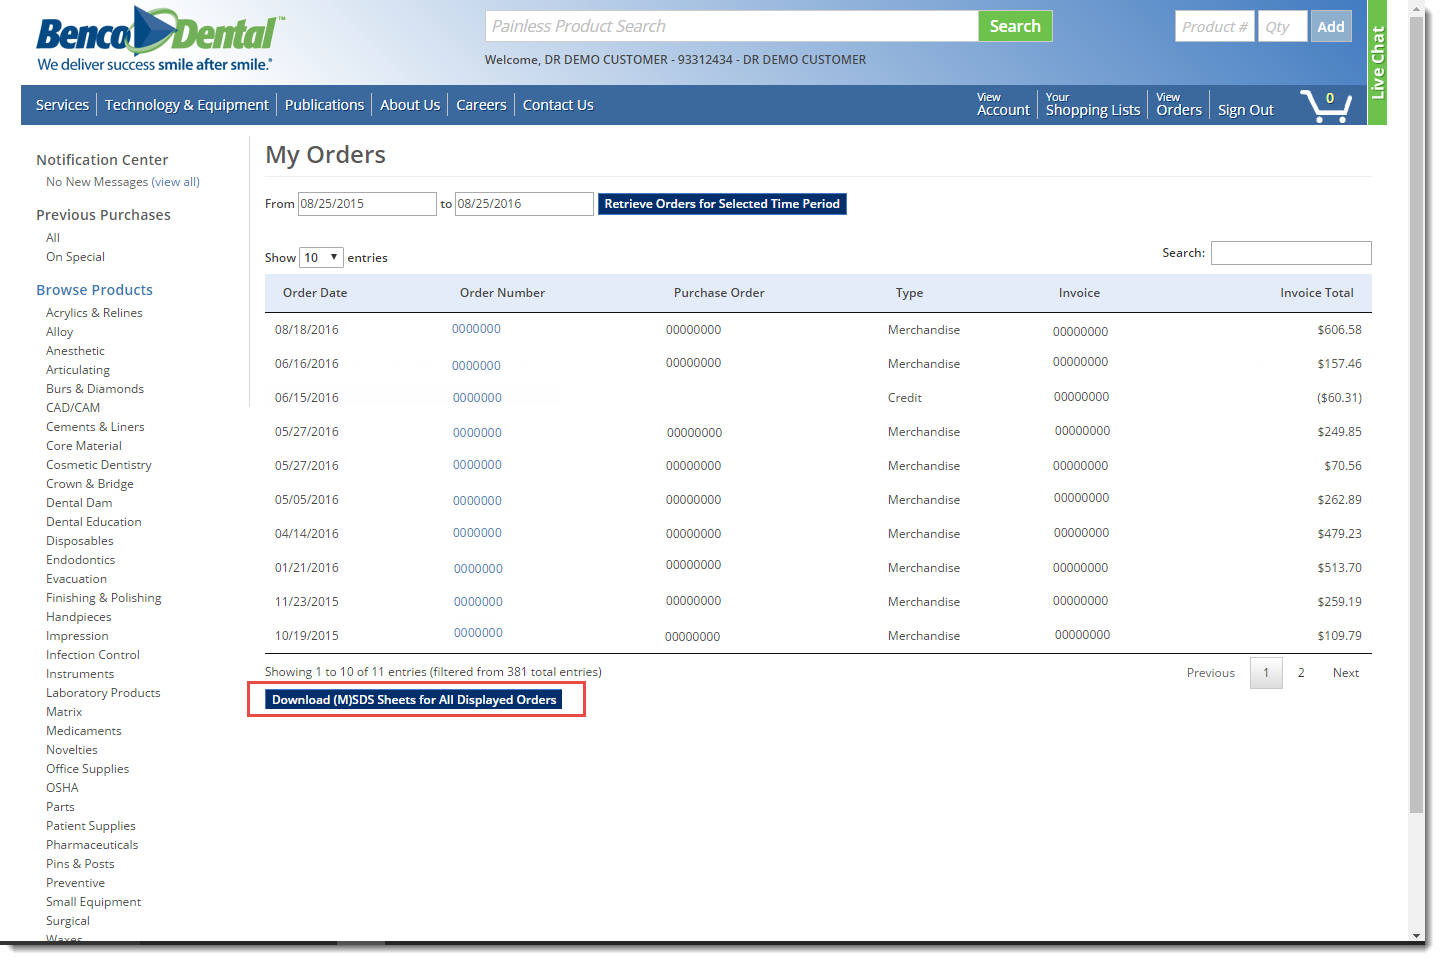
A PDF fill display with all of your SDS sheets for everything you ordered within the last 12 months.
To track your order, log in Painless Desktop and click on View.
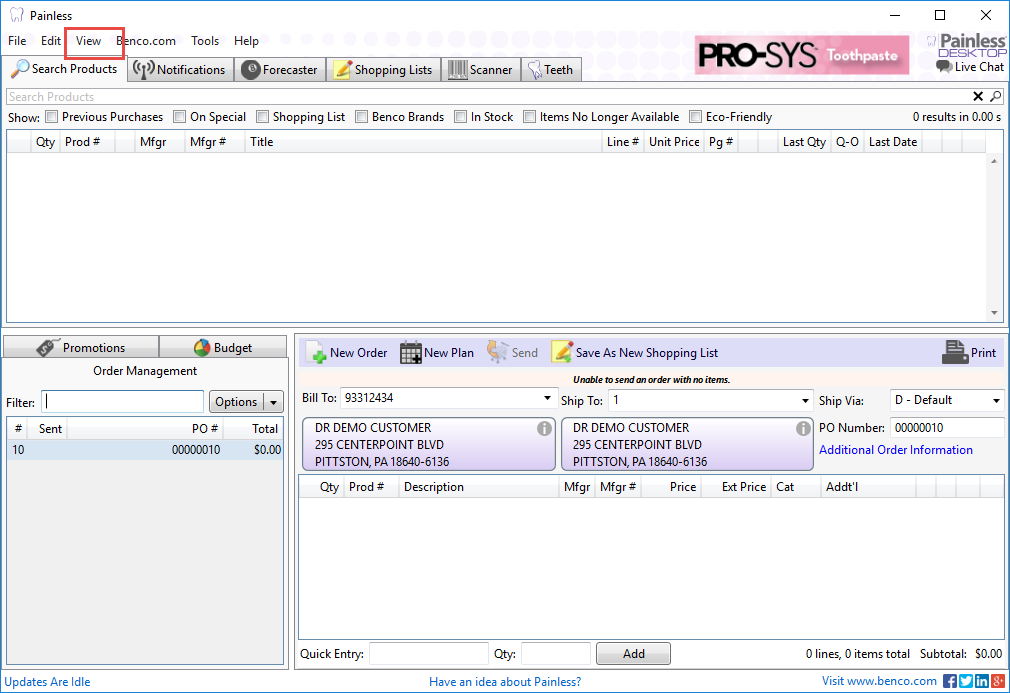
Next, click View My Orders/Invoices.
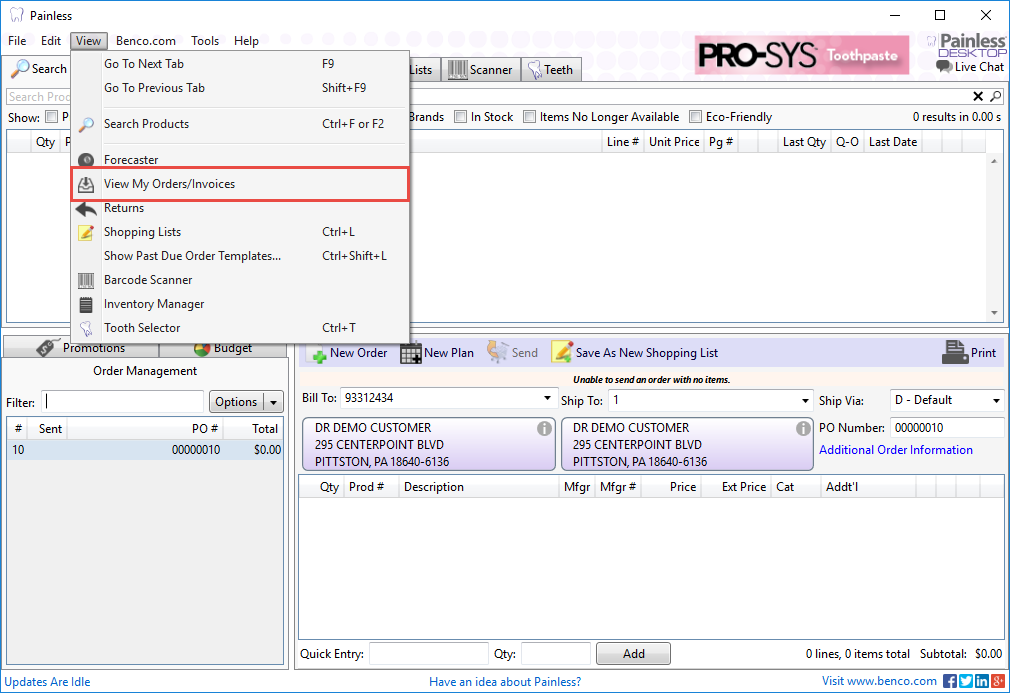
Next, click on the Order.
Next, click on Track.
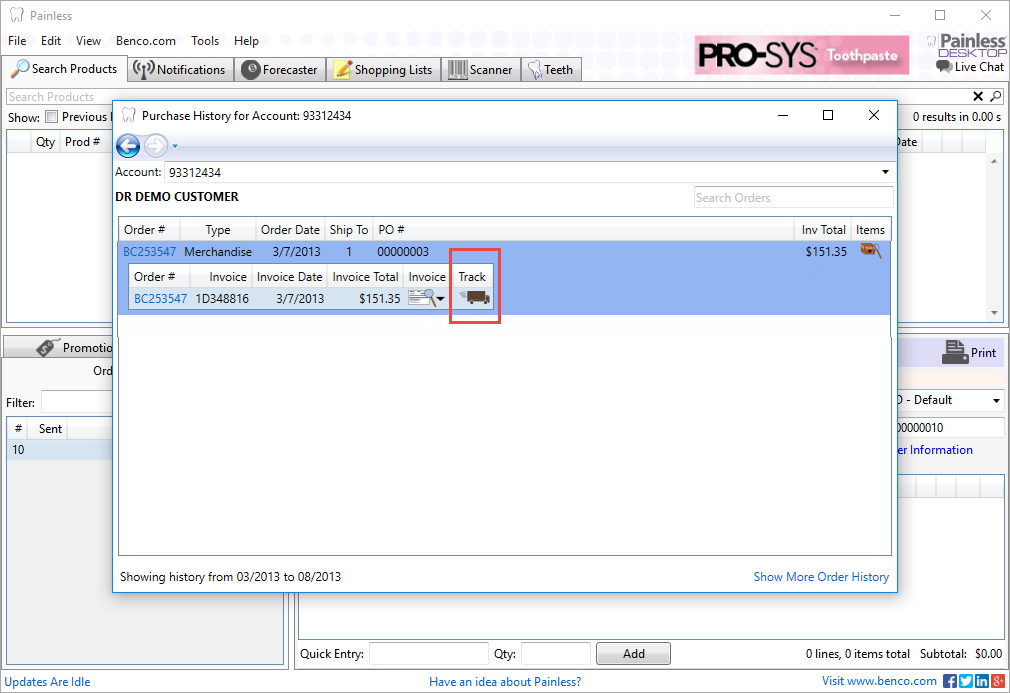
You will be redirected to benco.com to view the tracking information for your order.
To access you invoices, log in Painless Desktop and click on View.
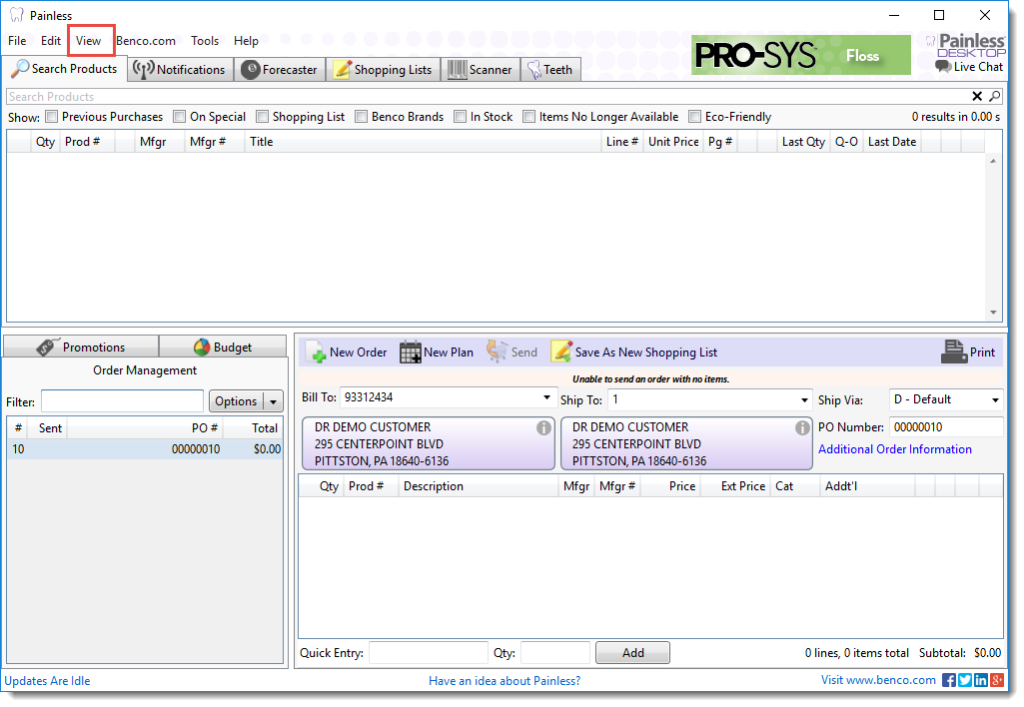
Next, click View My Orders/Invoices.

Next, click on the Order.
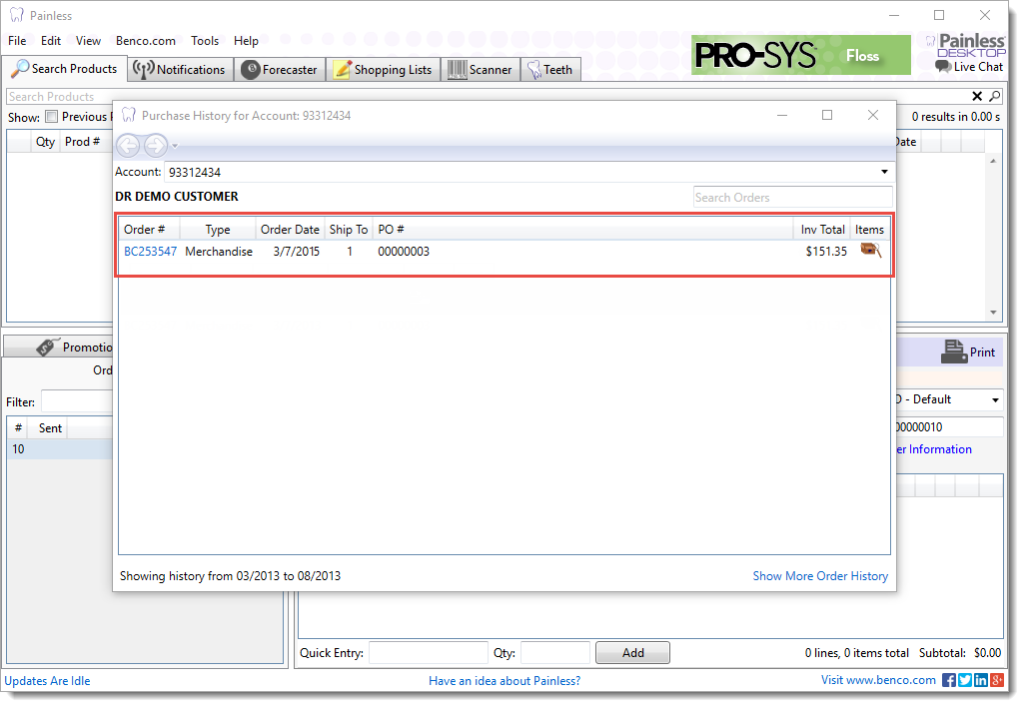
Next, click on the arrow next to the invoice image.
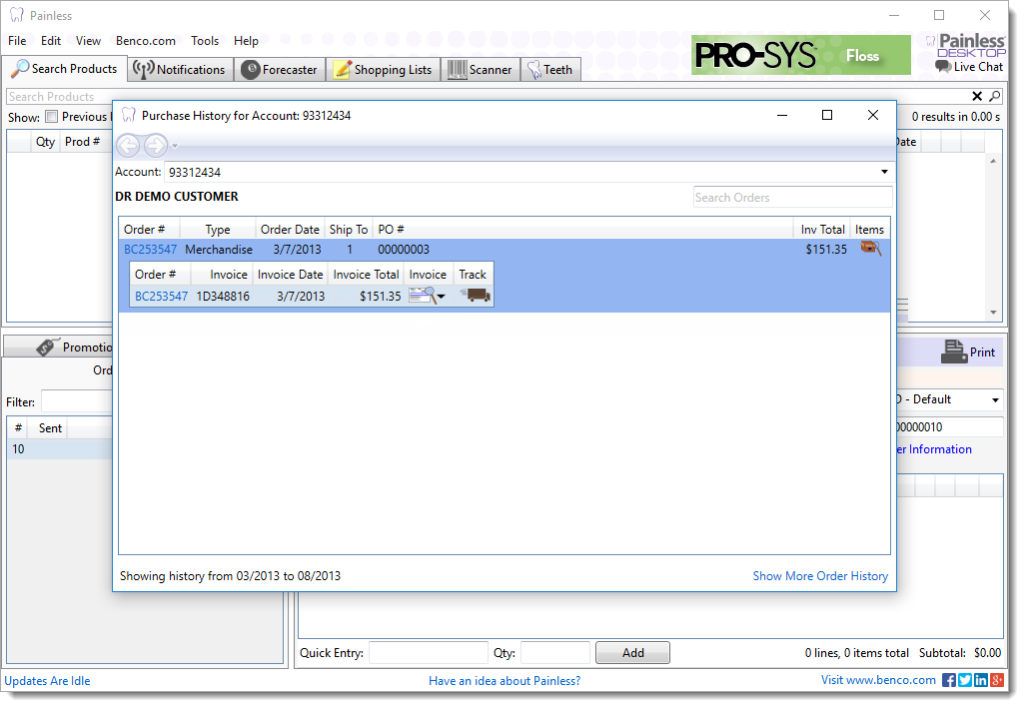
Finally, click View Invoice.

You can configure a budget for your purchases by logging into Painless Desktop and clicking on Budget.
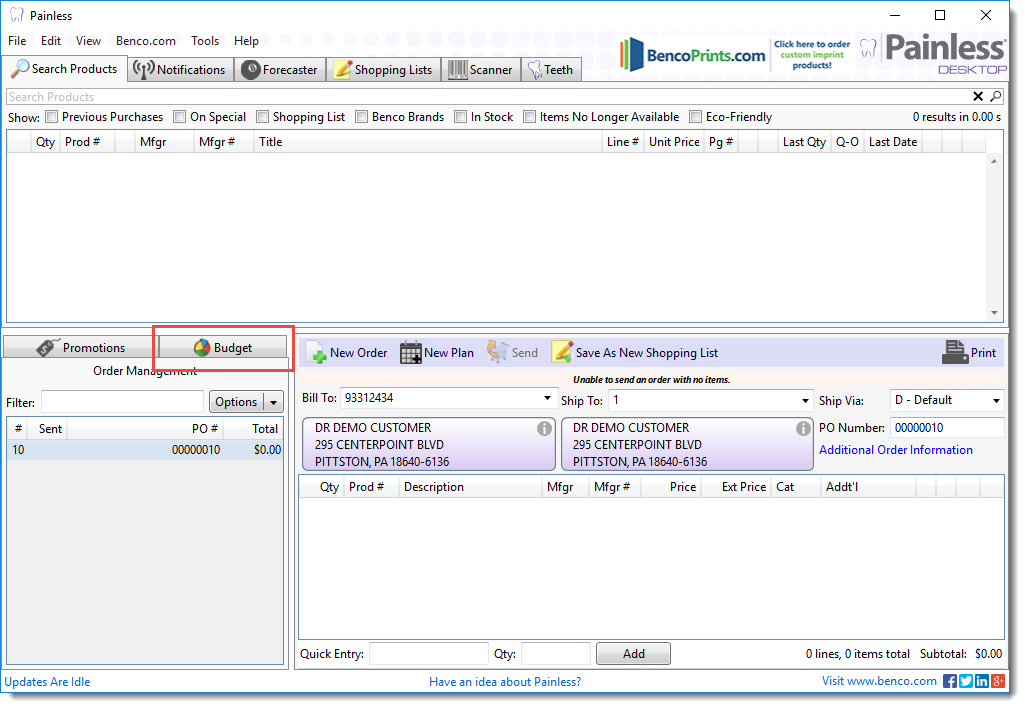
Next, click on Click here to create a budget.
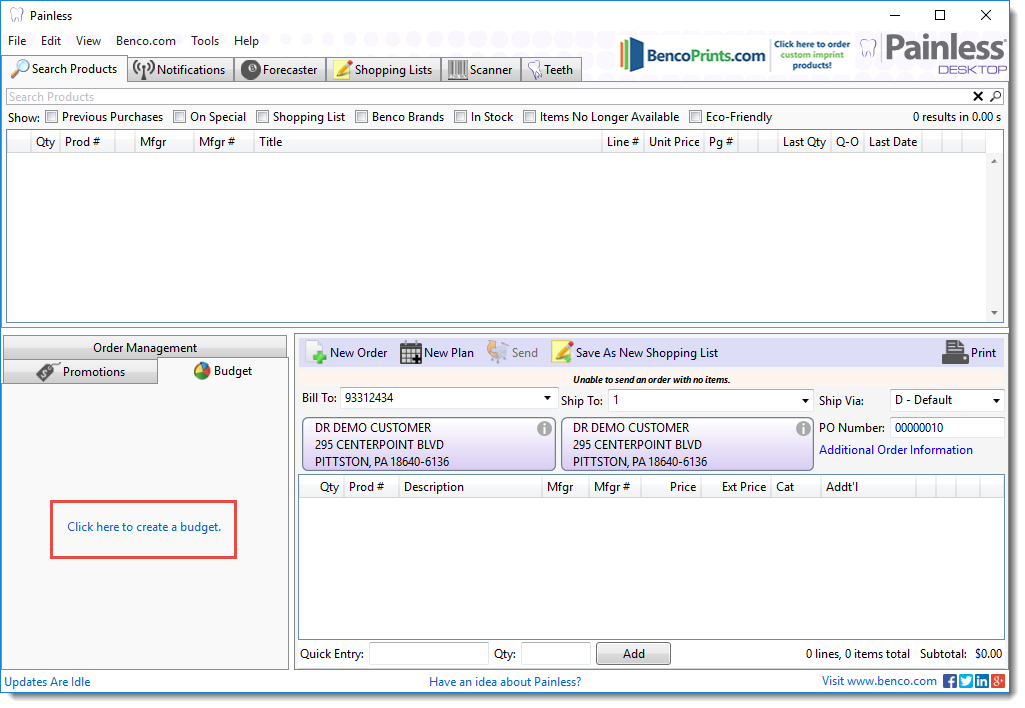
Select your account and click Next.
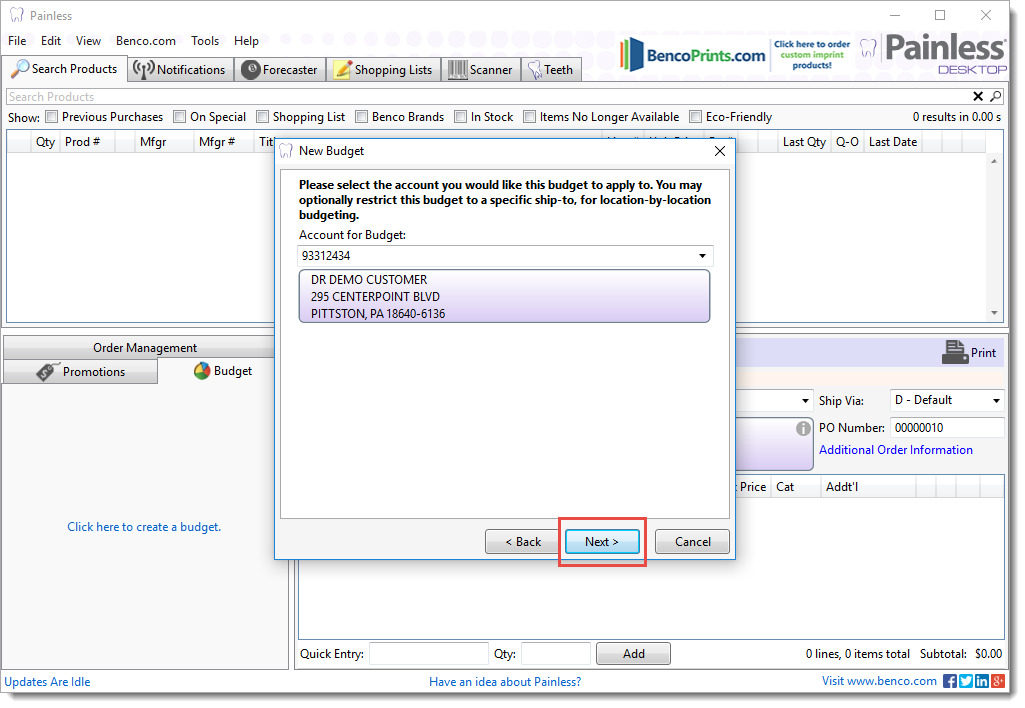
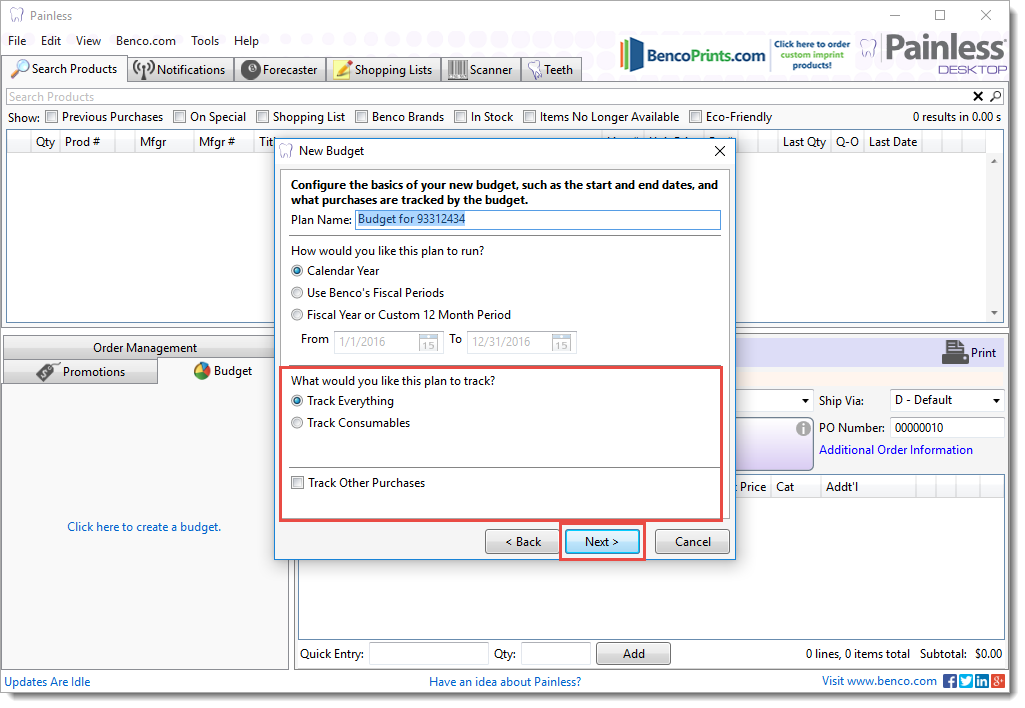
Select how you would like the plan to run. Your options include calendar year, Benco’s fiscal periods or you can enter a custom 12 month period.
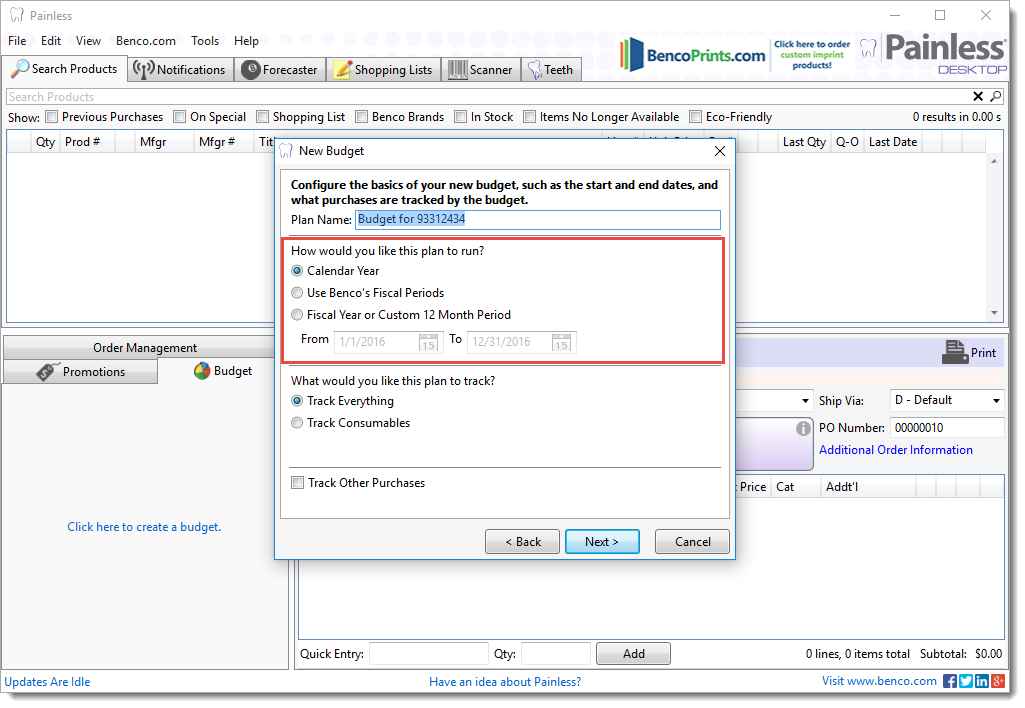
Next, select if you would like to track everything or only track consumables and click Next.
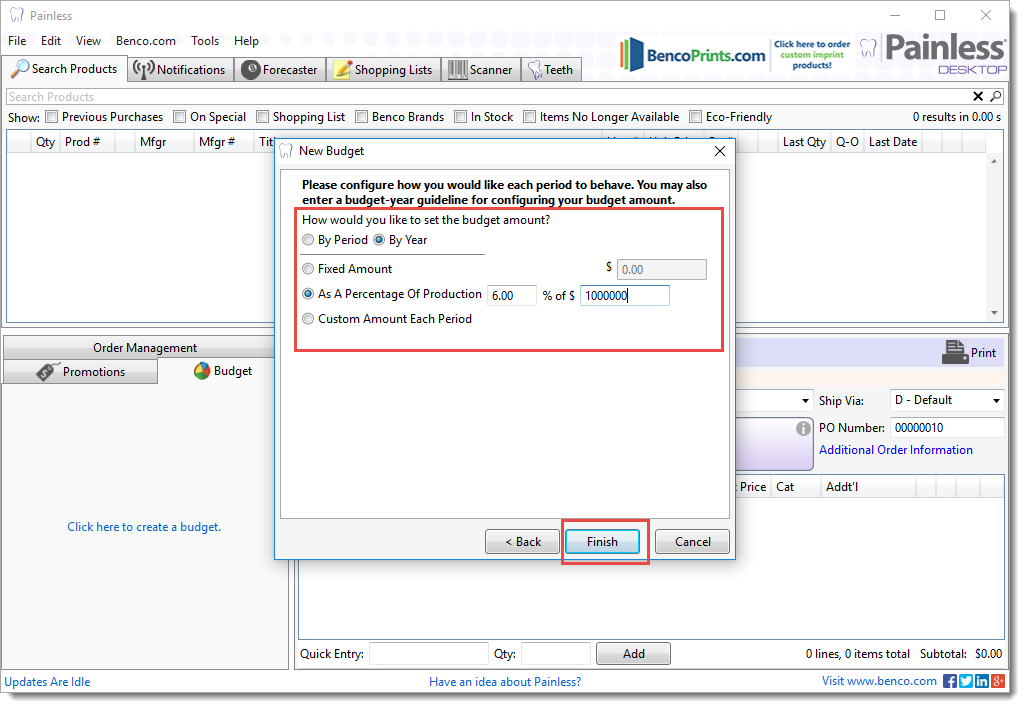
Next, select if you would like to budget by period or year and set your budget amount. When you are done, click Finish.
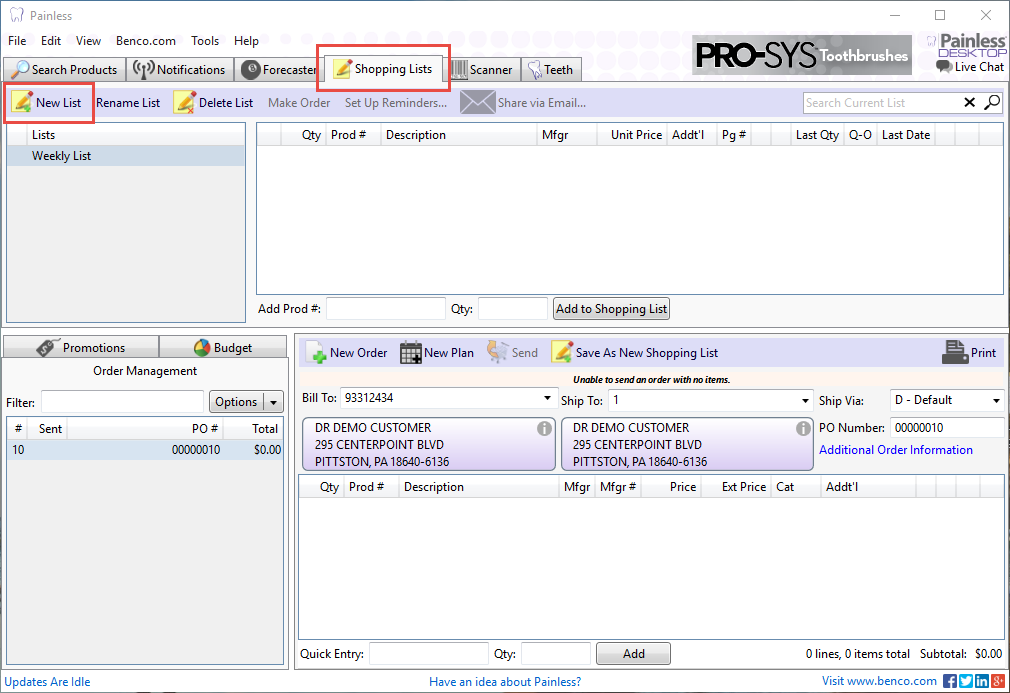
To create a Shopping List, begin by clicking on the Shopping Lists tab and then click on New List.
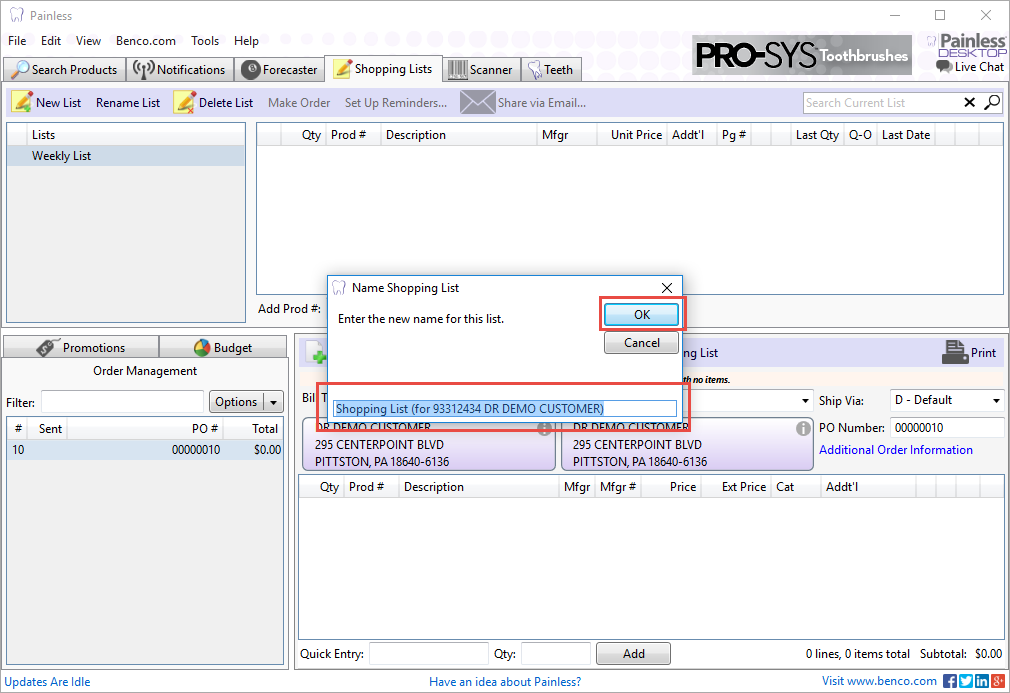
Next, enter the name of the list and then click OK.
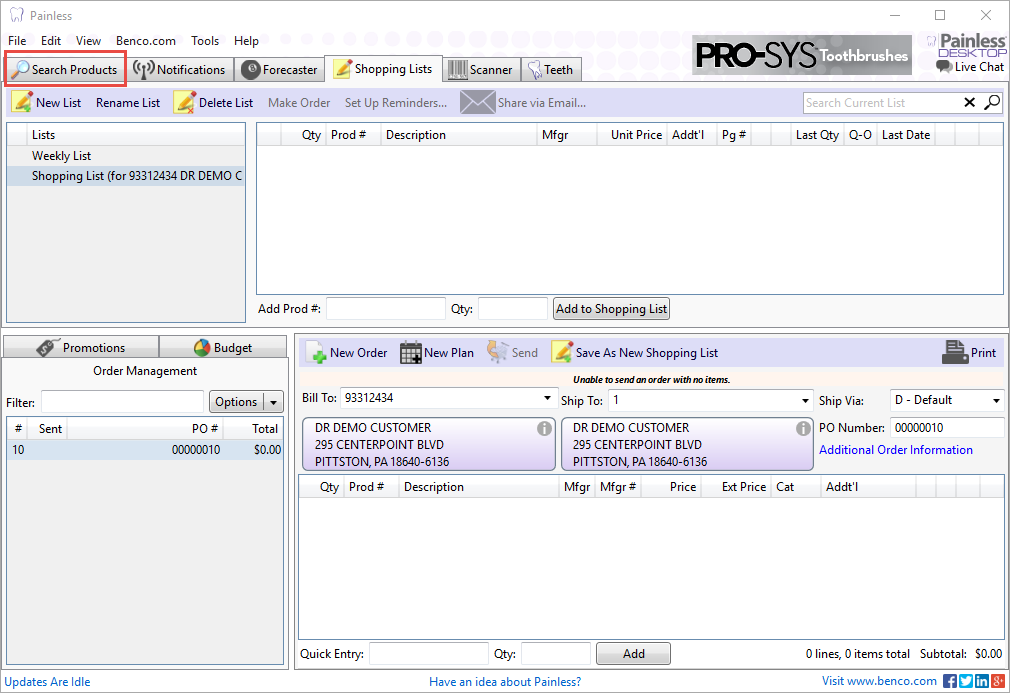
Next, click on the Search Products tab.
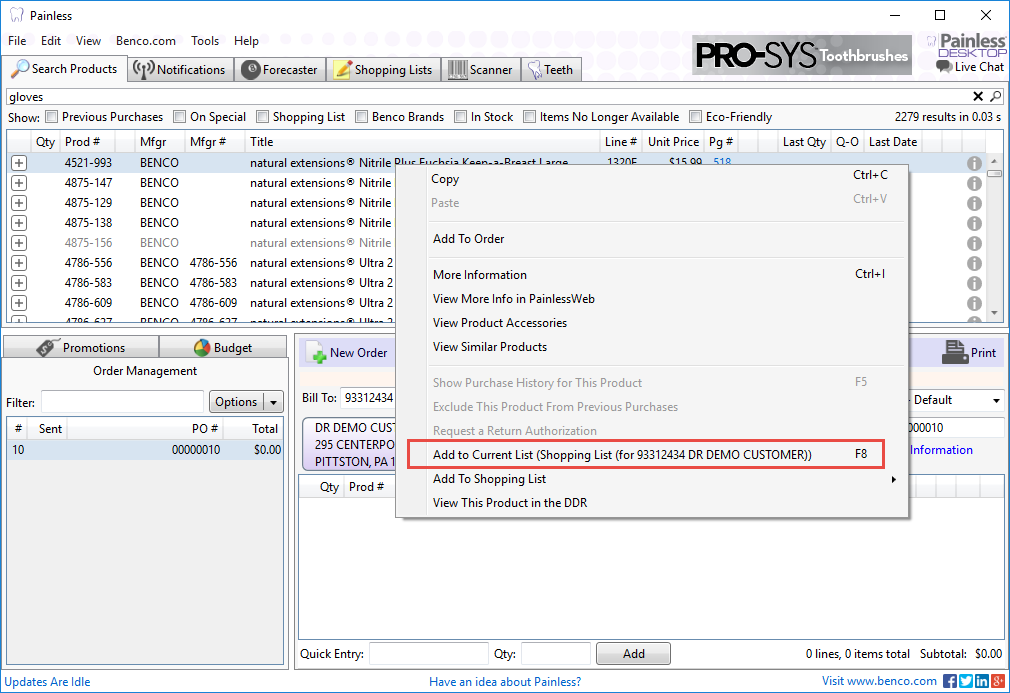
Next, search for the product(s). Once you locate the product, right click and then click on Add to Current List (Name of your shopping list).
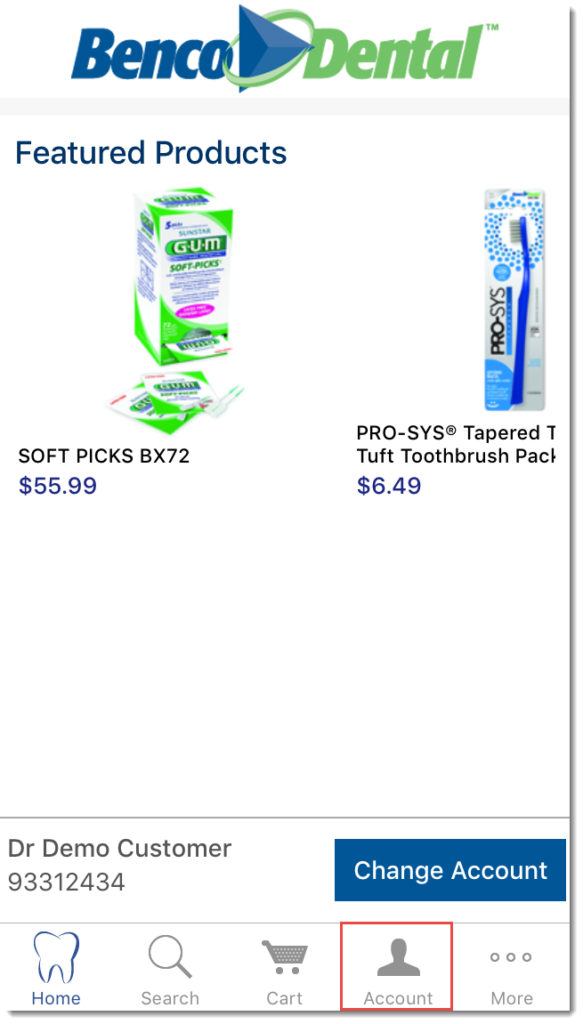
Once logged into Painless Mobile, press Account.
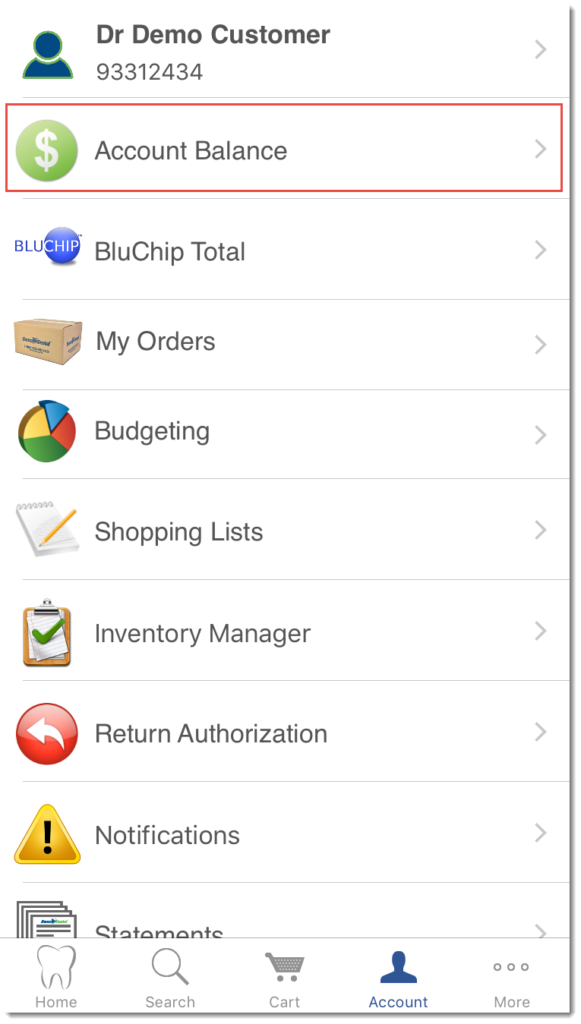
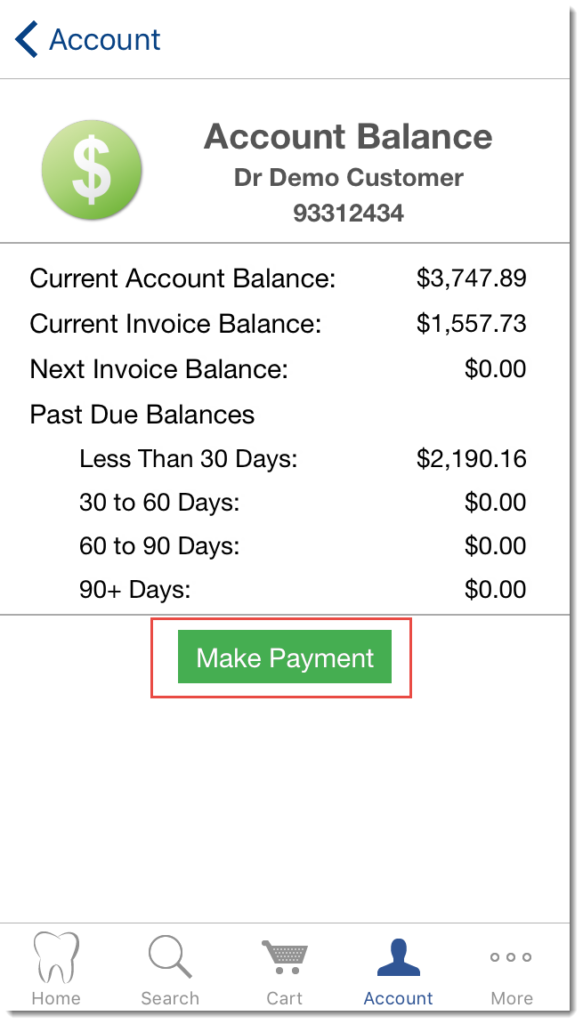
Next, press Account Balance.
Next, press Make Payment.
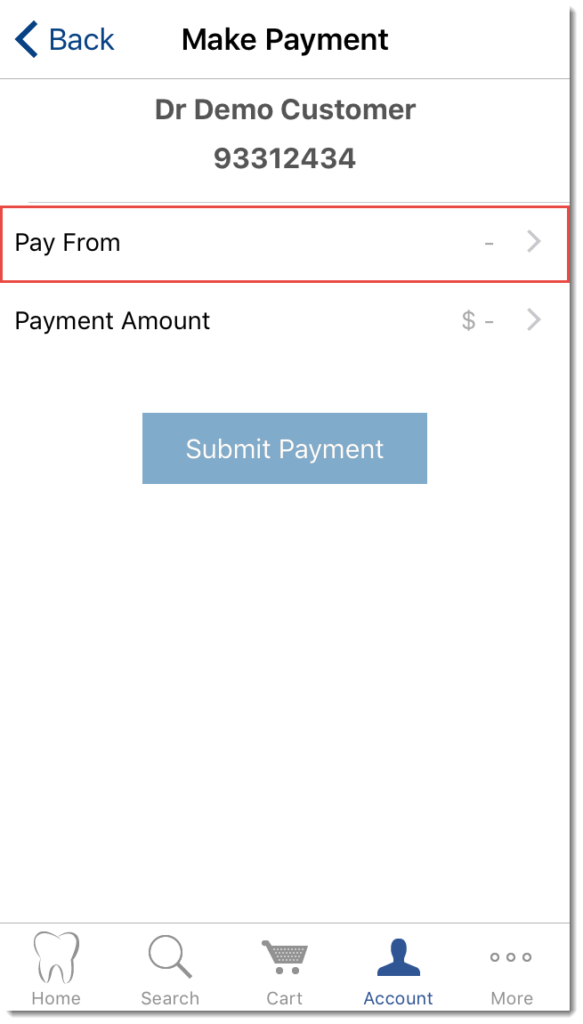
Press on Pay From.
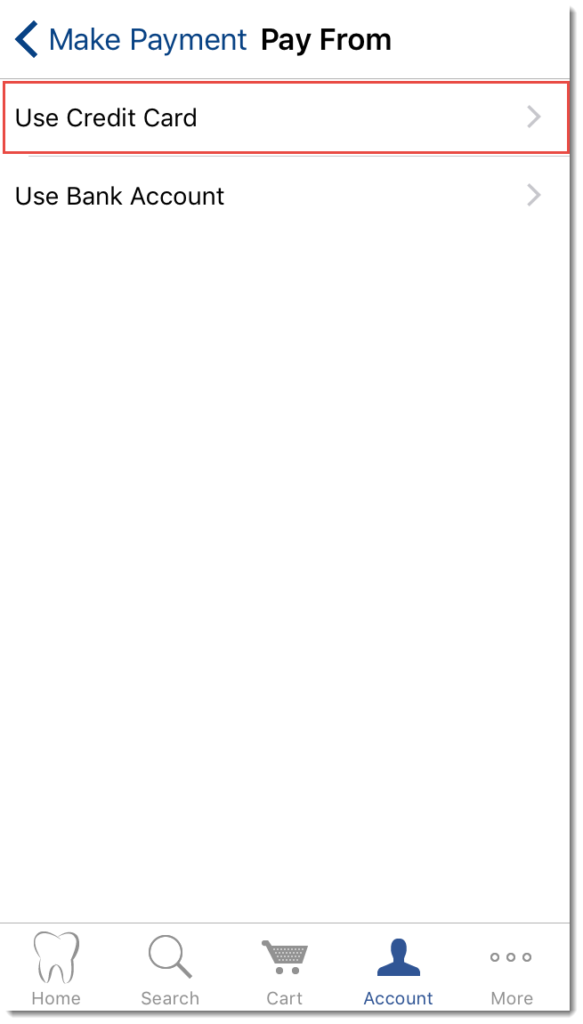
Next, press on Credit Card.
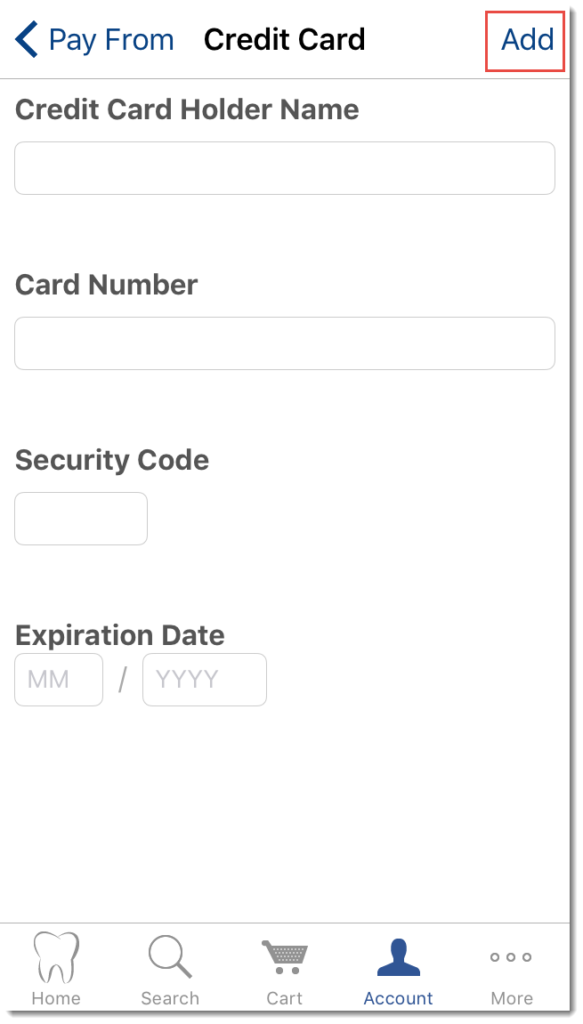
Enter your credit card information, including card holder’s name, card number, security code and expiration date. Once complete, press Add.
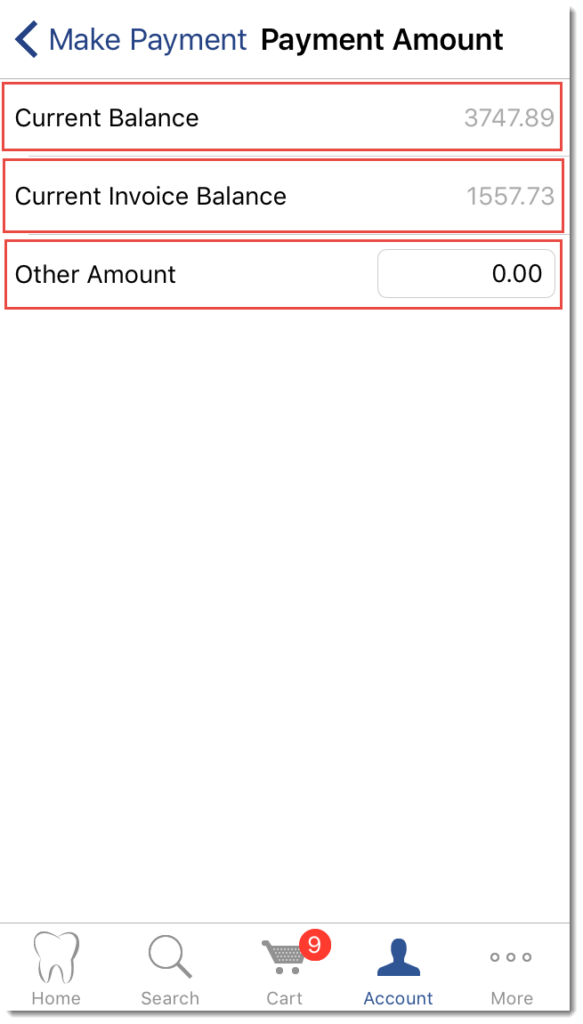
Next, press Payment Amount.

Select the payment amount: Current Balance, Current Invoice Balance or Other Amount.
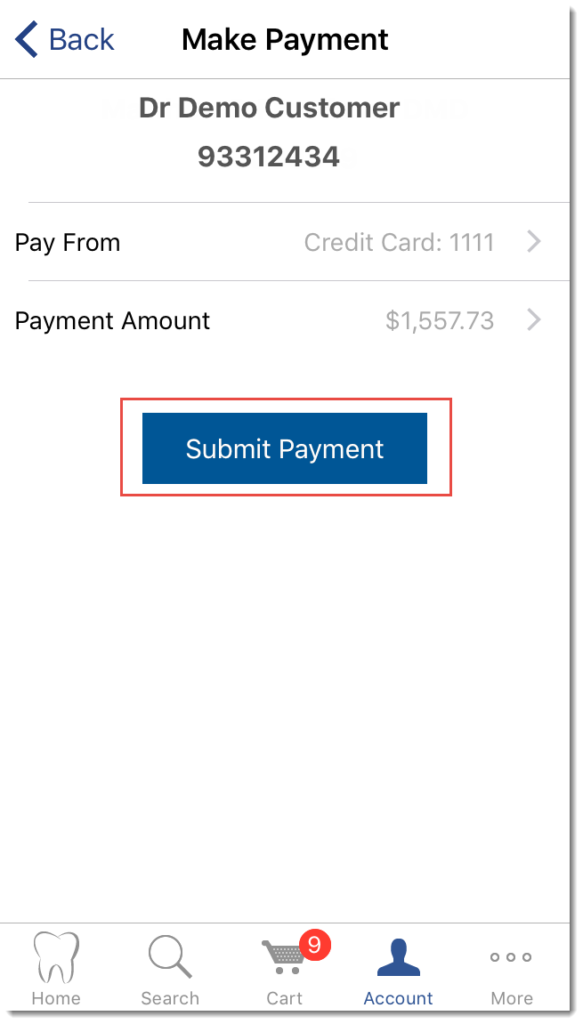
Finally, press Submit Payment.
Once logged into Painless Mobile, press Account.

Next, press Account Balance.

Next, press Make Payment.

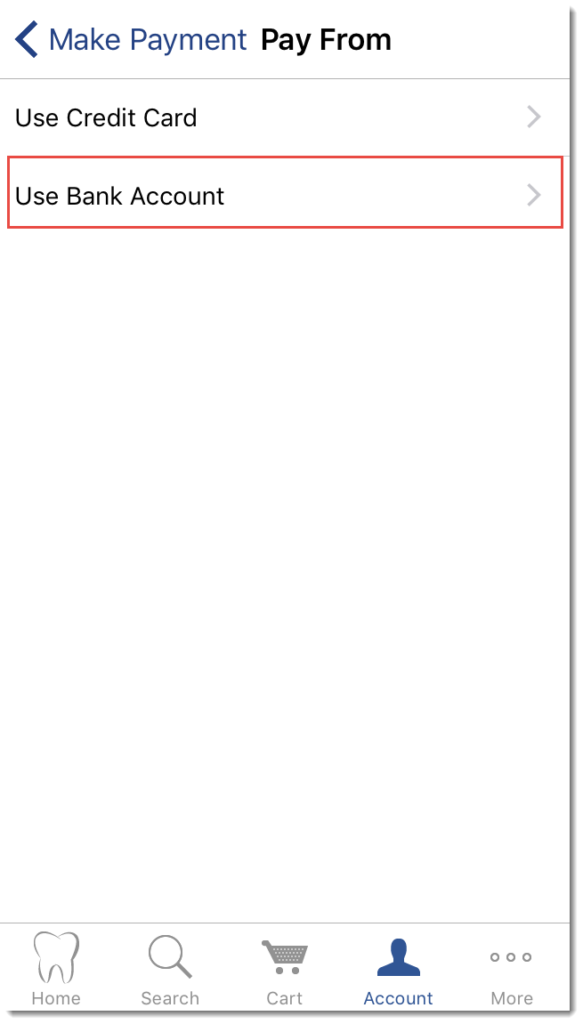
Press on Pay From.

Next, press on Use Bank Account.
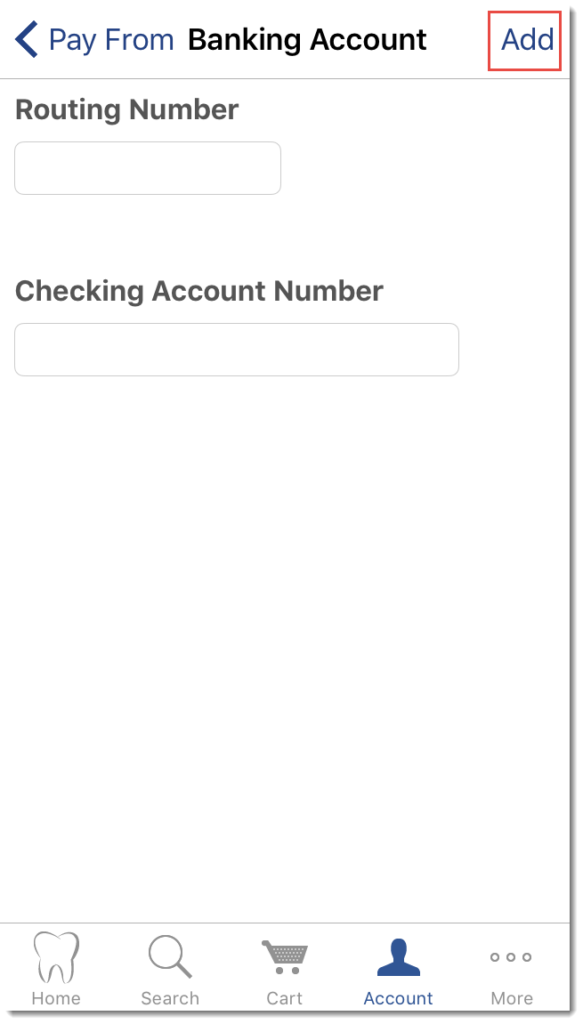
Enter your routing number along with the checking account number and then press Add.
Next, press Payment Amount.
Select the payment amount: Current Balance, Current Invoice Balance or Other Amount.
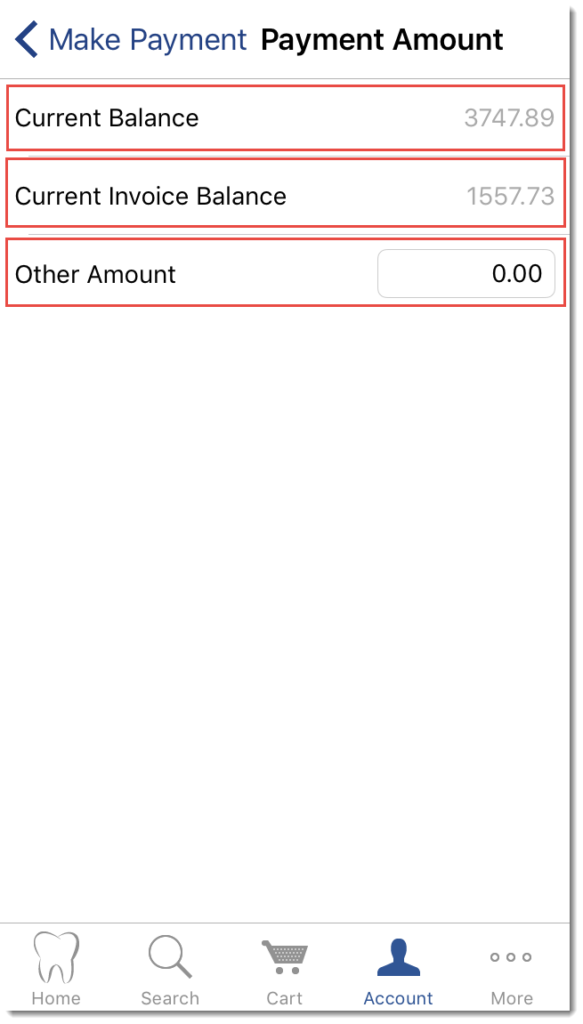
Finally, press Submit Payment.
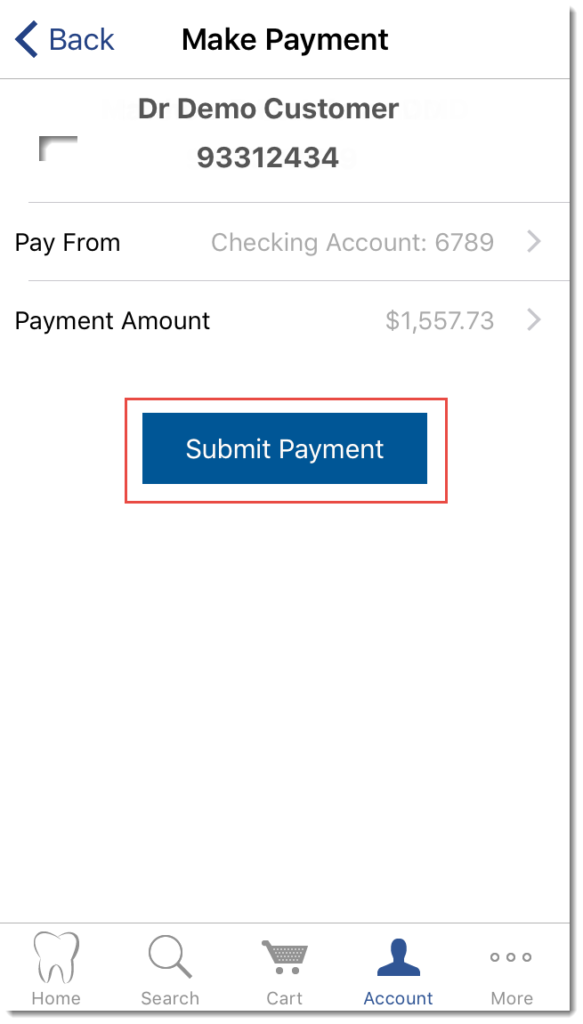
Once logged into Painless Mobile, press Account.

Next, press Account Balance.

Next, your account balance information will display.
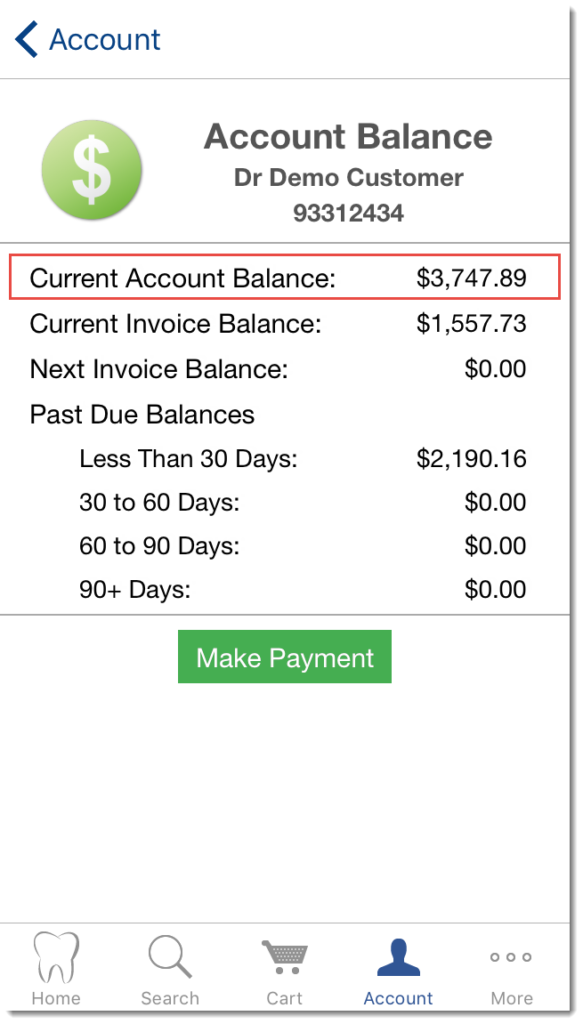
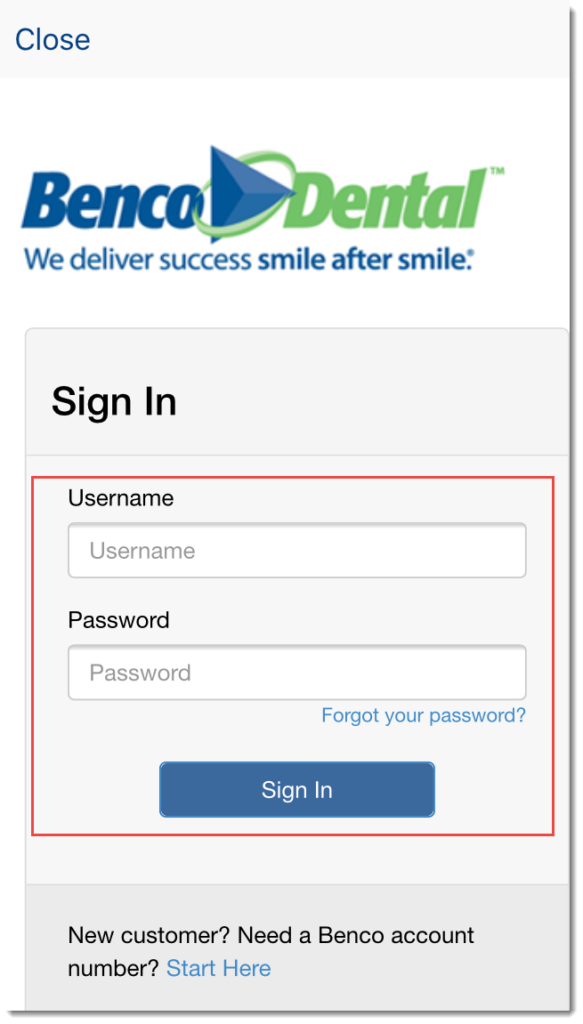
Once you log into Painless Mobile, press Account.

Next, press on your account name.
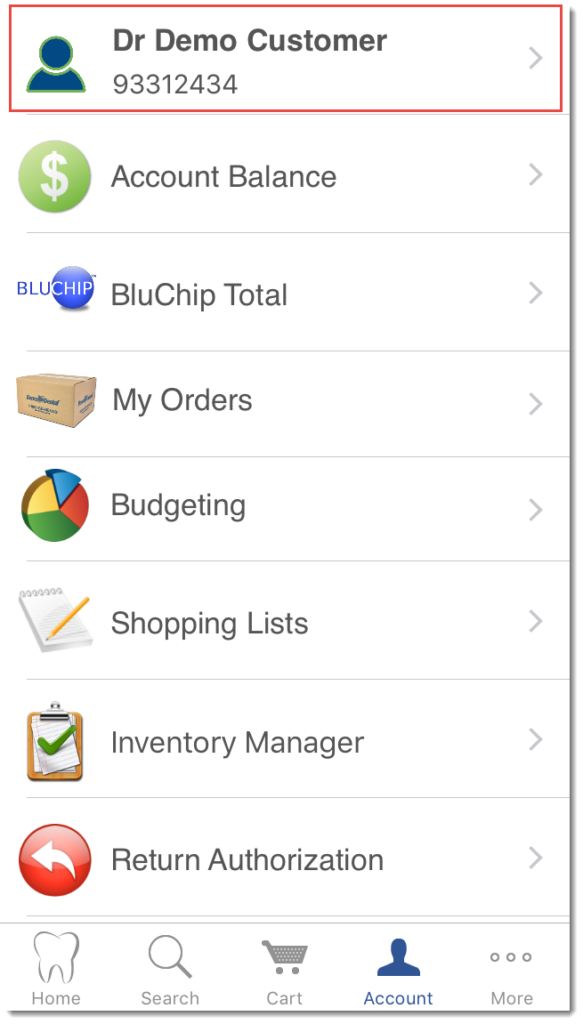
You will then be prompted to enter your user name and password.
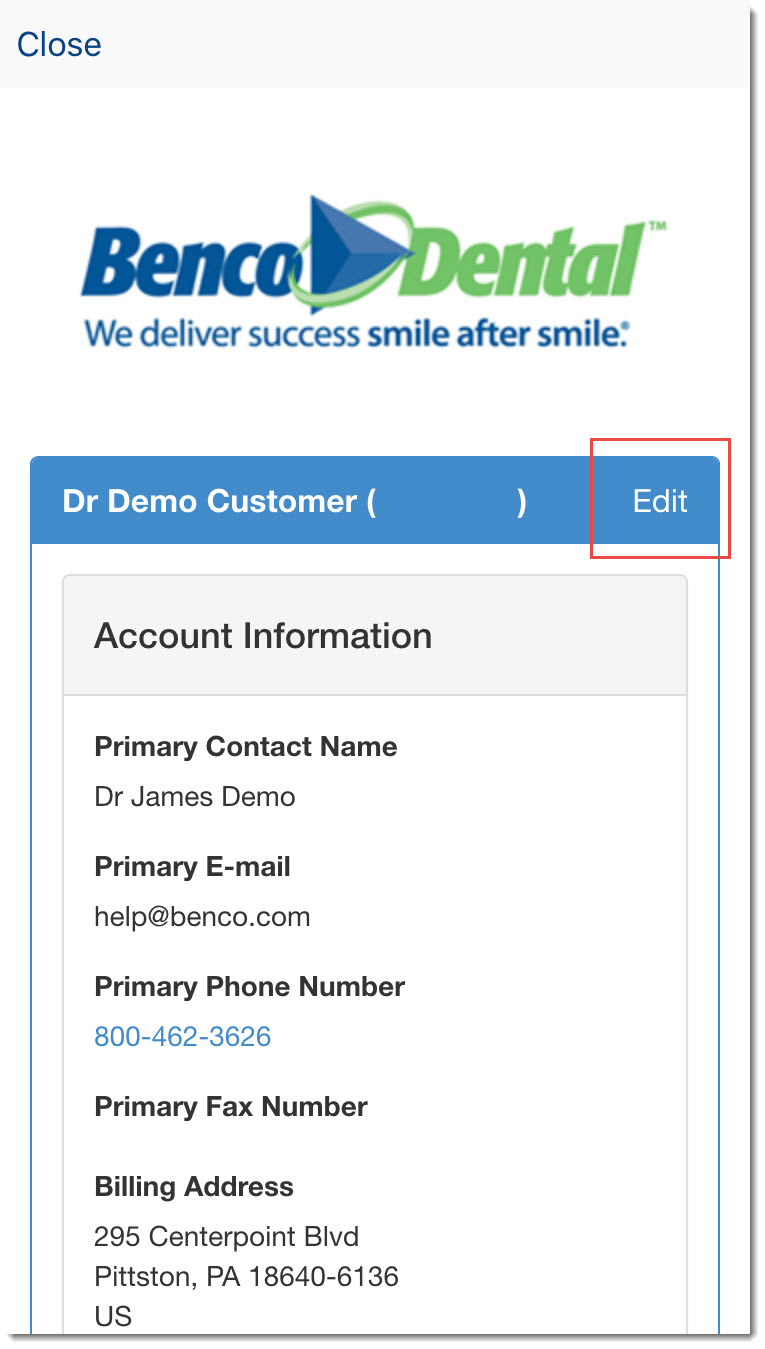
Click on Edit.
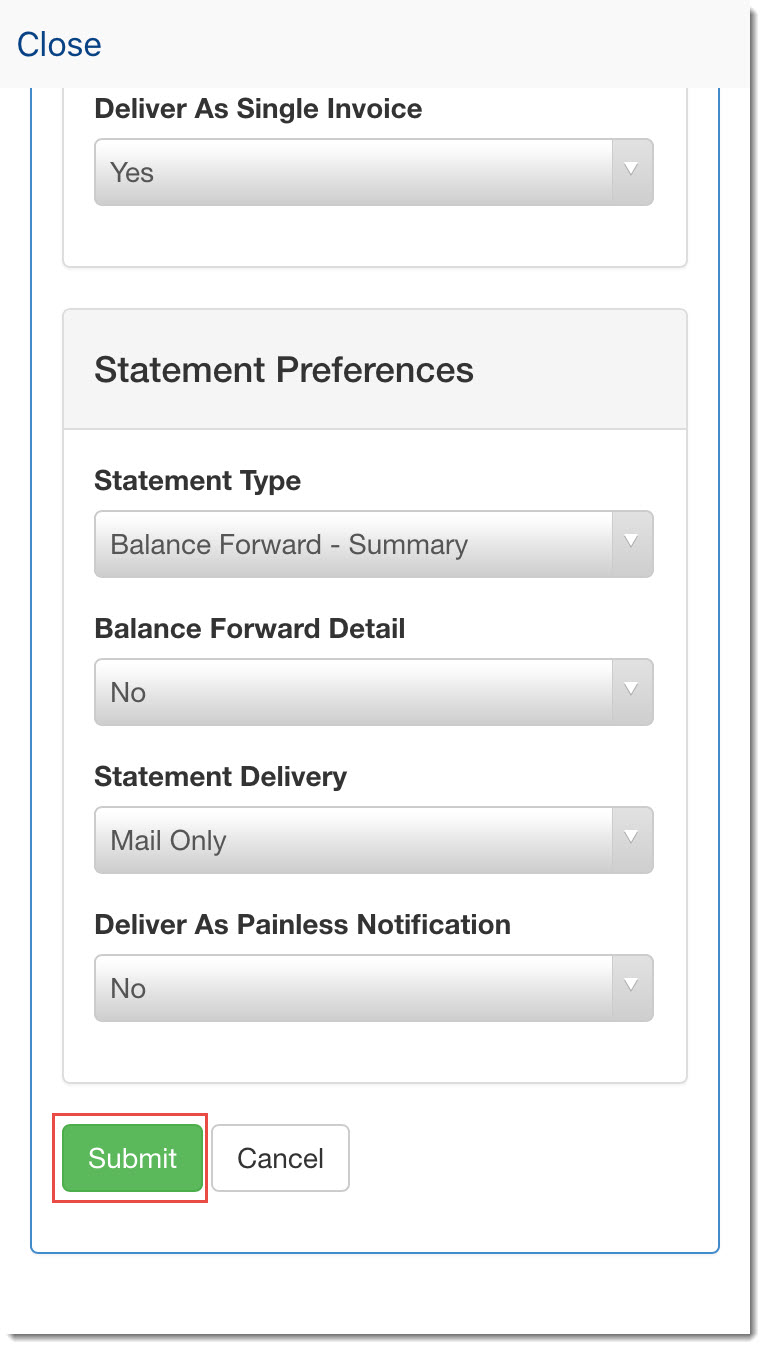
The form will now be available for you to edit. When you are done, scroll to the button of the app and press Submit.
Once logged into Painless Mobile, press Account.
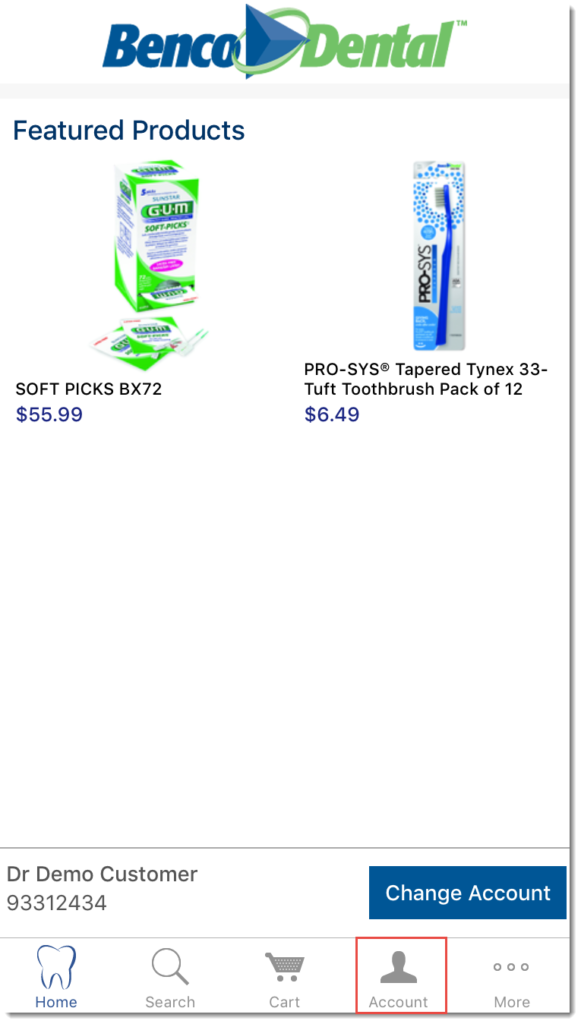
Next, press BluChip Total.
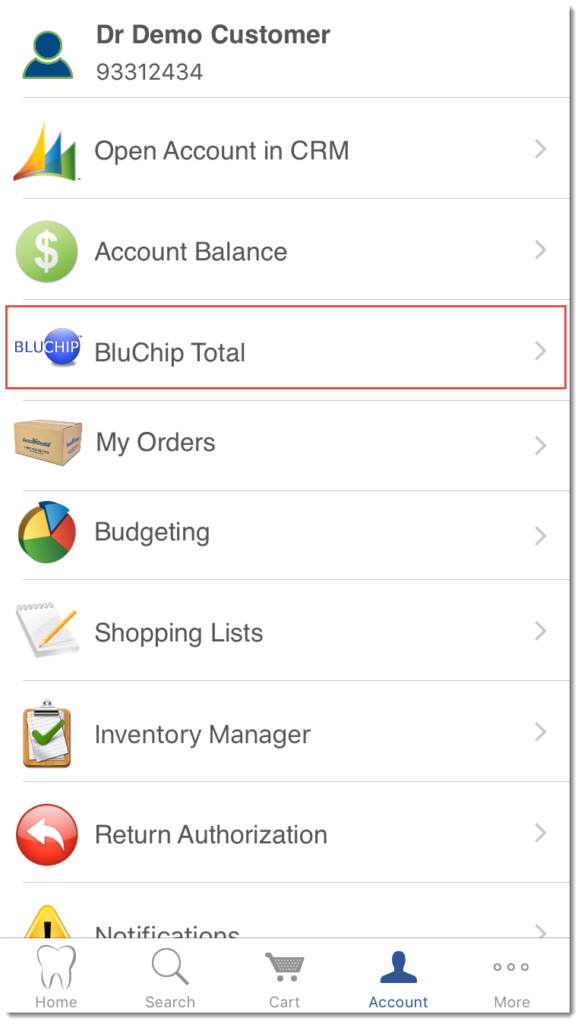
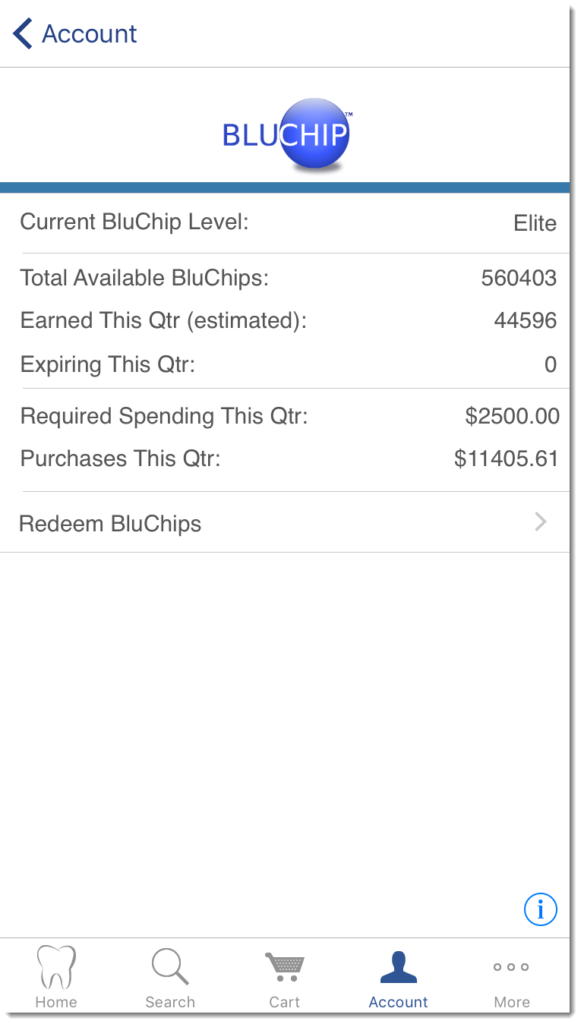
You BluChip information is now available.
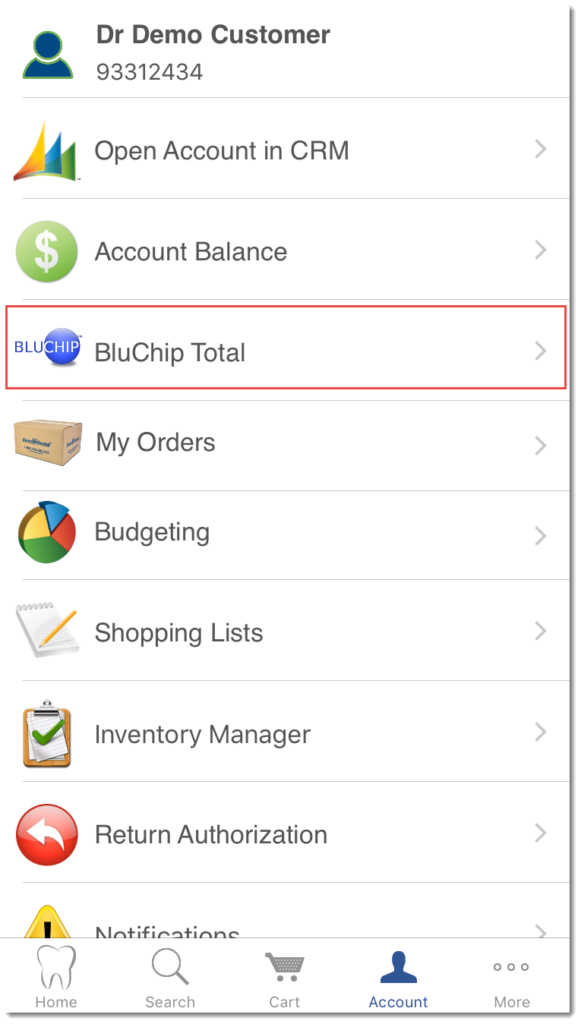
Once logged into Painless Mobile, press Account.

Next, press BluChip Total.
Next, click Redeem BluChips.
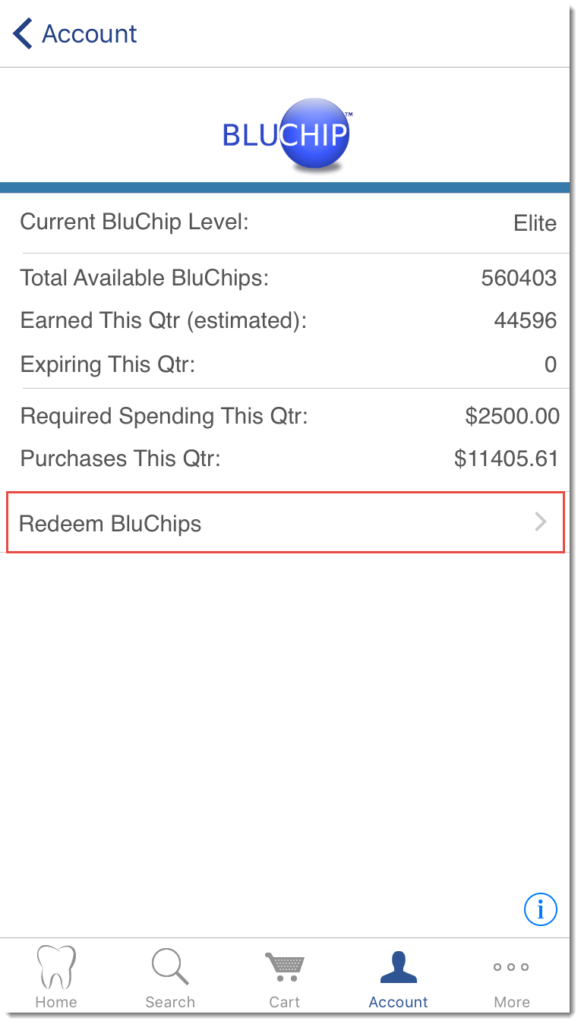
You will then be redirected to mybencorewards.com to redeem.
Once logged into Painless Mobile, press Account.

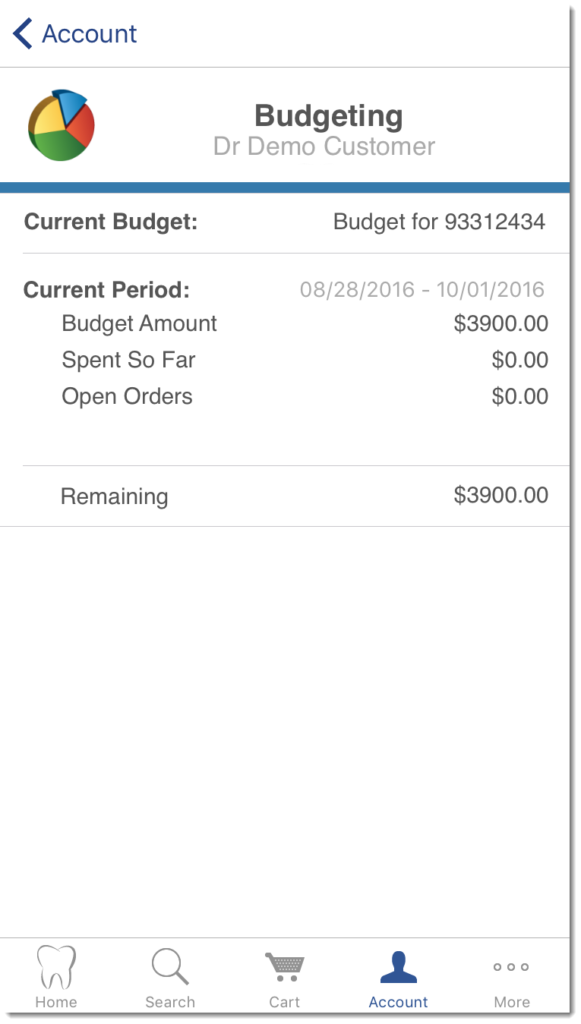
Next, press on Budgeting.

Next, you will be able to view your account budget.
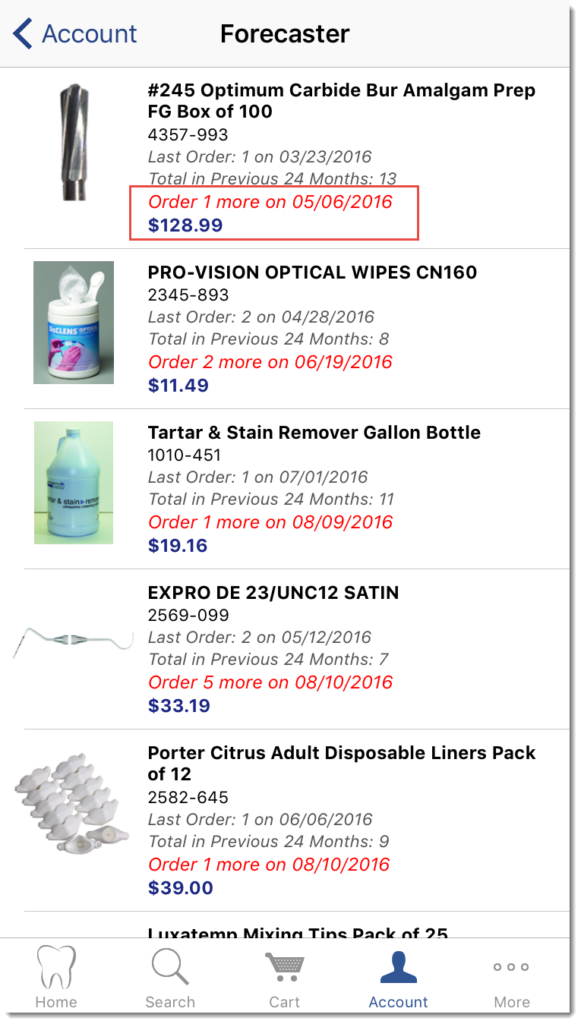
The forecaster offers you a quick look into items that you may need to purchase. The Forecaster identifies the items that you have purchased in the past and recommends the quantity and the date that items should be ordered.
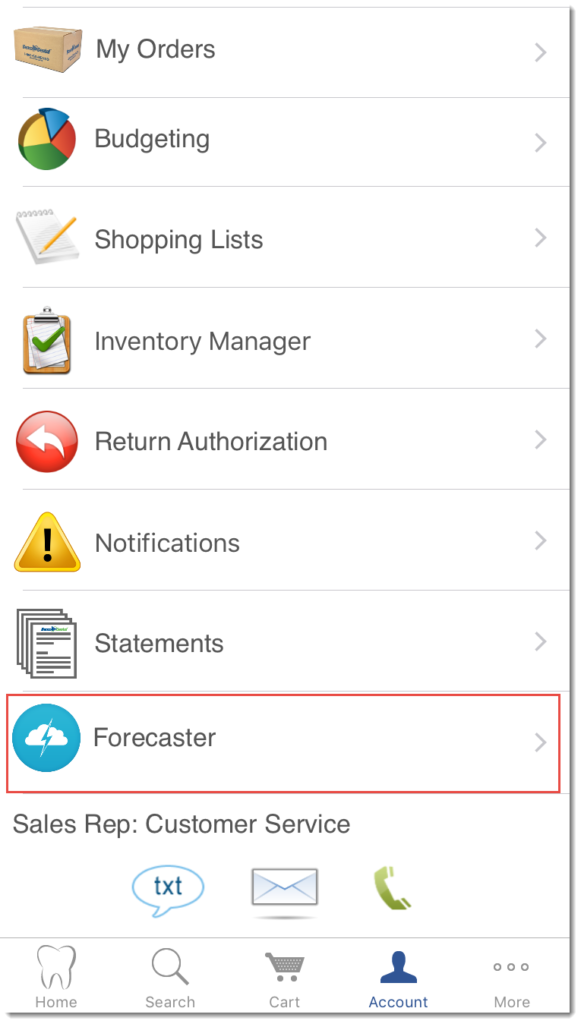
To access the Forecaster, log into Painless Mobile and press on Account.

Next, press on the Forecaster.
The recommended products will display providing you with the quantity and date to order.
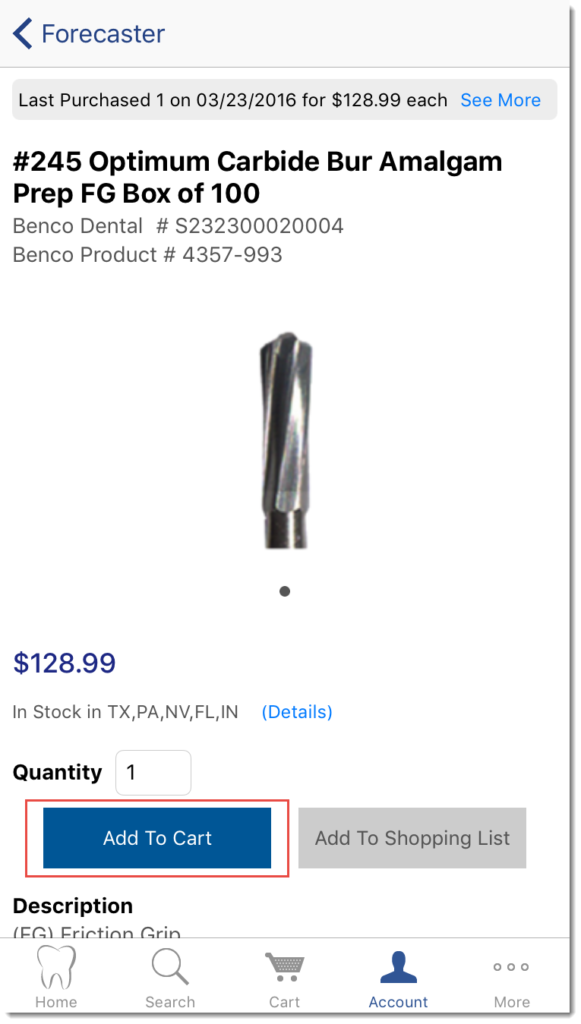
To order the item, press on it to get to the product details page and then press Add to Cart.
If you need to return an item, log into Painless Mobile and press on Account.

Next locate and press on the item you would like to return. You can also click on the barcode scanner icon to scan the item you would like to return.
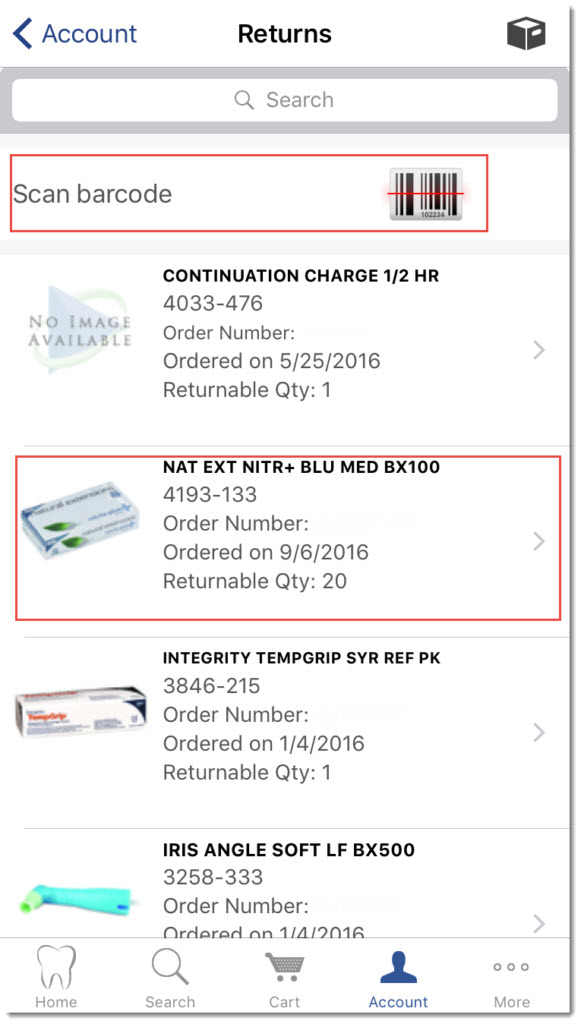
Next, select the quantity you would like to return and reason for the return from the drop down menu.
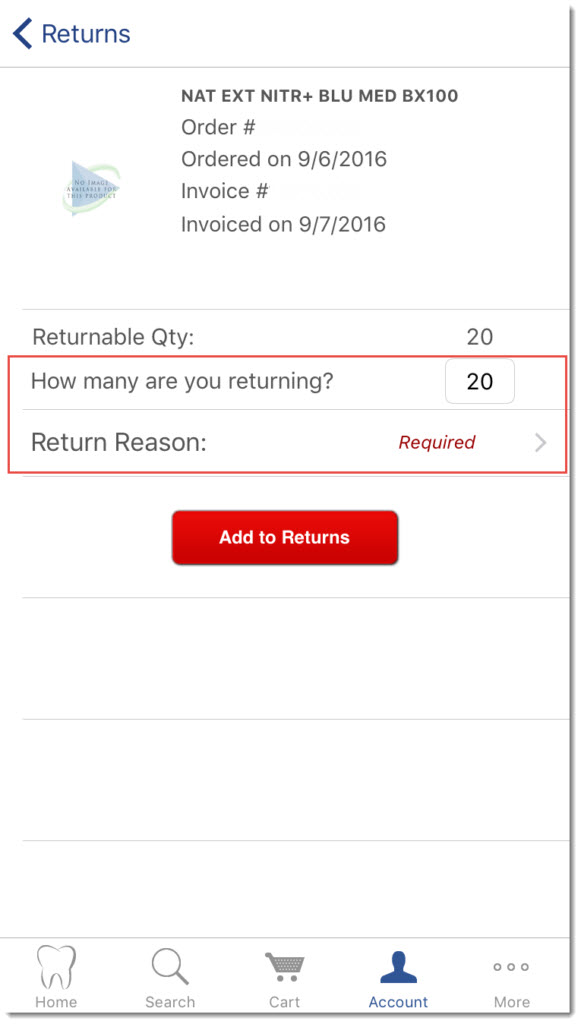
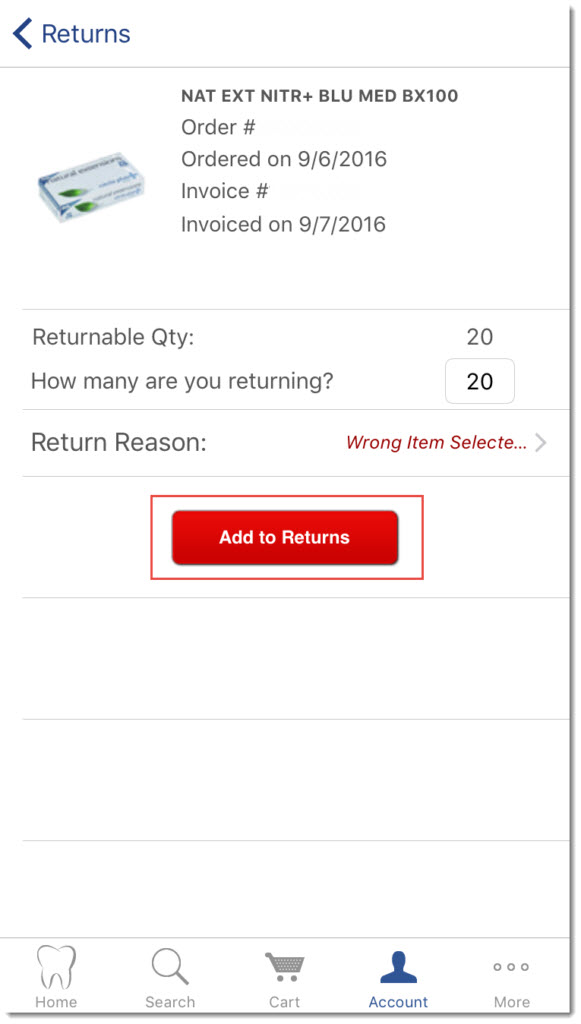
Next, click Add to Returns.
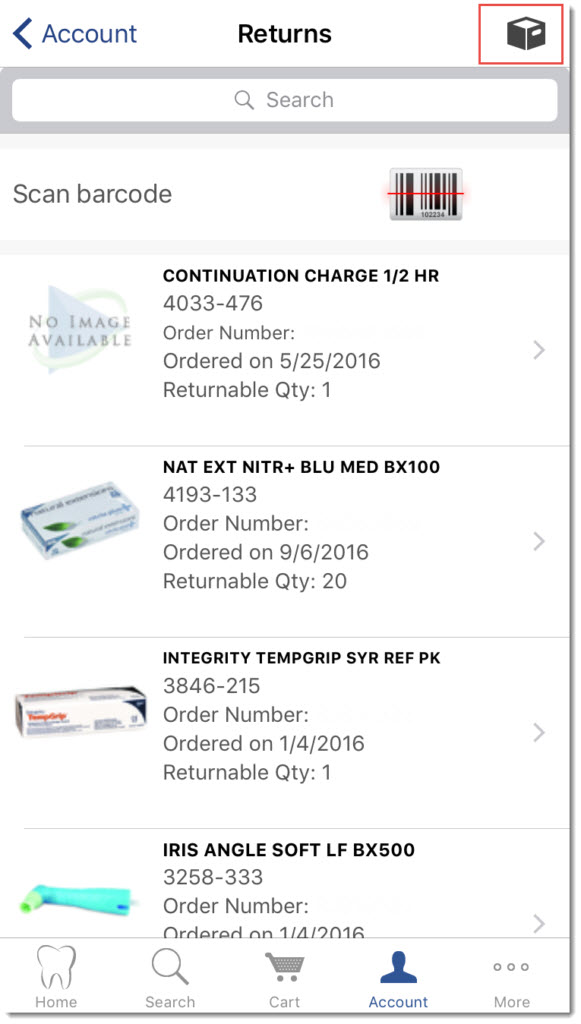
Next, click on the box icon located at the top of the app.
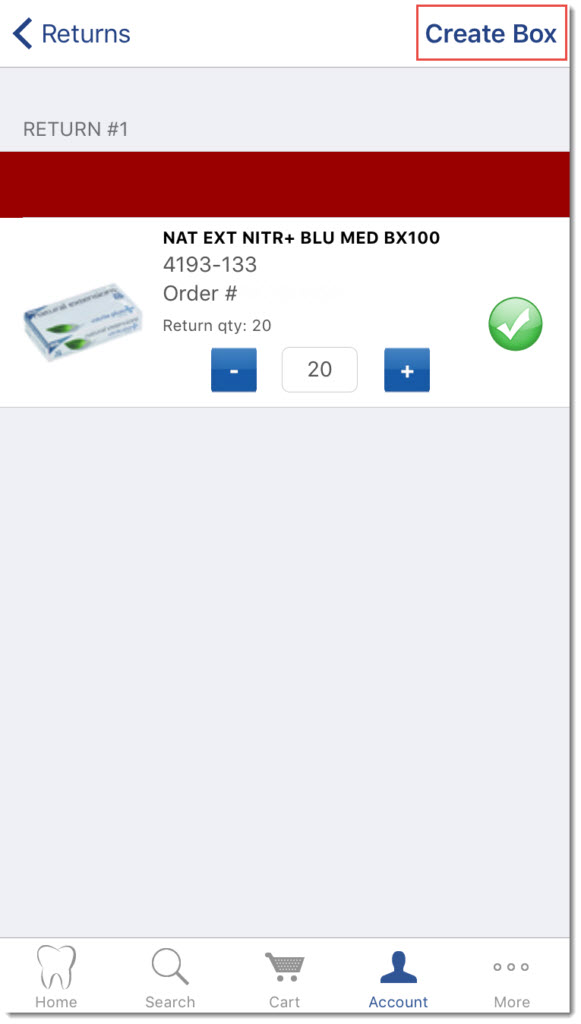
Next, adjust the quantity that you can fit into the box for shipment and press Create Box.
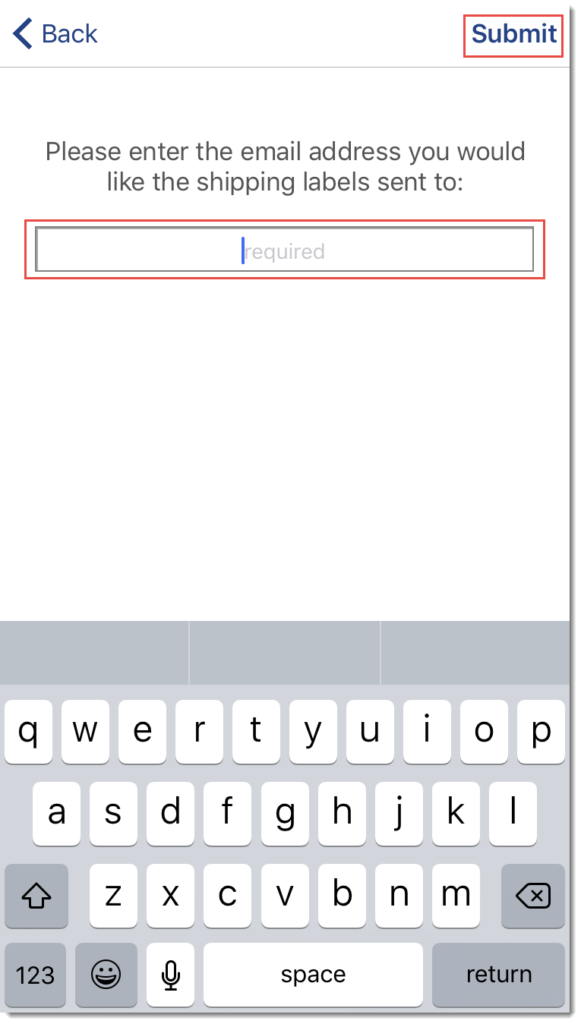
Finally, enter your email address and press Submit. You will receive an email with the return authorization and a shipping label.
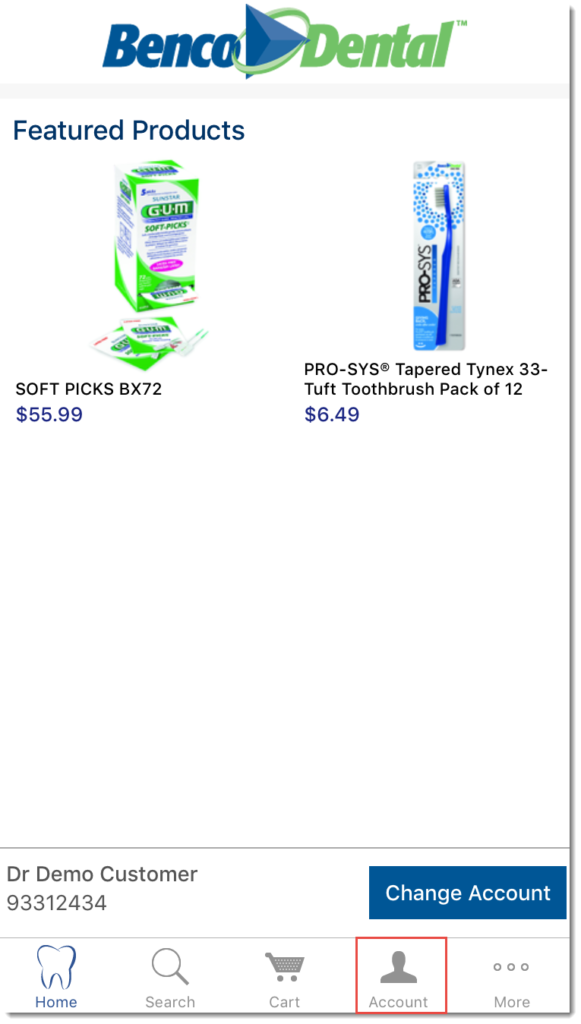
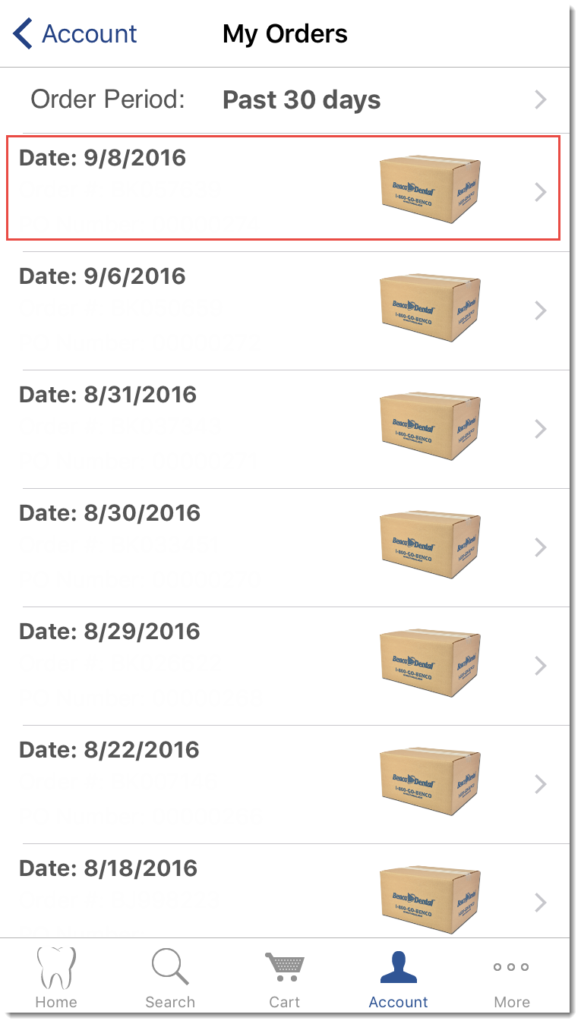
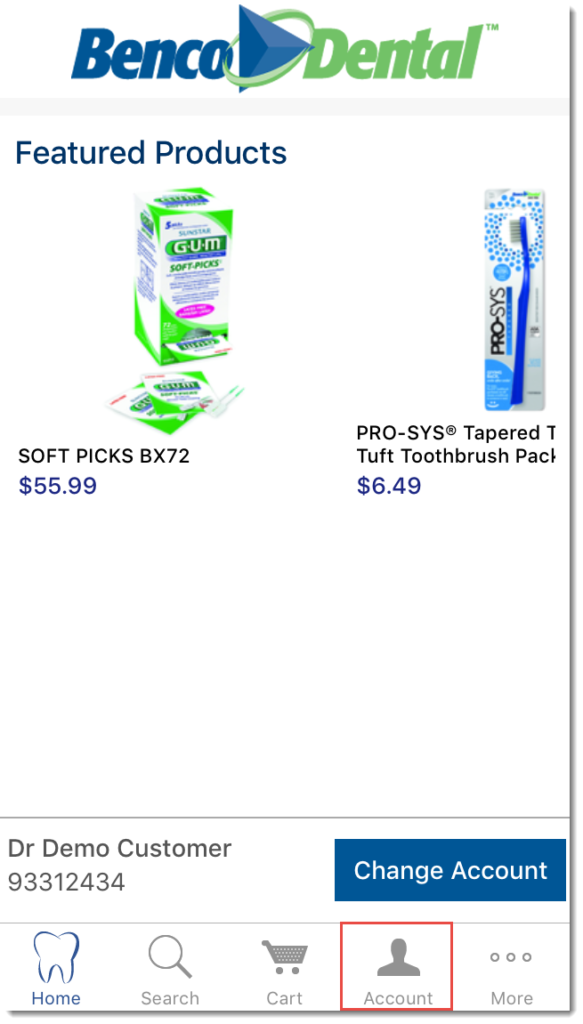
Once logged into Painless Mobile, press Account.
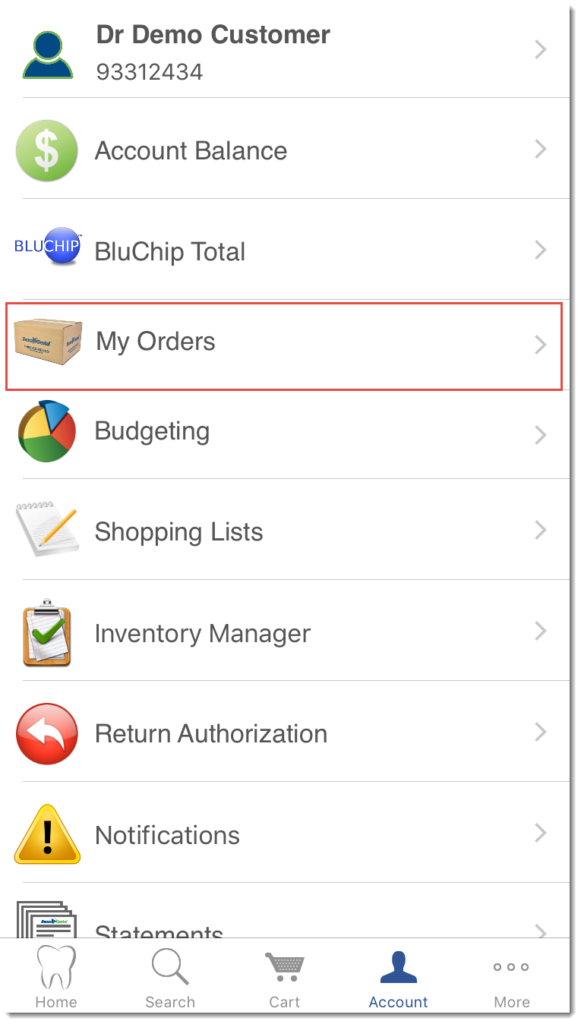
Next, press My Orders
Next, locate and press on the order.
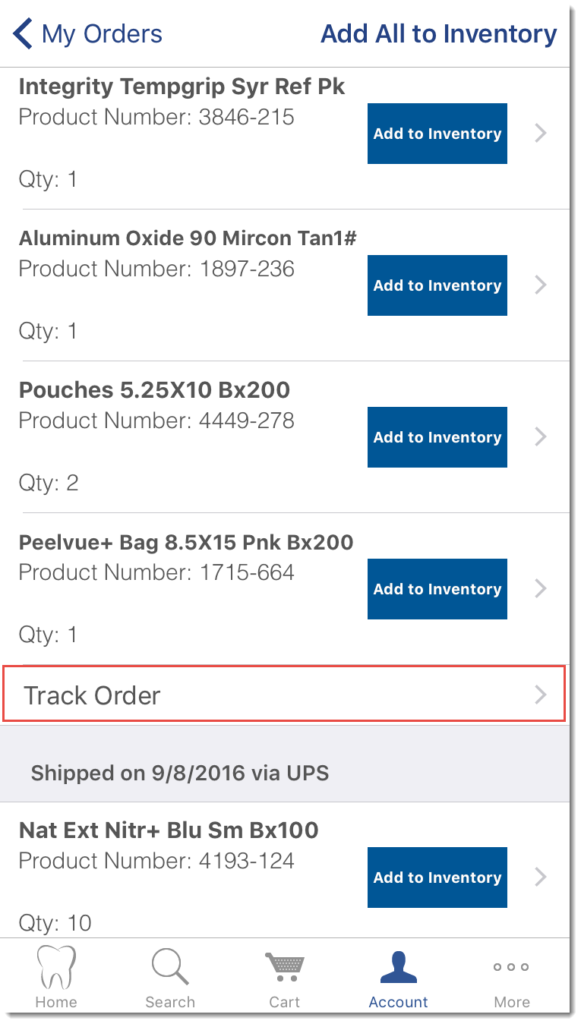
Scroll to the end of the shipment and press Track Order.
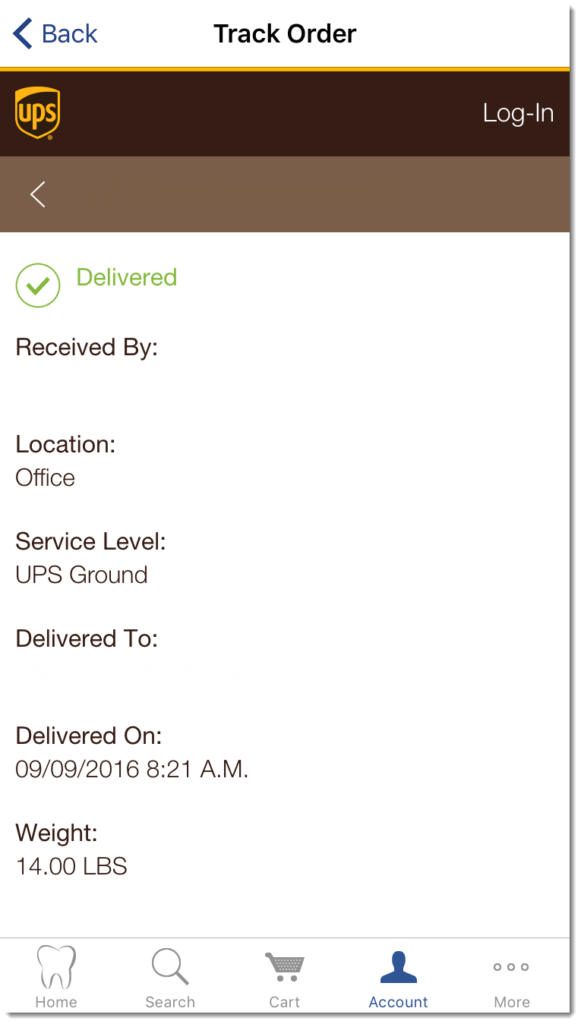
The order tracking details will display in the app.
Once logged into Painless Mobile, press Account.
Next, press My Orders.
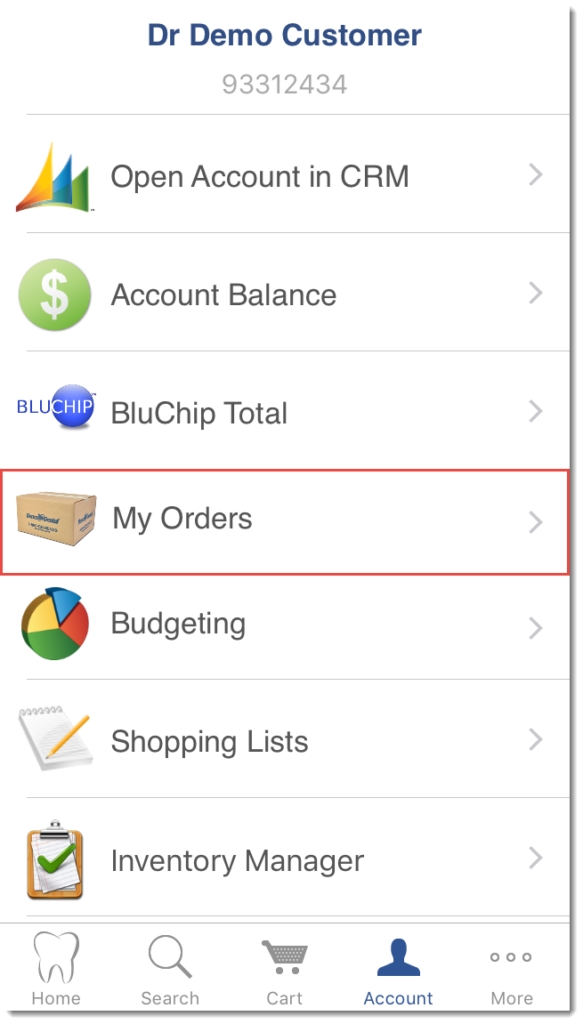
Next, locate and press on the order.
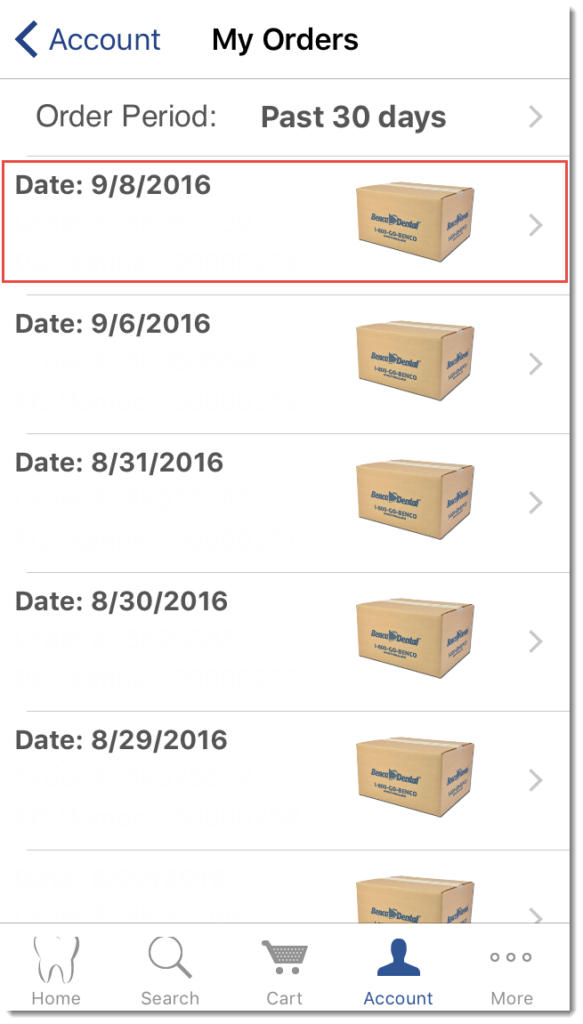
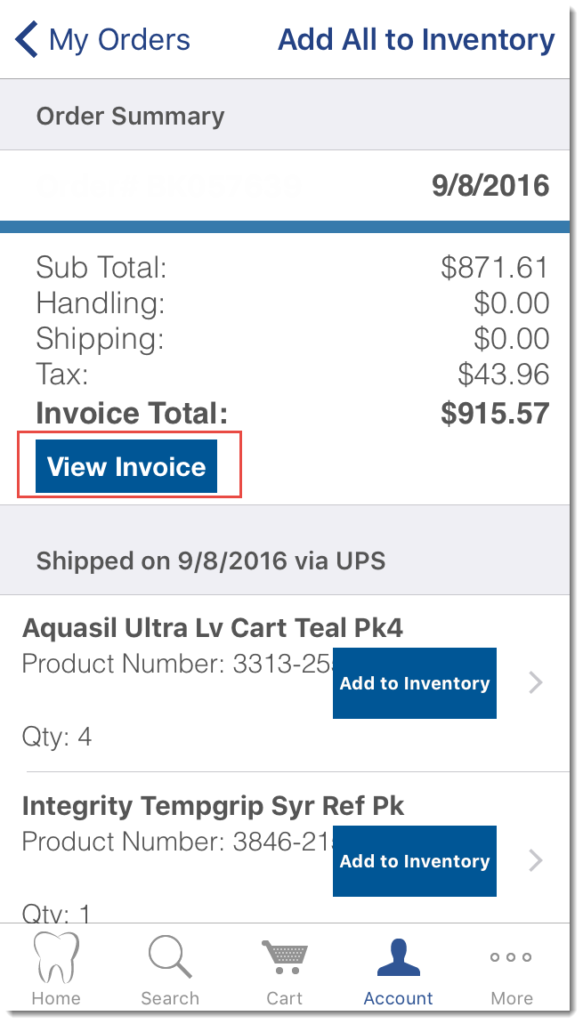
Next, press View Invoice.
The invoice will display. You can you use Share option at the top right of the app to email a copy of the invoice.

Once logged into Painless Mobile, press Account.

Next, press Shopping Lists.
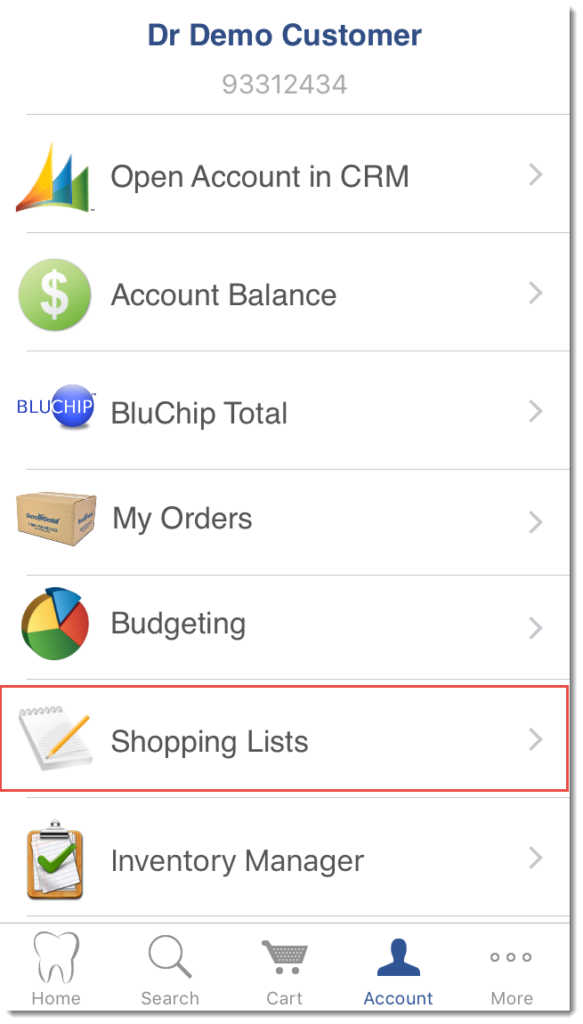
Next, press on the + sign at the top right of the app.
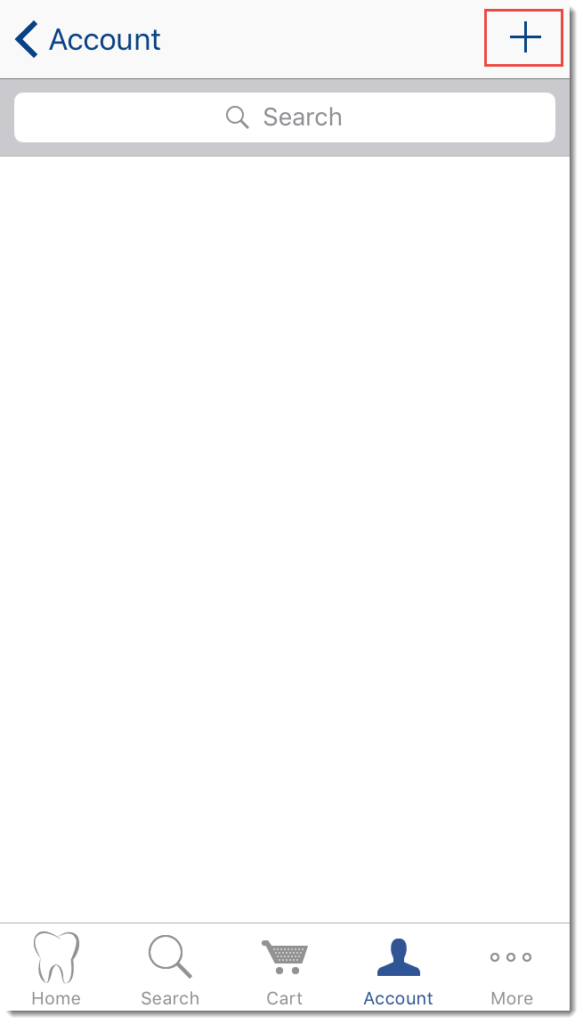
Enter the name of your shopping list and press Create.
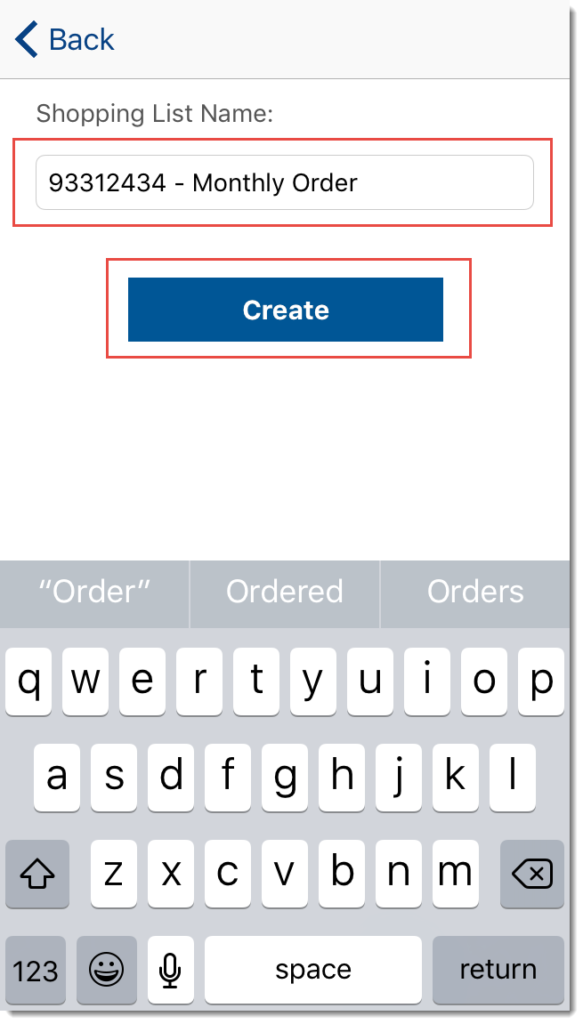
To make an account payment, log into benco.com and click on View Account.

Next, click Make a Payment Using a Credit Card.

Select the radio button next to Current Balance, Last Statement Balance or Other Amount. Enter your credit card information and click Make Credit Card Payment.

Finally, Submit the payment.
To make an account payment, log into Benco.com and click View Account.

Next, click Make a Payment Using an Instant Bank Transfer.

Enter your bank account information and select the radio button next to Current Balance, Last Statement Balance or Other Amount. Finally click Submit Payment for Processing.

To check your account balance, log into Benco.com and click on View Account.

Next, click on View Account Balance Information

The Account Balance page will display and include your current account balance, invoice balance and next invoice balance.

To edit your account information, begin by logging into benco.com and click on View Account.

Next, click on Manage Account Details.
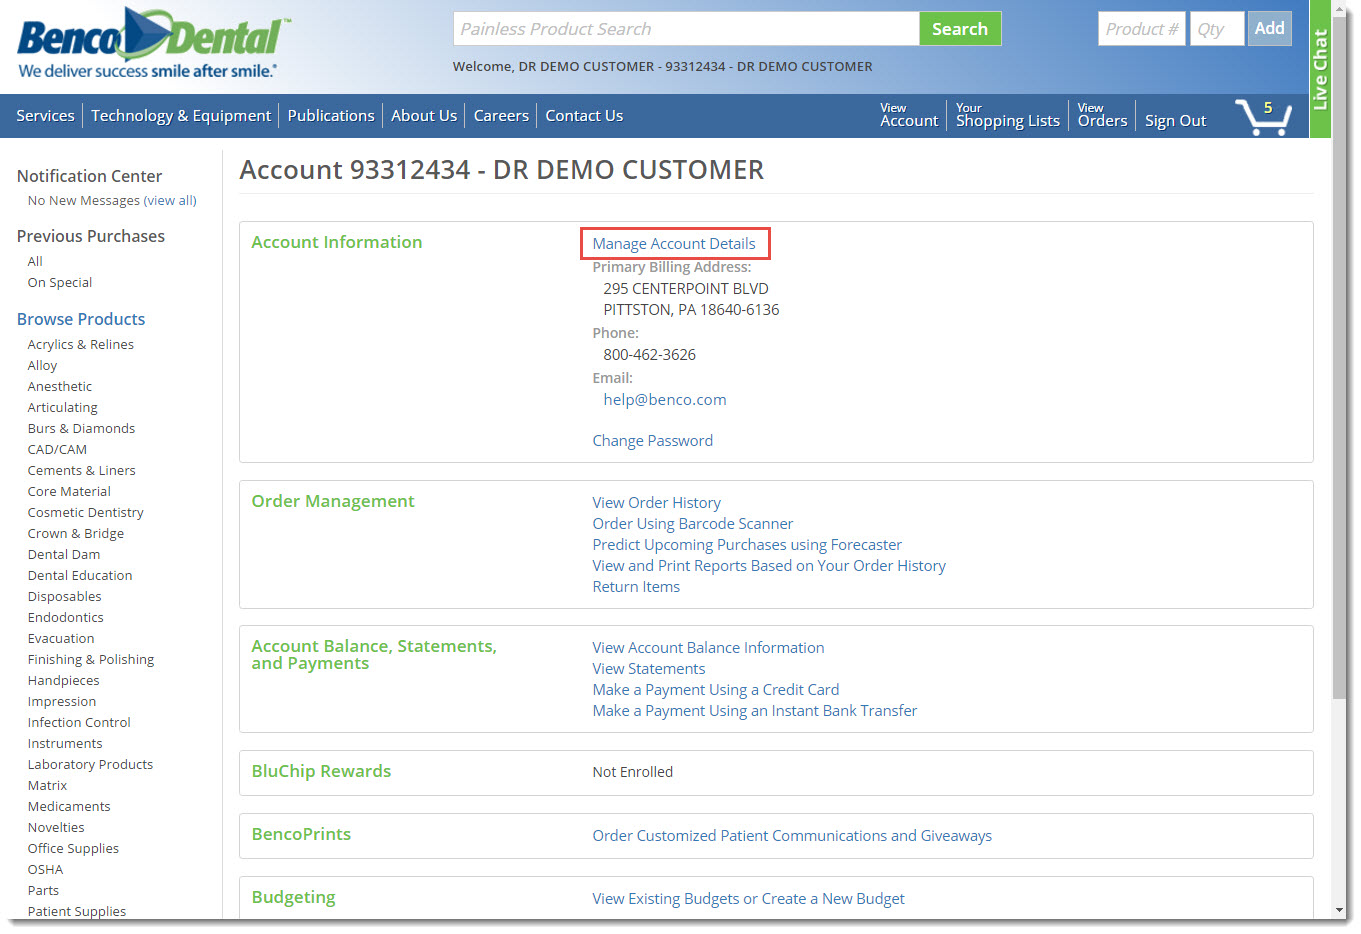
Click Edit.

Modify your account information and click Submit.

To change your password, log into benco.com and click on View Account.

Next, click on Change Password.
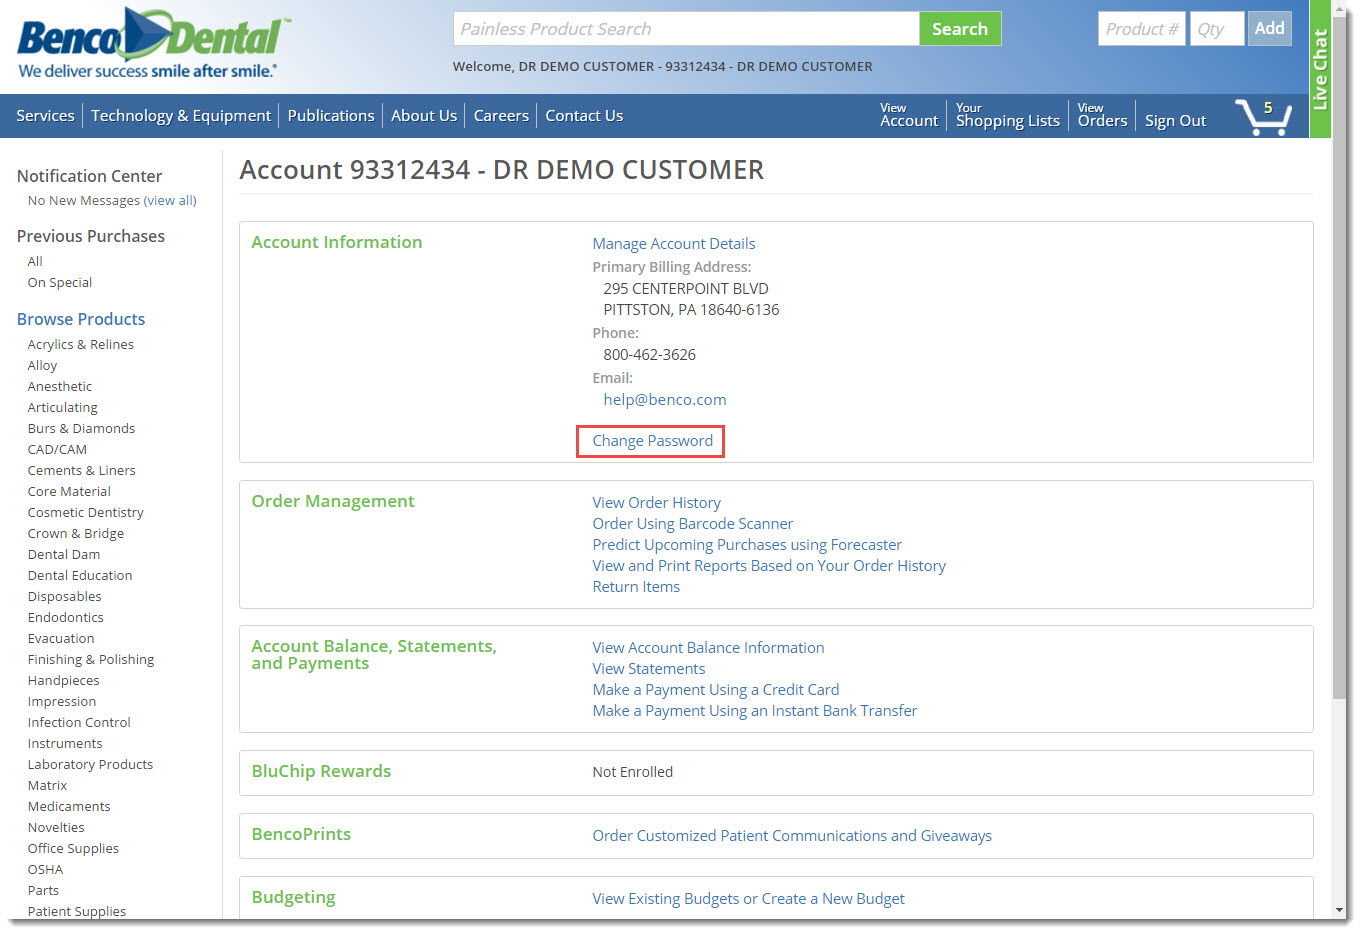
Next, enter your currently password along with your new password and click Save.

To access your BluChip Ledger, log into benco.com and click on View Account.

Next, click on Enrolled (View Details).
Finally, click on Click here to view BluChip Ledger Report.

To check your BluChip balance, log into benco.com and click on View Account.

Next, click on Enrolled (View Details).

The BluChip Rewards Information will display for you to view your BluChip balance.

You can redeem your BluChips by going to https://www.mybencorewards.com.
To configure a budget, log into benco.com and click on View Account.

Next, click on View Existing Budget or Create a New Budget.

Next, click on There is no active budgets for this account. Click here to create a new budget.

Adjust the budget amount for each calendar month and click Save Budget.
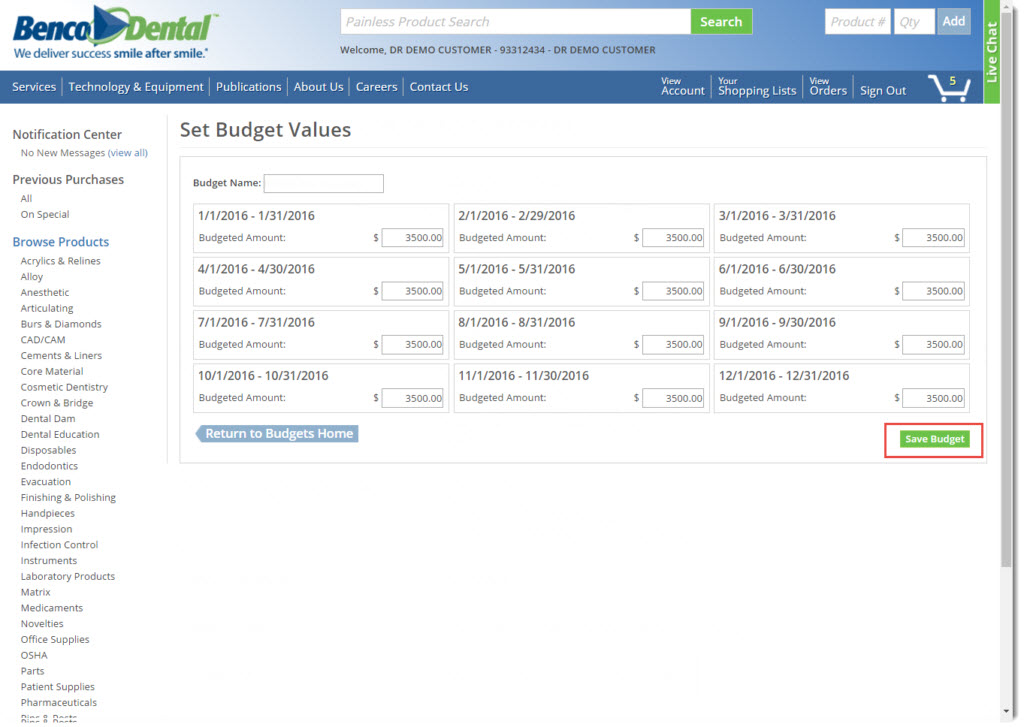
Setting up a subscription order is a great opportunity to have your supplies shipped automatically to your office.
To set up a subscription, click on Add to Subscription on the product details page.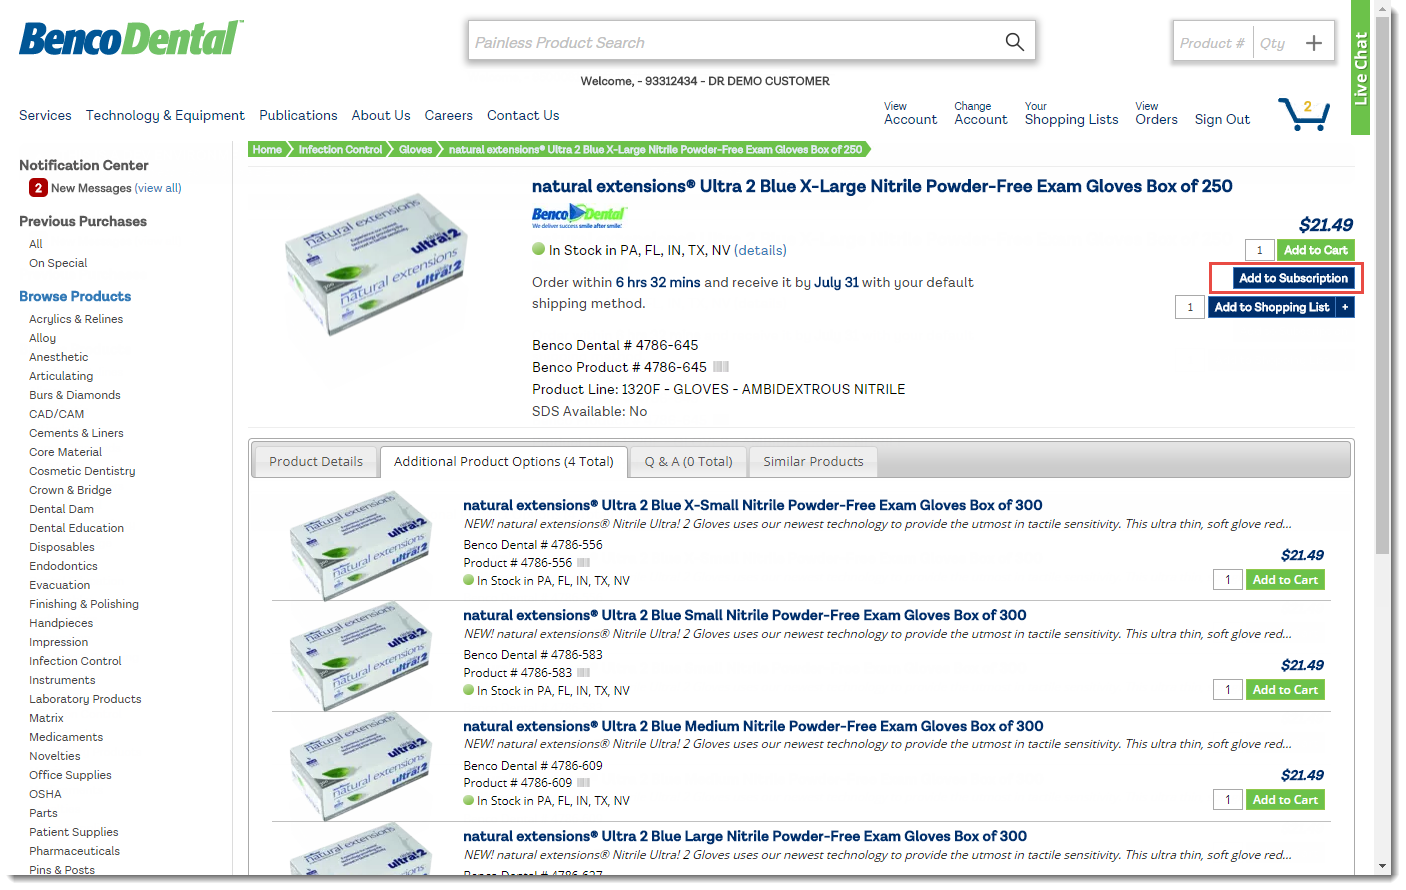
Next, set the quantity, shipping location and the frequency of the shipment and then click Create.
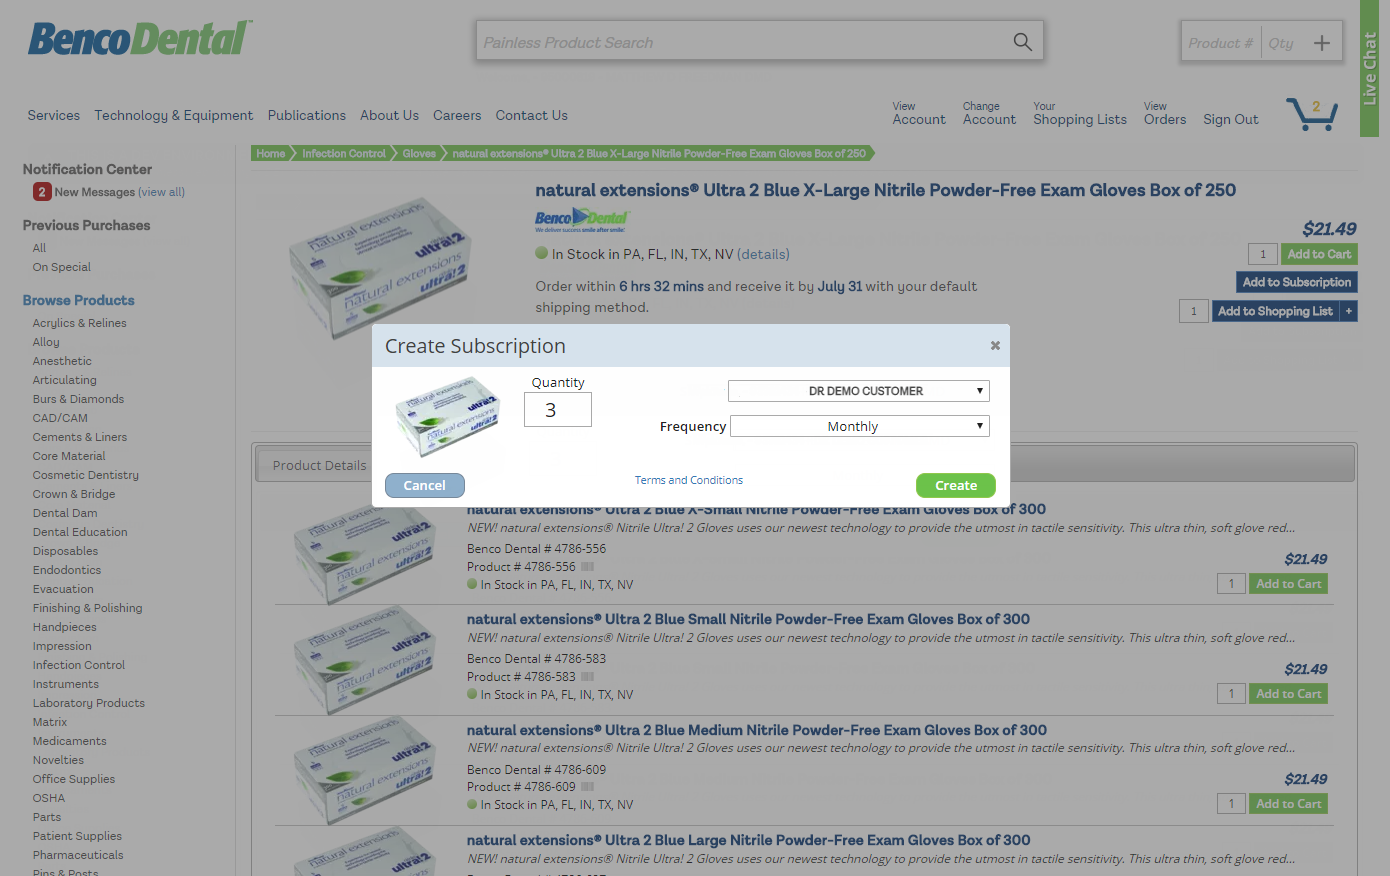
Repeat the above steps for all the products you would like to be automatically shipped.
Print Inventory Tags /Benco Barcodes Quick Glance PDF
[embedyt] https://www.youtube.com/watch?v=h7xFyUK-wac[/embedyt]
The process for printing inventory tags begins by adding items to your barcode basket. You can add items from your search results or from the product details page by clicking on the barcode icon.
If you want to print the tags based on your previous purchases, click on All under Previous Purchases.
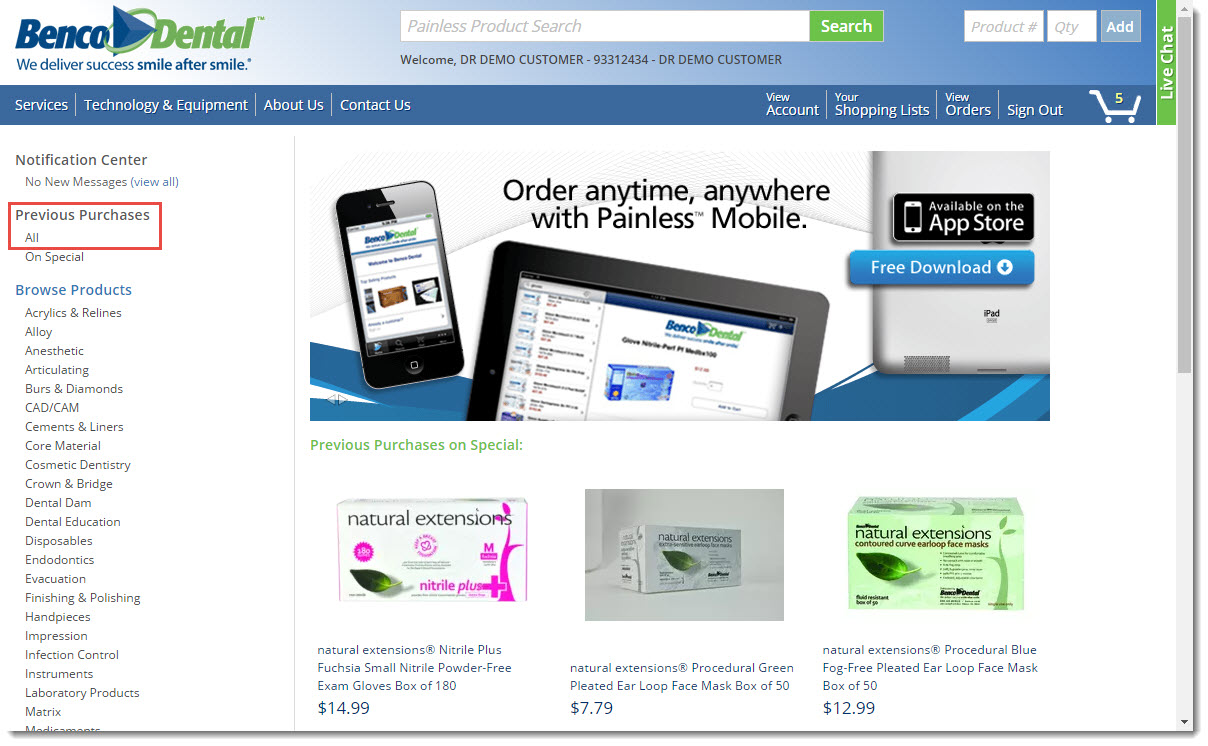
You can use the filters in the left navigation to sort the products by category. Next, click on the barcode icon next to each product. This will add the product to the barcode basket.
![]()
Once you add all the products to the barcode basket, click View Account.
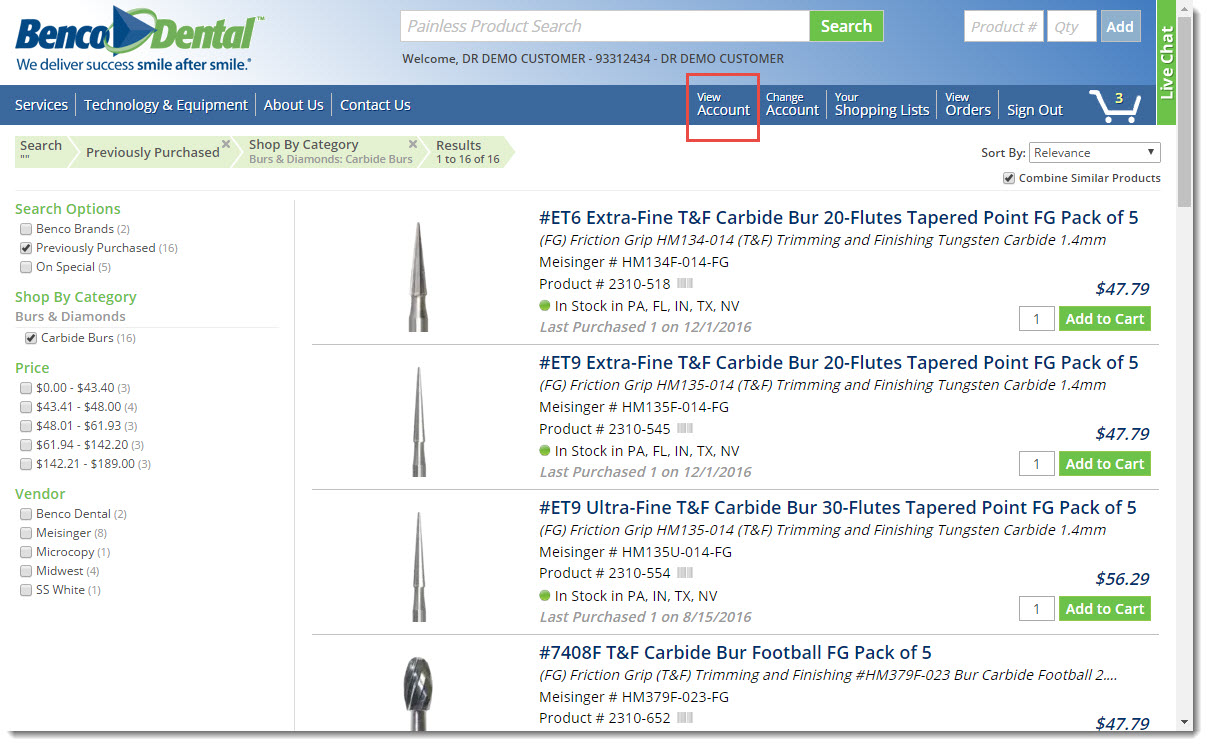
Next, click on Order Using Barcode Scanner.
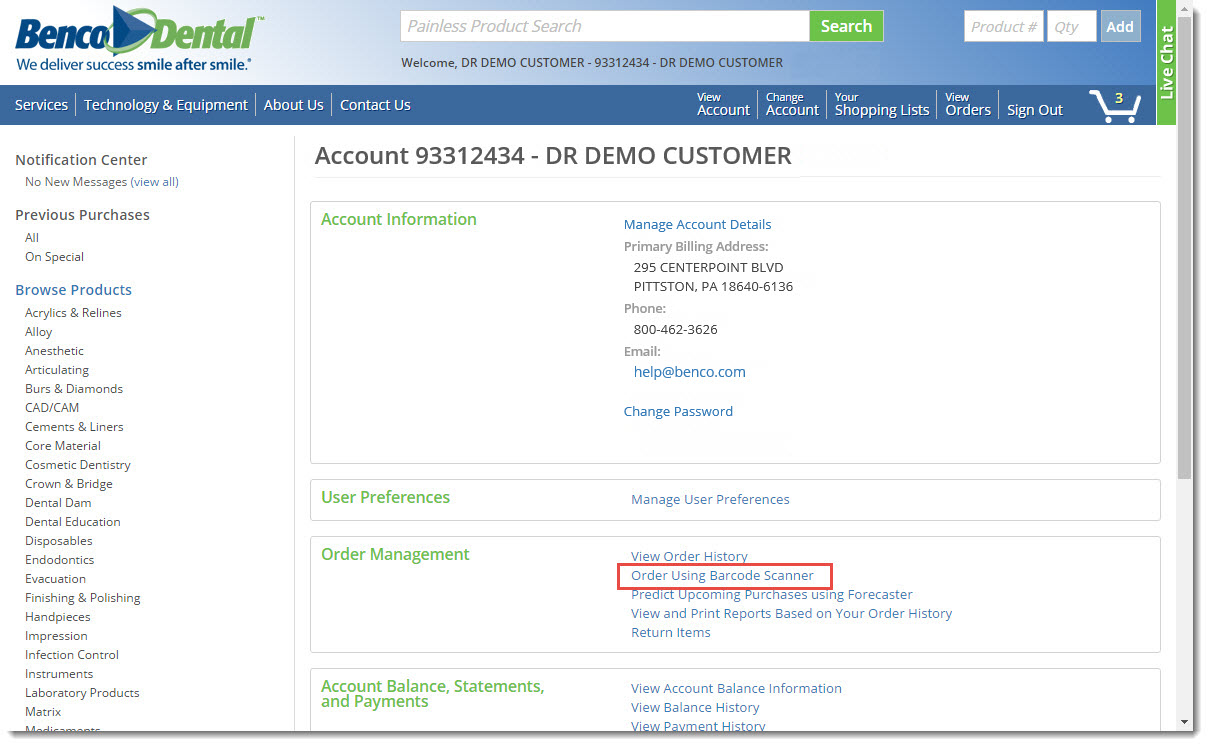
Next, click Print Tags/Labels using Barcode Baskets. On the Barcode Label Basket page select the type of labels that you will be printing on from the drop down menu.
If you have a label sheet that has missing labels, you can enter the number of labels to skip by selecting the number from the drop down menu.

Finally, click View/Print Labels.
To request a return, log into benco.com and click on View Account.

Next, click on Return Items.

The Returns Wizard will display, click Continue to Step 1.

Next, select the items to return from a list of your recent purchases. You will be promoted for the quantity being returned, the reason for the return and additional details about the product if necessary. Click Add to Return. Repeat this step for all items you need to return.
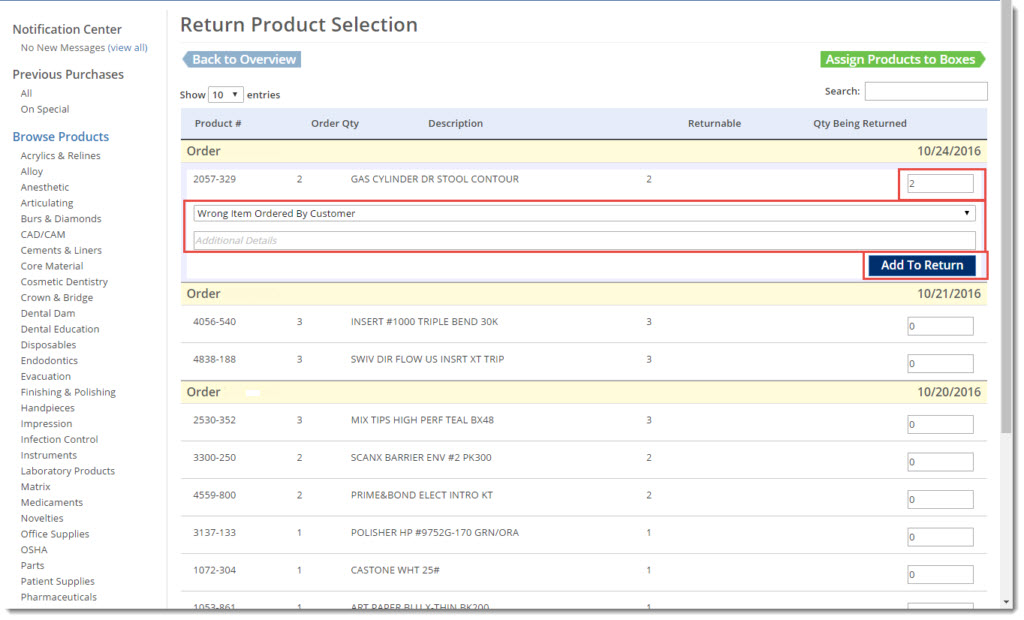
Next, click Assign Products to Boxes.

Next Chose the items that you will be returning in a particular box. Here you will see a list of items selected in Step 1. For each item, choose the quantity being placed in the box. If all of your items will not fit into one box, you can repeat this step for later for any remaining boxes. When you are finished, click Review box and Generate RA.

Next, review the contents of the box and enter your email address to which the shipping label will be sent. Finally, click Generate RA and Print Summary for this Box.

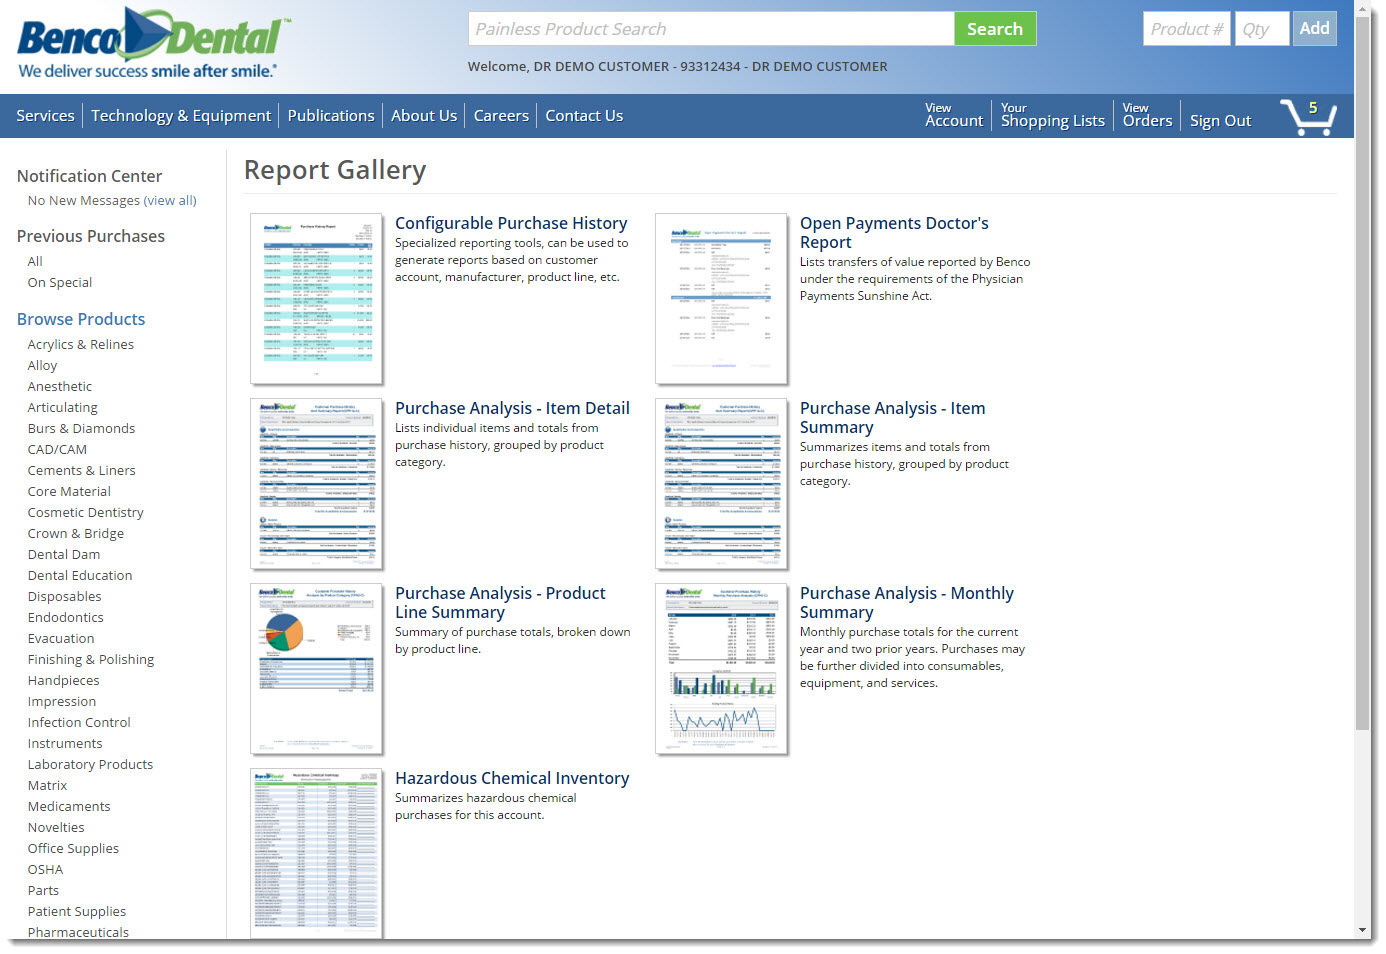
To access reports, log into benco.com and click on View Account.

Next, click on View and Print Reports Based on Your Order History.
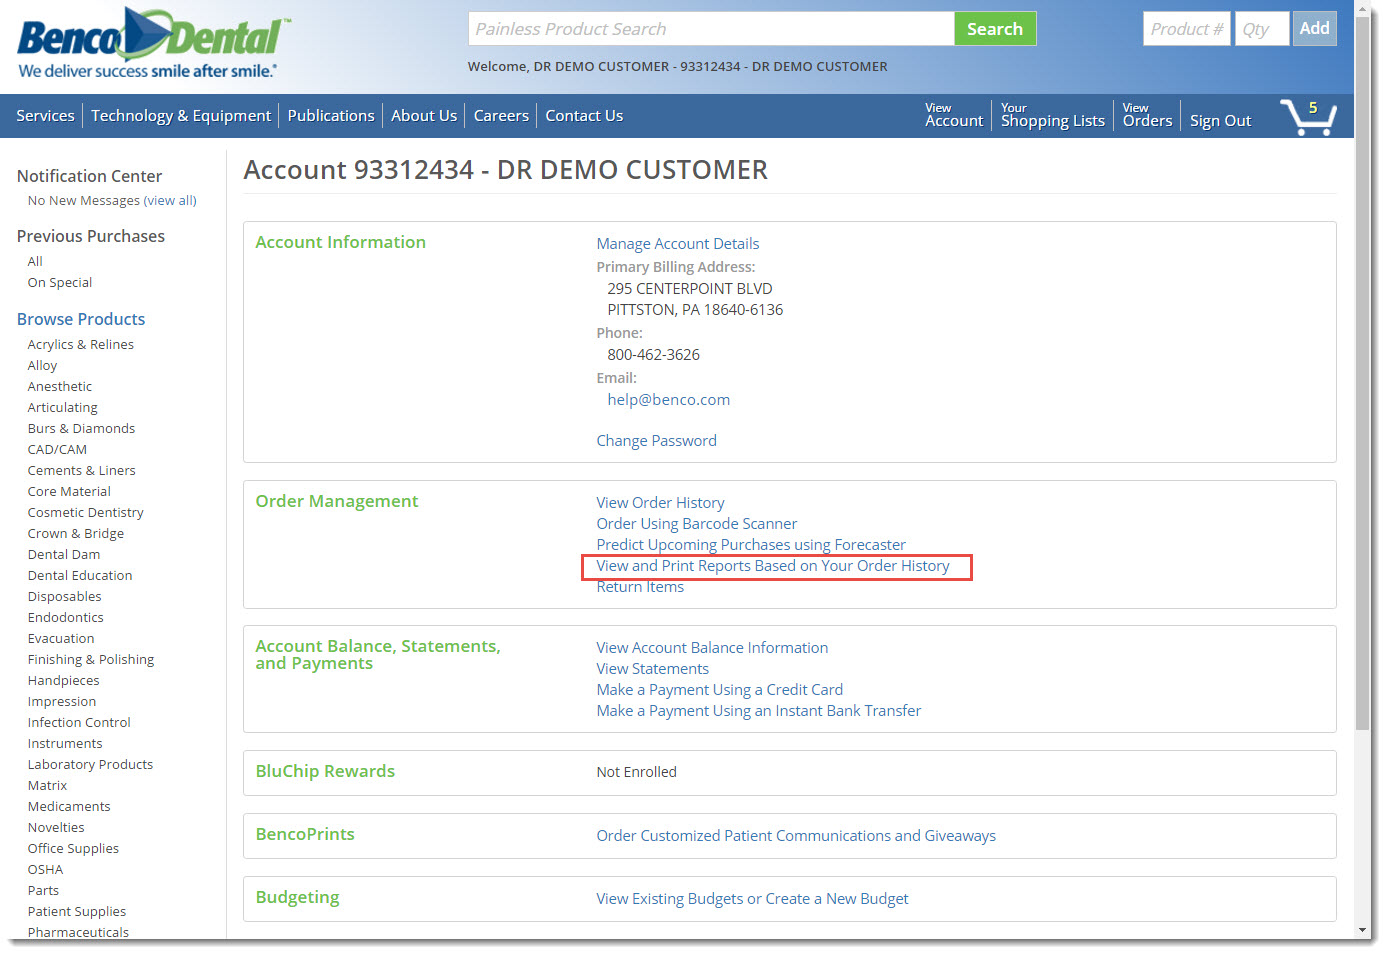
The Report Gallery will display, click on the report name to view the report.
To track your order, log into benco.com and click on View Orders.
Next, locate and click on the order number.
Next, click View Shipment Details.
Next, click Track.
The tracking information for your order will be displayed.
To view your invoices, log into benco.com and click on View Orders.

Next, locate and click on the order number.

Next, click on View Invoice Details.

Next, click on View PDF.

Your invoice will display.

To access your SDS Sheets for items you have purchased, begin by logging into benco.com and click on View Orders.

Next, click Download (M)SDS Sheets for All Displayed Orders.

A PDF will appear for you to view, save or print.
